
Here at the Honeybee Inn every moment is a treat!
I mean, less so, when you’re the one having to make a bunch of inflatable Bee Thoraxes for an outfit that should not exist. 😂 I’m very proud of this outfit but oh man. It was very complicated for such a small amount of latex!
Let’s start with the reference material:


These are my two main references for the honeygirls, they’re both in-game screenshots from FFVIIR.
I went with latex for these outfits for a couple of reasons — the first being, I’m good at latex, and I prefer working with it to sewing. (Very important distinction, for when something is going to be frustrating: I want to be working in a material I already feel good at.)
Another is because I knew I wanted the honeybee tail to be an inflatable, which was one of my forte’s, back when I used to work for a latex company full-time. (We made inflatable tails and horns, mostly, like the tail I put on panther, but every now and then I got to do something insane!)
And the third is that these stupid bodysuits just don’t work as shown in game. 😂
They’re shown as completely backless, which you can see from the reference. While you can have outfits like this, they would have to be very heavily boned, or even made a little like a suit of armour, so that the front part of the bodysuit more or less stands up on its own. Or they could be glued to the girls wearing them with adhesive. (Not something I, a person who is low-key allergic to most adhesives, was dying to do.) Given the dance moves the girls do, I don’t think these bodysuits are heavily boned, which means that they’re likely just glued to the girls.
But there’s another option: clear latex.

Clear is perhaps a slight misnomer; the colour is called transparent natural, and it’s the natural amber shade of the latex without any additional dye. It shows up on most skin tones as more or less transparent, once shined up. (I actually think it looks way nicer on darker skin-tones than mine.) This allowed me to make a bodysuit that is comfortable, moves with me, and still has the illusion of backlessness in the garment, and also gave me a place to attach the wings.
So! Let’s get to it!
Part One: The Pattern
I’m not going to get too into the pattern drafting itself in this, because pattern drafting is it’s own monster entirely, but we’ll talk about it a little bit.
Here’s an overview of the pattern:
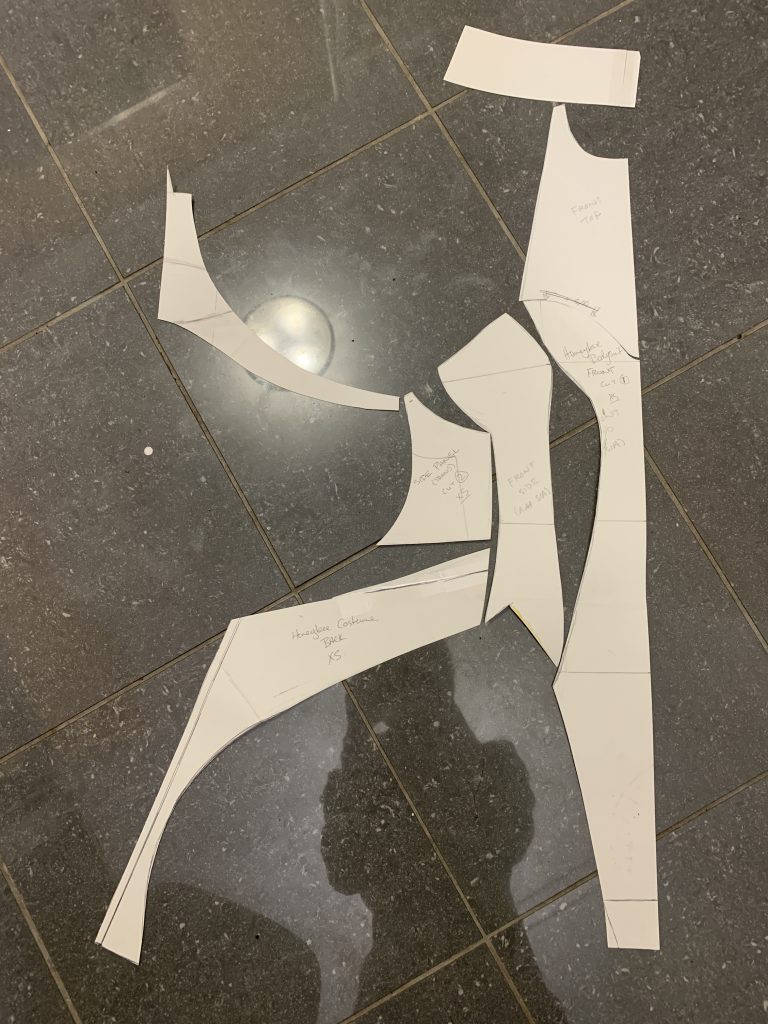
The pieces stop on both the Center-front and the Center-back — I didn’t have a centre-front seam, but I did have a centre-back seam! So when I traced the pieces out, for the centre-front, I would flip the piece along the centre line to trace the other half. (I like drafting mirrored pieces in half because it ensures that both halves are a perfect mirror of each other.)
From here, you can see how much of the shaping of the bodysuit happens in that front princess line seam — the one that goes down the bust, between the side-front and centre-front panels. As far as I’m concerned, this is a mandatory seam for any garment that needs to be fitted like this.
(You can also see how I ran out of card-stock for the back strap. 😂 I drew in the top flat, without that little bite out of the stop of the strap.)
The piece that gave me the biggest problems in the pattern is actually the little piece labelled “Side Panel (Trans)” — the trans just means it’s cut out of transparent latex, I like to label my colours in a pattern that has several different ones so I don’t get confused.
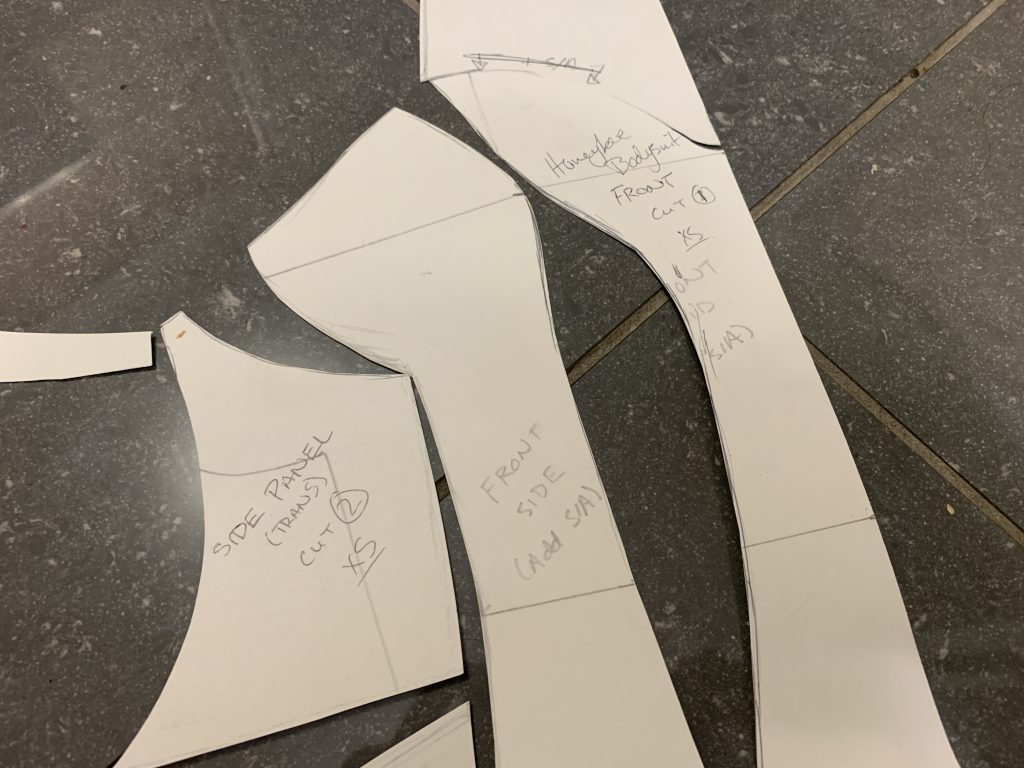
You’ll notice that it doesn’t line up 100% smoothly against the side of the bust cup or the top of the thong back that it meets at the bottom; this is because I wanted this piece to pull tight along the edge, so it would stay flush against my skin, and be as invisible as possible. It also made it a pain in the ass to install, as you’ll no doubt see below.
I also didn’t make pattern pieces for any of the ruffles or stripes — I don’t generally make pattern pieces for appliqué pieces like that, but your mileage may vary, and you may find it helpful for you! Personally, for things like stripes and ruffles and bows, I just draft those directly onto my latex, because they’re mostly just flat strips of fabric.
There’s also the pattern for the Honeybee Tail, which is much less confusing:
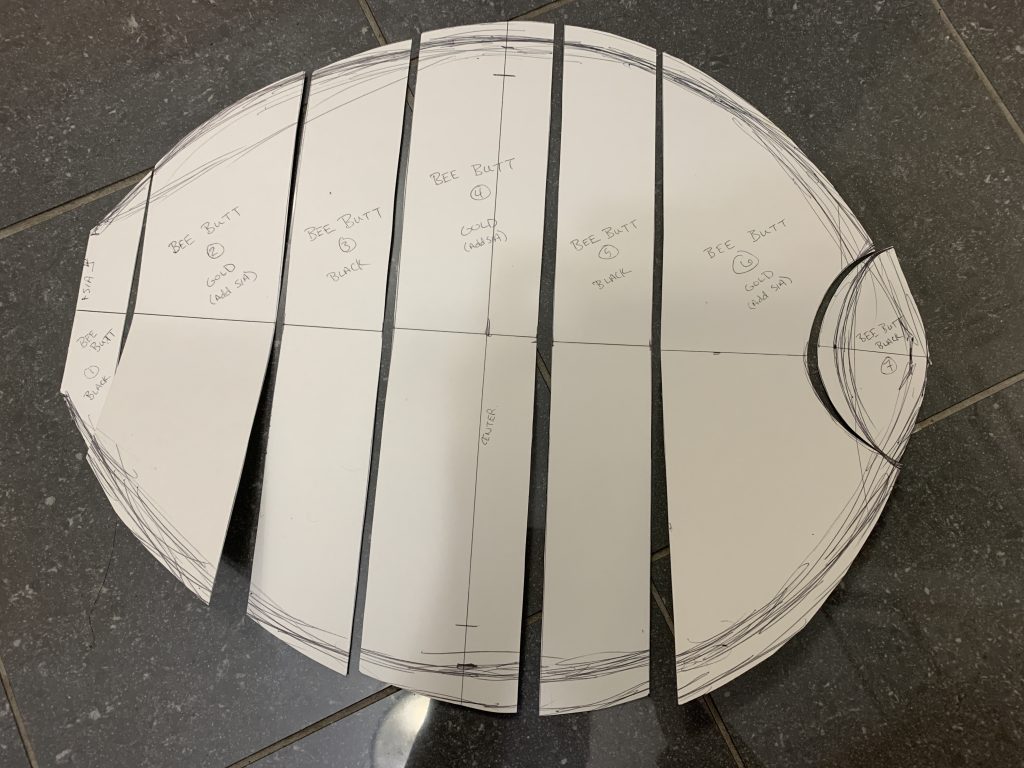
I’m going to go into more in-depth about this later in the post/or in a next post (as I’m writing this down I haven’t 100% decided whether they’ll be together or separate), but rest assured, there was a pattern for this! We’ll talk a little more about inflatable patterns when we get there, because this also went through a couple of iterations.
Part Two: Construction of the Bodysuit Itself.
You’ve already seen a little bit of this in the curved seams tutorial, but let’s go through this a little more in-depth. There are some pieces that really have to be done before others, to make sure that things are reinforcing each other properly.
The actual bodysuit goes together pretty quickly, as far as the actual seams and pieces — the thing that takes the longest for the bodysuit is the pleats. The pleats take a while.
The first thing I did, while everything is still apart; I marked down where I wanted the front stripes to go, cut out some 3/4″ stripes in gold, and glued them down; in this case, I lined them up with the two edges, and then drew in where it would be so it would be down the middle of the front panel as well.
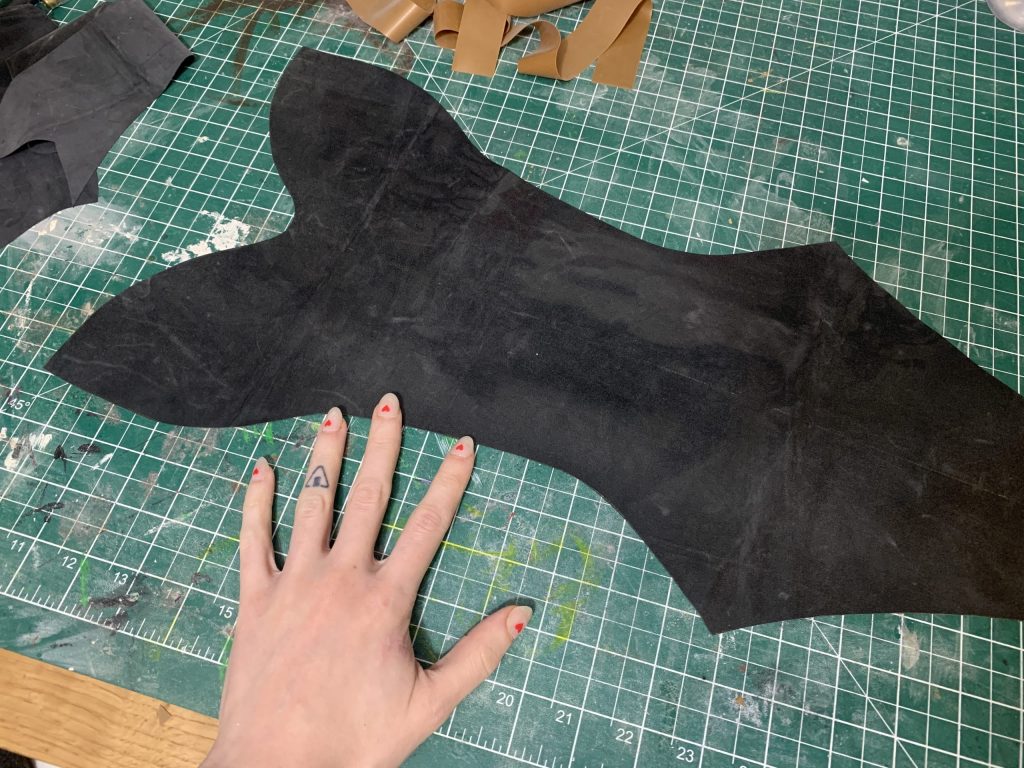
If these pieces look just a little bit different than my pattern, it’s because this is another one I did for another Cosplayer! I realized I didn’t have enough photos of actually gluing mine together, so I had to make another one for this writeup. (You’re welcome.)
Once the stripes were installed down the front piece, I put the side pieces on — which is what you can see in the Curved Latex Seam Tutorial, if you’d like to see it closer!
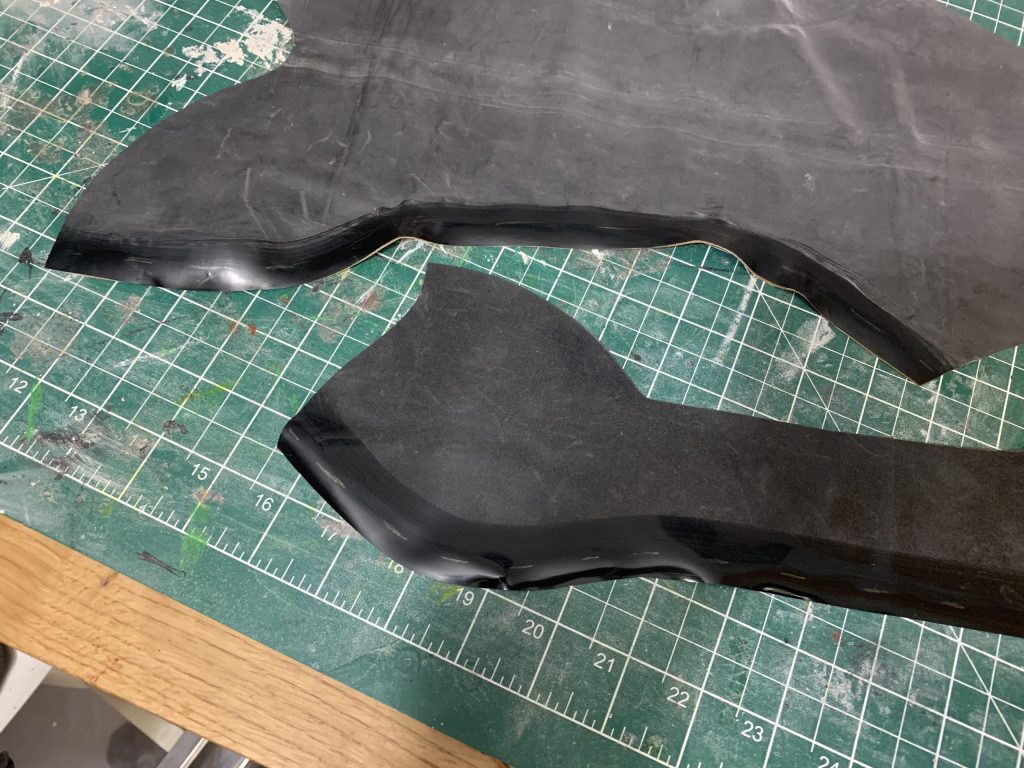
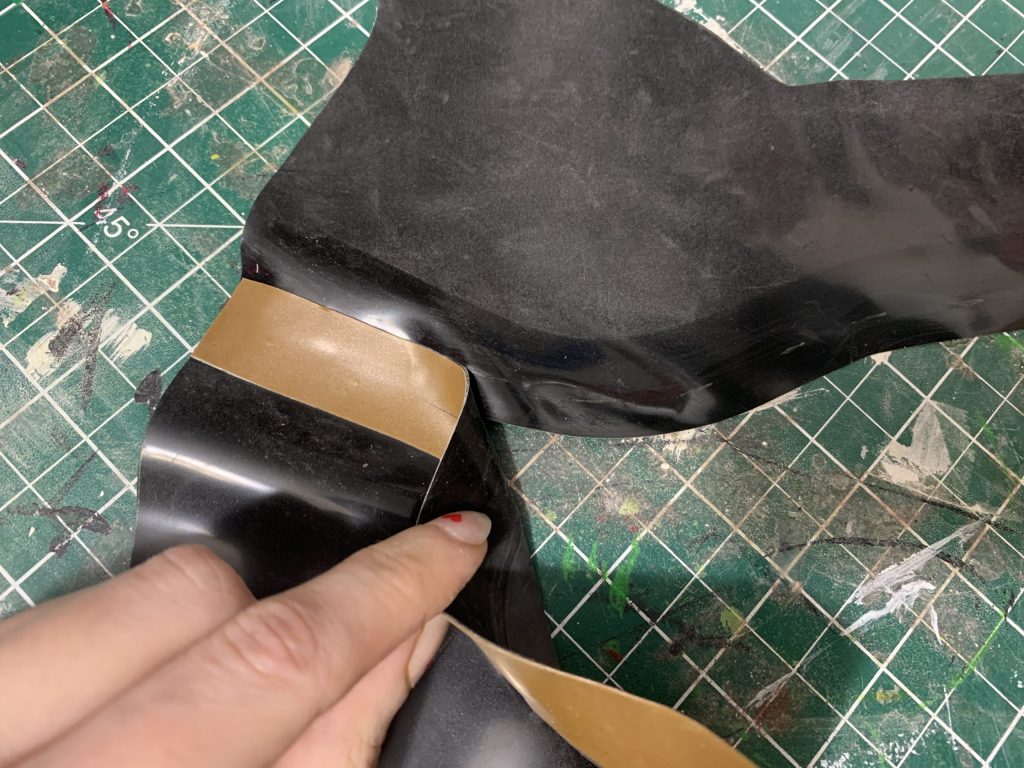
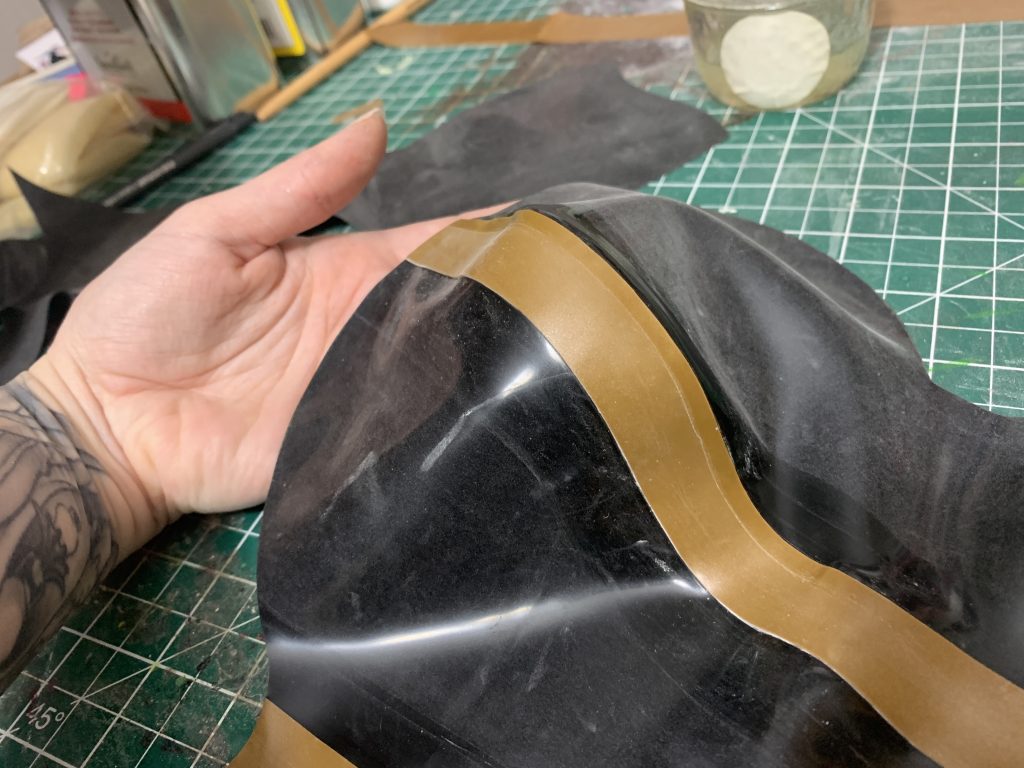
That’s the whole front of the bodysuit together, except for the top bib bit.
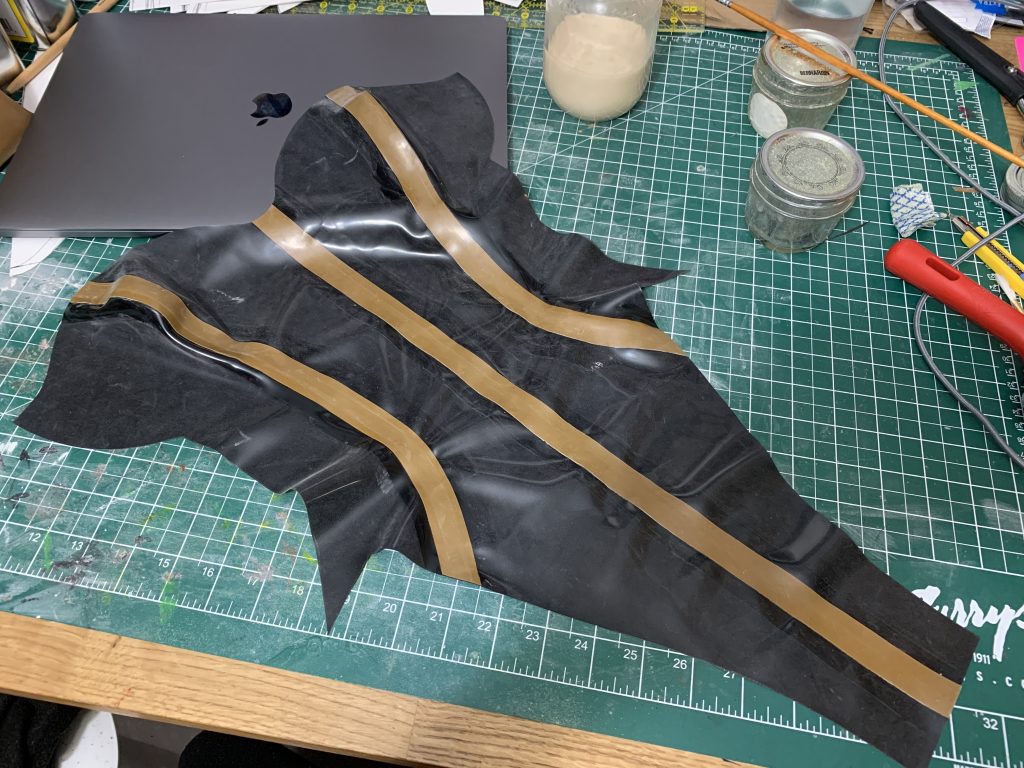
Before I put any more of this together, though, I want to install all of the ruffles on the white bits, so that the edges of all of the ruffles can be sandwiched between non-ruffled pieces, to reinforce them.
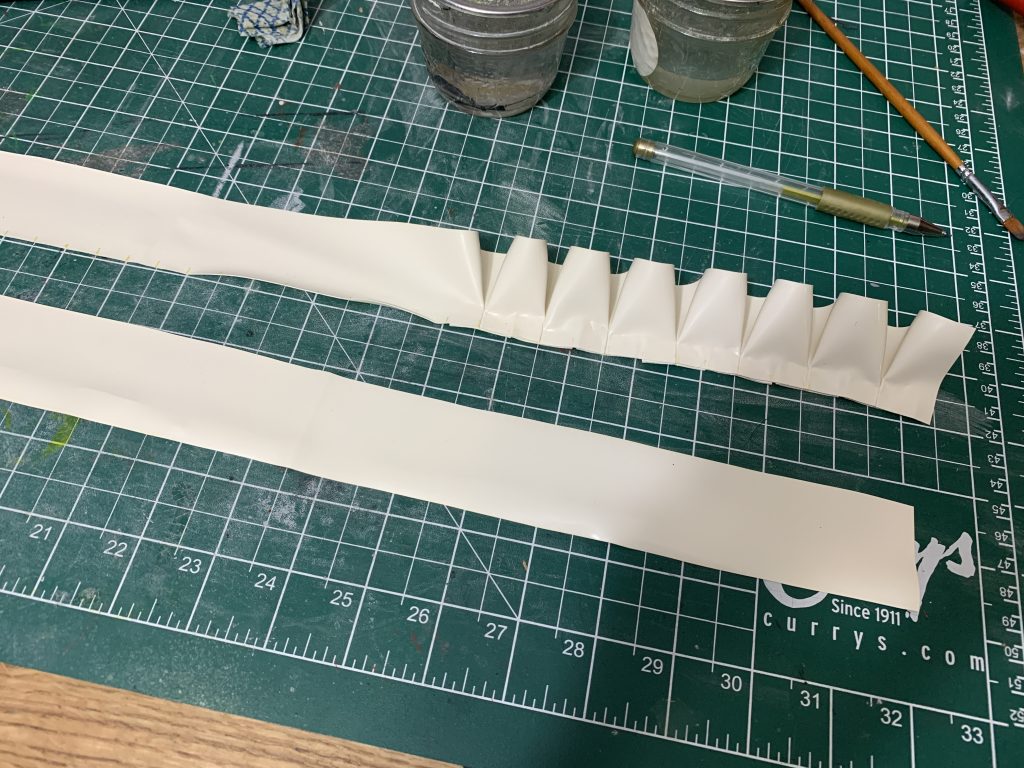
Take a look at the Ruffles Tutorial for a more in-depth look at making box pleats like this! I did a mark every 1/2″ for these, and that’s a 2″ piece of white latex.
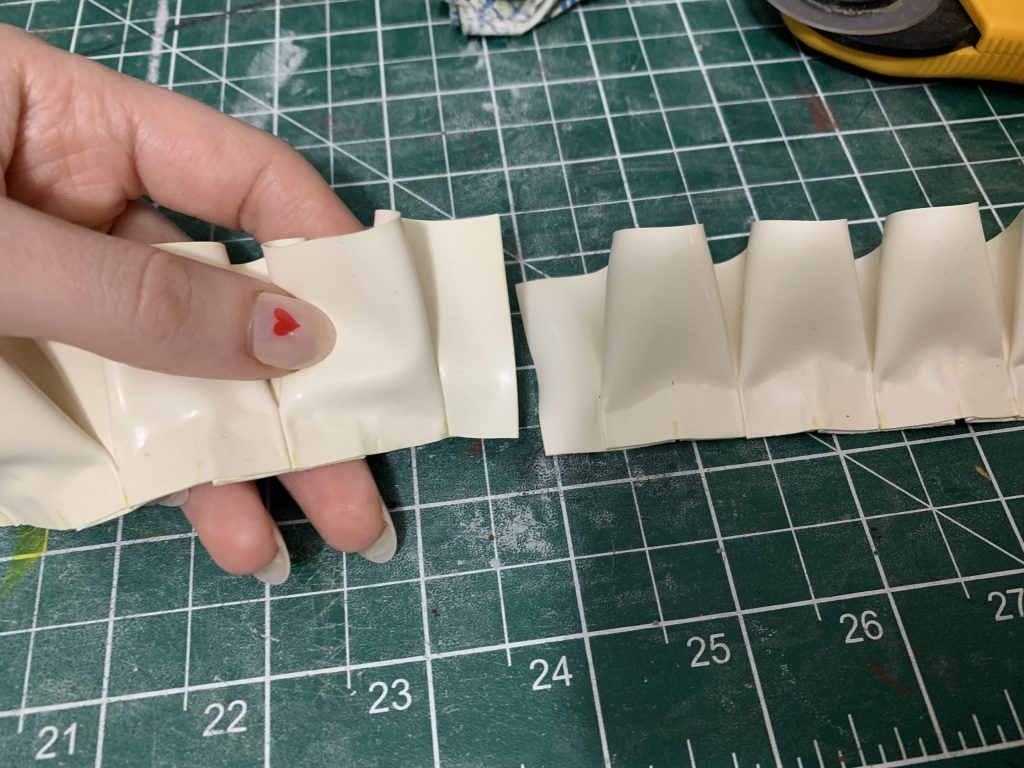
I put the two pieces of box pleating I had made together like this, which gave me enough ruffle to go all the way across the top of the bodysuit. I lined that up with the middle of the bodysuit; because of the shape I’m attaching it to, the ruffles surrounding are mostly covering this seam.
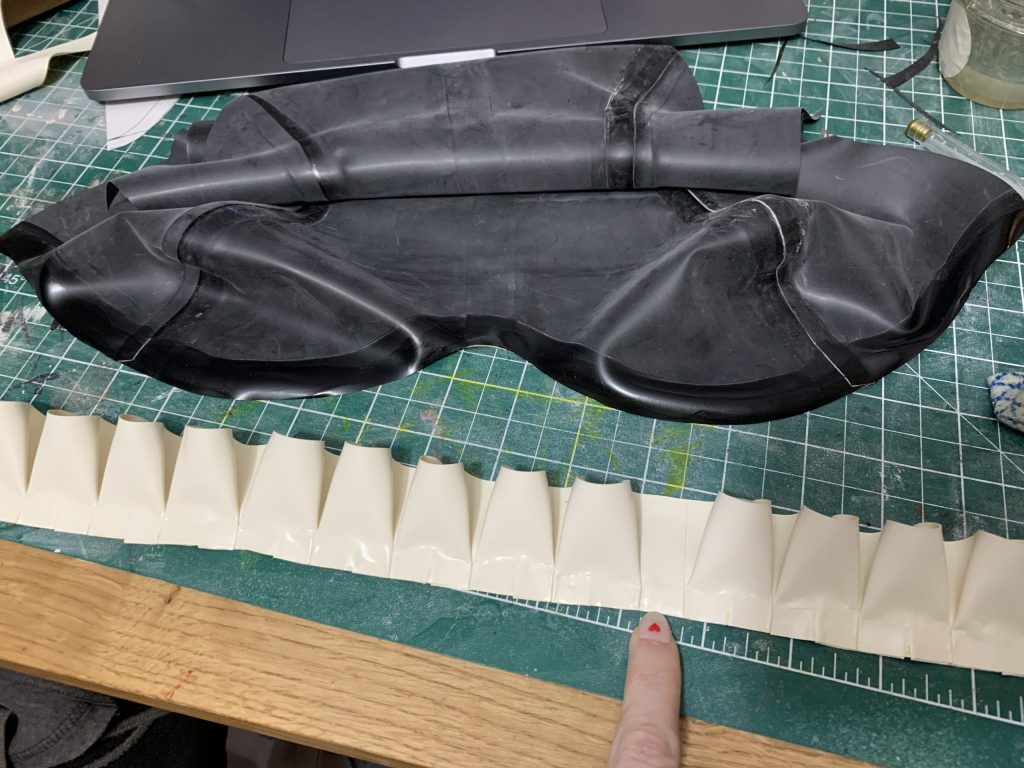
There’s that middle bit! And you can see the glue on the back-side of the front that I just finished constructing. The easiest way to put the ruffles onto the curved surface is by having the ruffles in your hand, and taking it slow — there’s not much stretching to be done in this case (and since you have multiple layers of latex glued together, the ruffles are hard to stretch anyway), it’s more just carefully placing it.
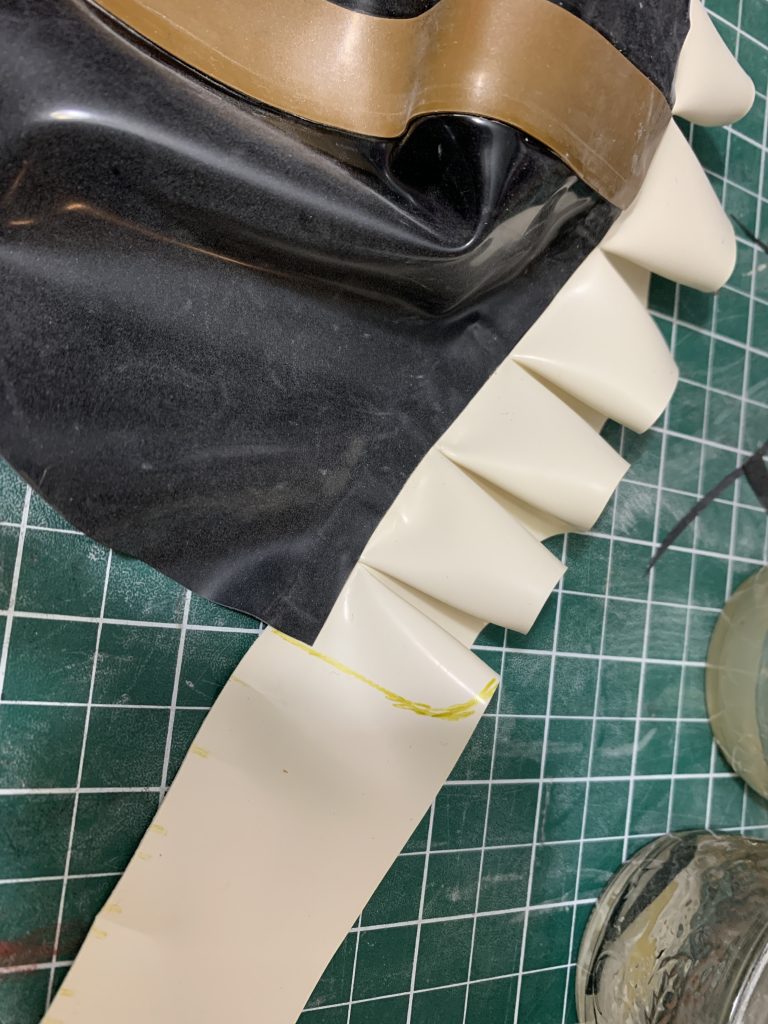
Here’s me marking the edge of the ruffle where it runs out of cup — you can also see that I’ve pulled some of the excess ruffles out of the edge of this piece, when I ran out of cup to attach them to, to make trimming this bit off easier. Then I cut this with a rotary cutter.
Next up, we want to attach the bib underneath this, to sandwich in the pleats — but first! You’ll notice in the reference that there’s also a button placket, surrounded by smaller pleats on both sides, up the middle of the bib.
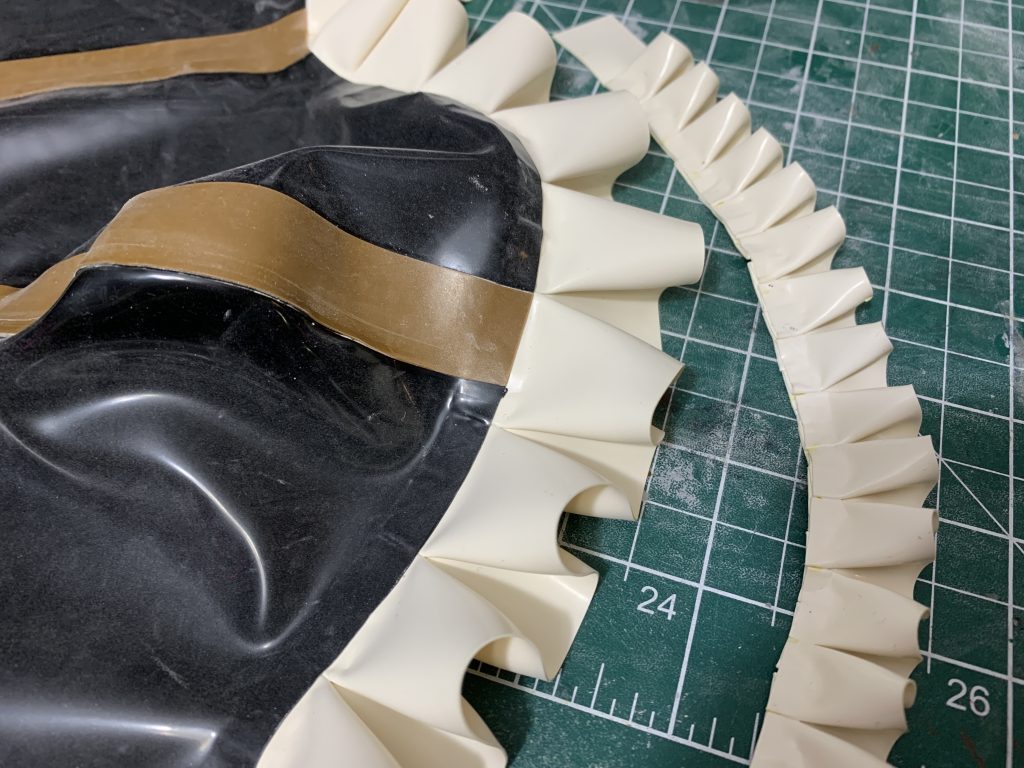
So I made some smaller pleats! These are a 1″ strip made into box pleats that I marked off and folded every 1/4″.
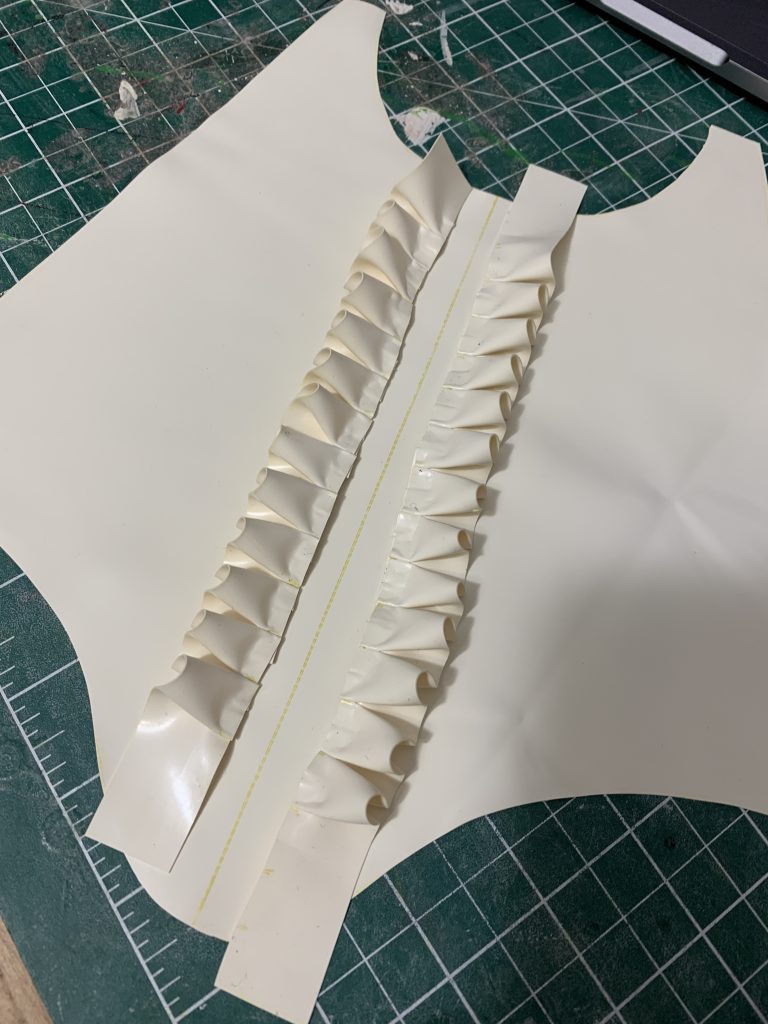
I already have the centre line marked down the front of the bib from when I cut it out, so now I just have to mark off where these are going, equidistant from that centre-line, for a button placket that’s 3/4″ wide (to match the stripe down the centre-front of the bodysuit.
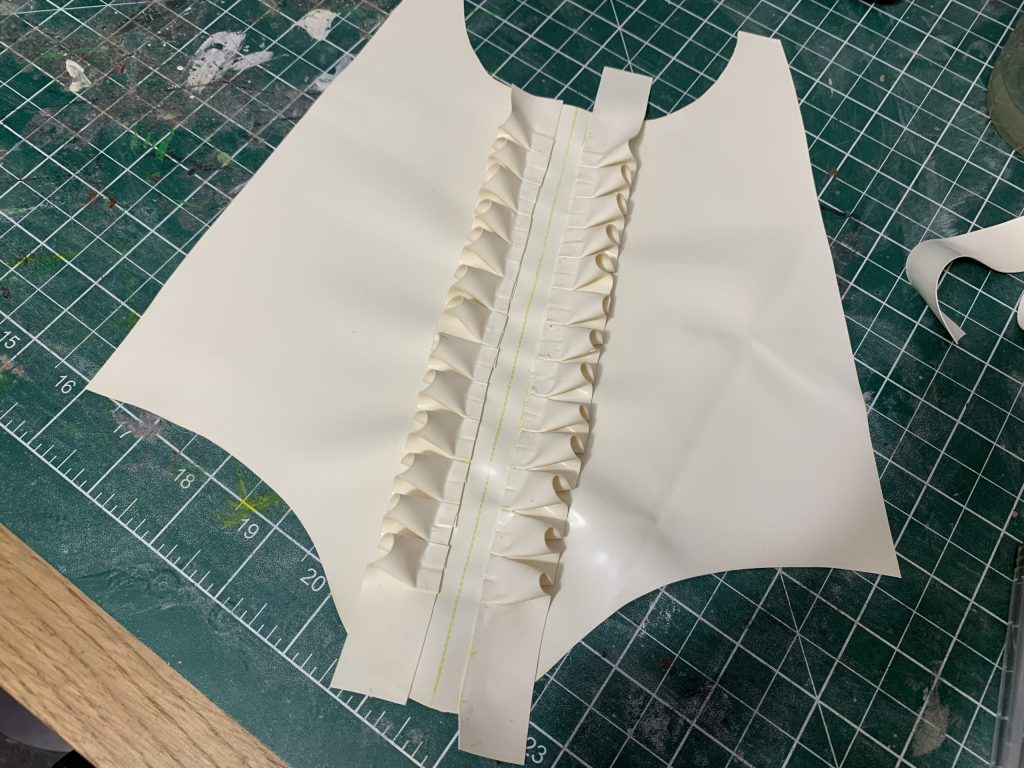
Here they are glued down and rolled — then I cleaned off the centre-front mark, and applied another strip of latex overtop, for the buttons to eventually be put onto — we’ll talk about how exactly those work in a later step.
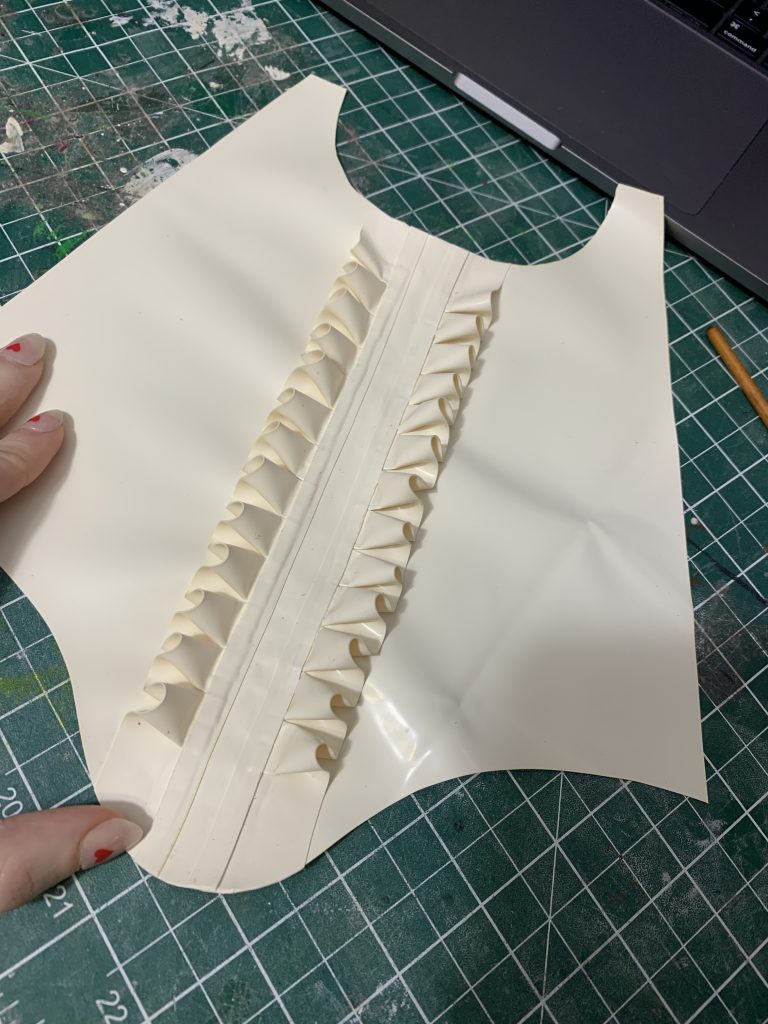
There it is, all rolled down. I also put two little strips of decorative latex down the side of the placket, to help hide the edges of the pleats. I’ve also trimmed the edges down, and glues down the top and bottoms of the pleat fabric, since they’ll all be getting sandwiched in seams that I’m about to do.
I started with the collar piece at the top; these are halter tops, so this only attaches at the front, and then just closes in the back (in this case, with velcro — I used a lot more velcro than I usually do for the honeybees!).
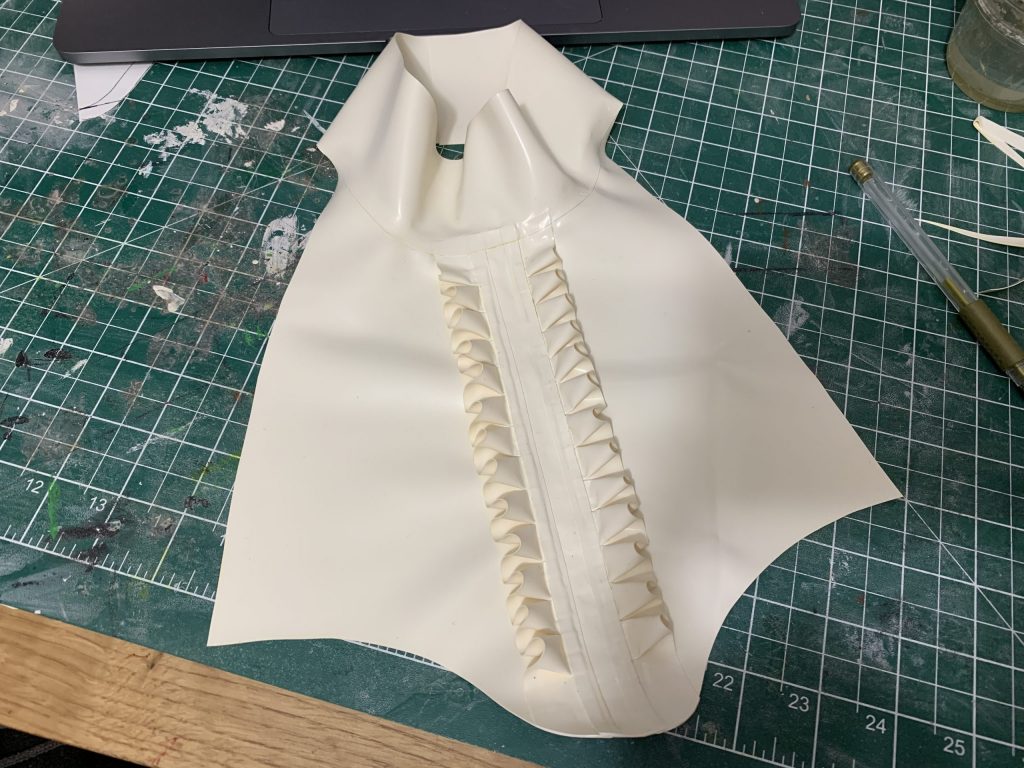
Here it is done — the collar is on top of the bib piece, which sandwiches in the tops of the ruffles, so everything there reinforces itself. If you remember the pattern pieces on this, though, installing the collar basically means putting a relatively straight piece, on another one which is quite curved …
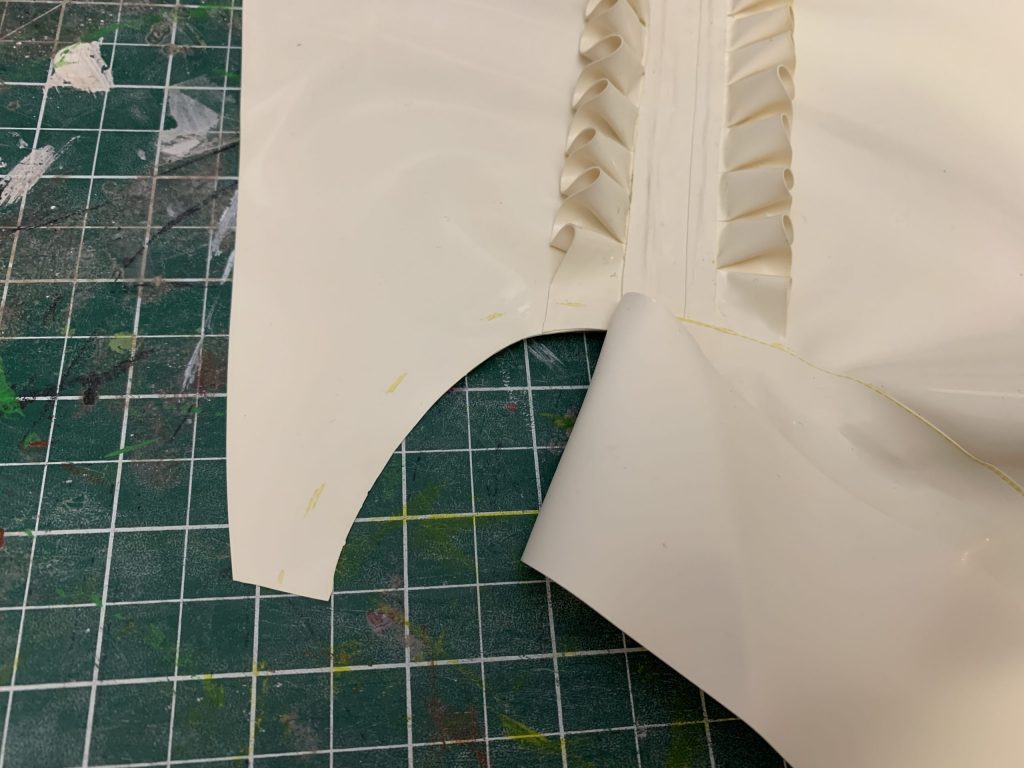
Like so. In the case of collars like this, I like to put a couple mm down in the middle — even if I pull this up later, it gives me a place to start with. Then I gently pull the collar out straight, just like I’m doing a curved seam, and put a little stretch in the top piece, the same.
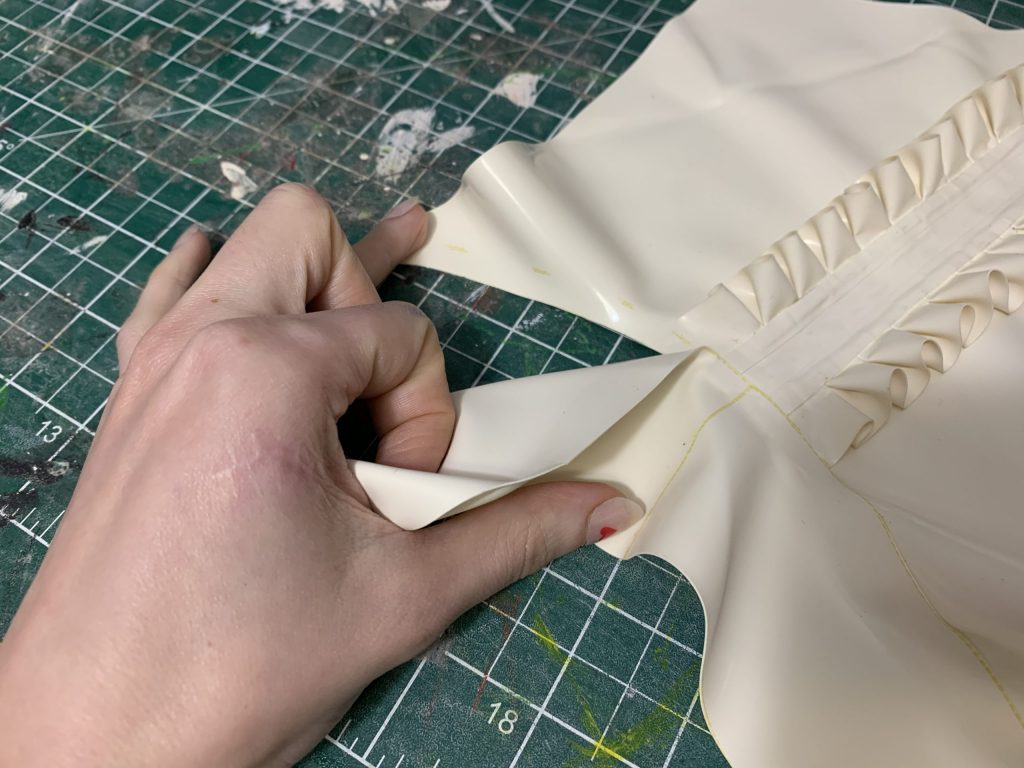
Here I am, trying to photograph it with a single hard, but like so, roughly. This goes together almost exactly like a curved seam, remember to stretch everything equally! In this case, I try not to stretch the neck so much as just flatten it out, so don’t put much stretch in the top, either!
Then it was time to glue it onto the bottom …
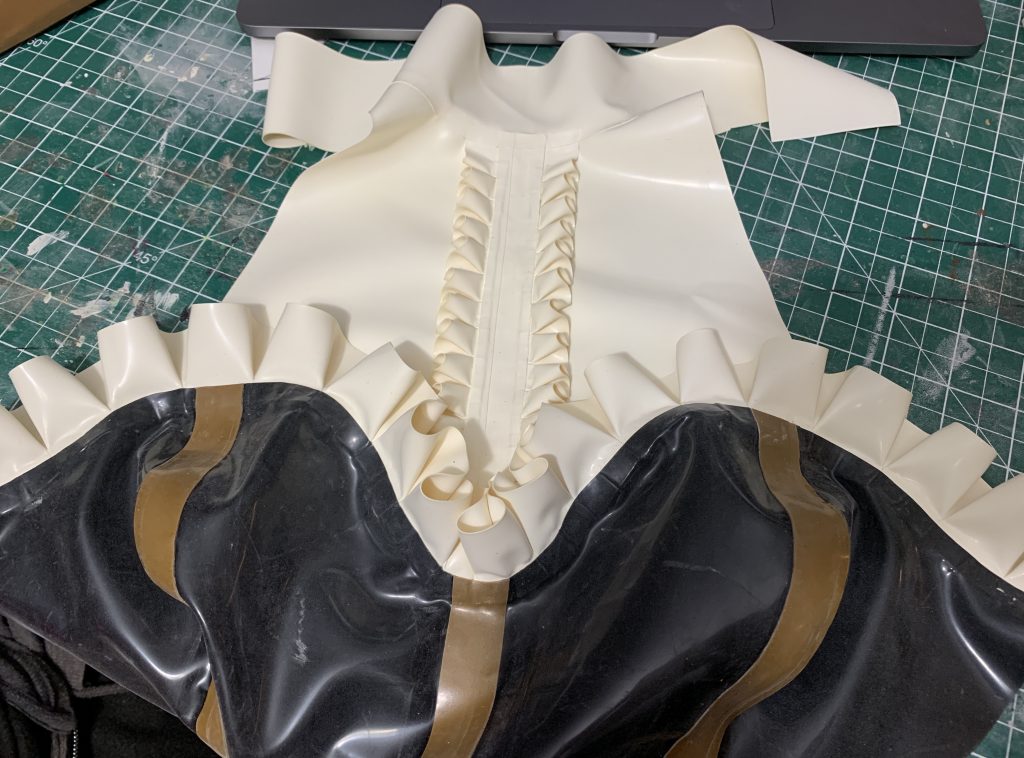
Which is the rest of the bodysuit! For this, I kept the bodysuit face-down and manipulated the bib (the smaller, easier to work with part) onto the back of the ruffles, which sandwiches in a good portion of them.
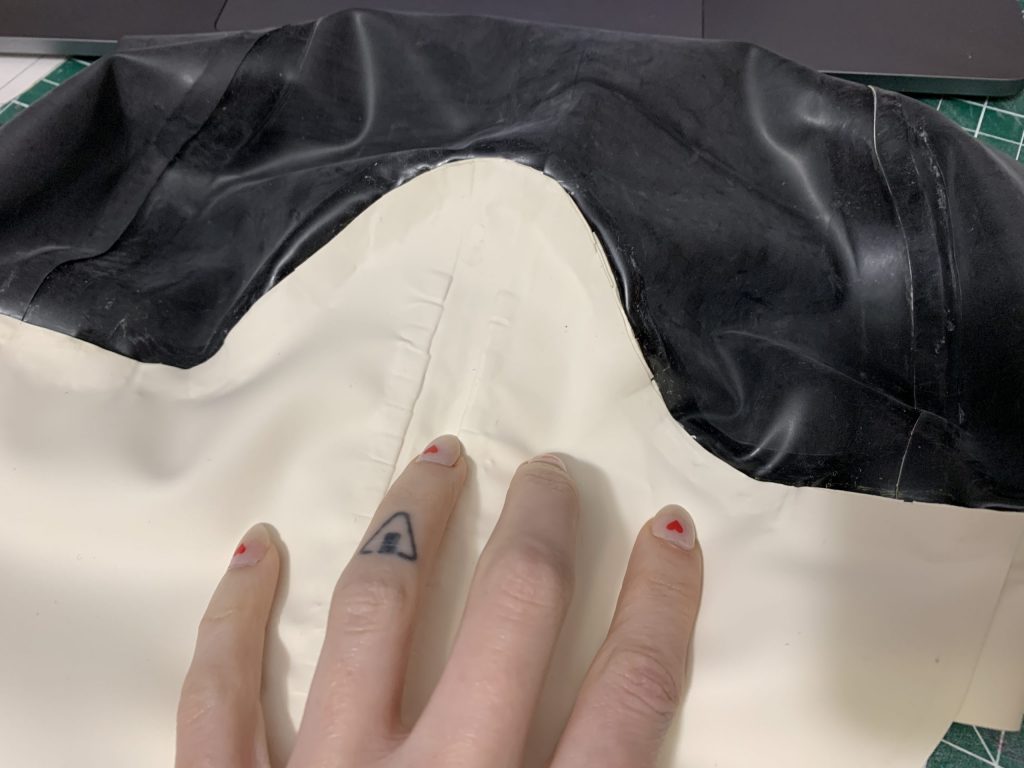
Here’s a look at the sandwiching from the back.
When I’m adding trim reinforcement on (which tends to be one of my last steps), I’ll reinforce the rest of the inside of the ruffles. (I did this very much later, so if you see unfinished ruffles on the inside, mind your business. 😂)
Now that the whole front was together, I built out from there …
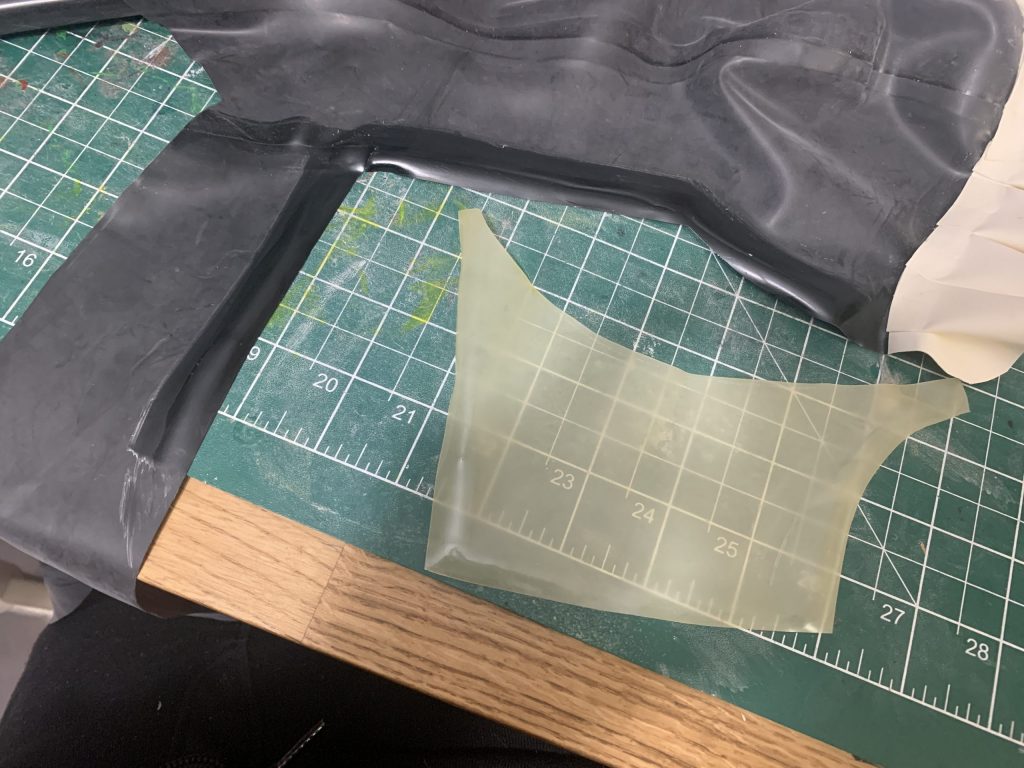
Here you can see I’ve done a couple of things — I’ve put the back of the thong on, but only at the side seam, which allows me to lay everything very flat like this for the transparent side panel.
If you’ll remember the panel, the side piece is shaped … interestingly. It’s smaller along the curved edge than it should be to fit flat, in order to minimize the potential for that part gapping — for people who understand patterns, I’ve basically put darts along where it meets the top of the thong, and the side of the breast cup.
It does also make it kind of a pain to install. It always takes me a couple of attempts to get everything as smooth as I want, not gonna lie. My Order of operations for this was to start at the top of the side of the boob cup, and go from there, treating each of the 90 degree corners as a sort of pivot point. The side of the boob cup has some curve-seam-esque stretching and manipulating in it.
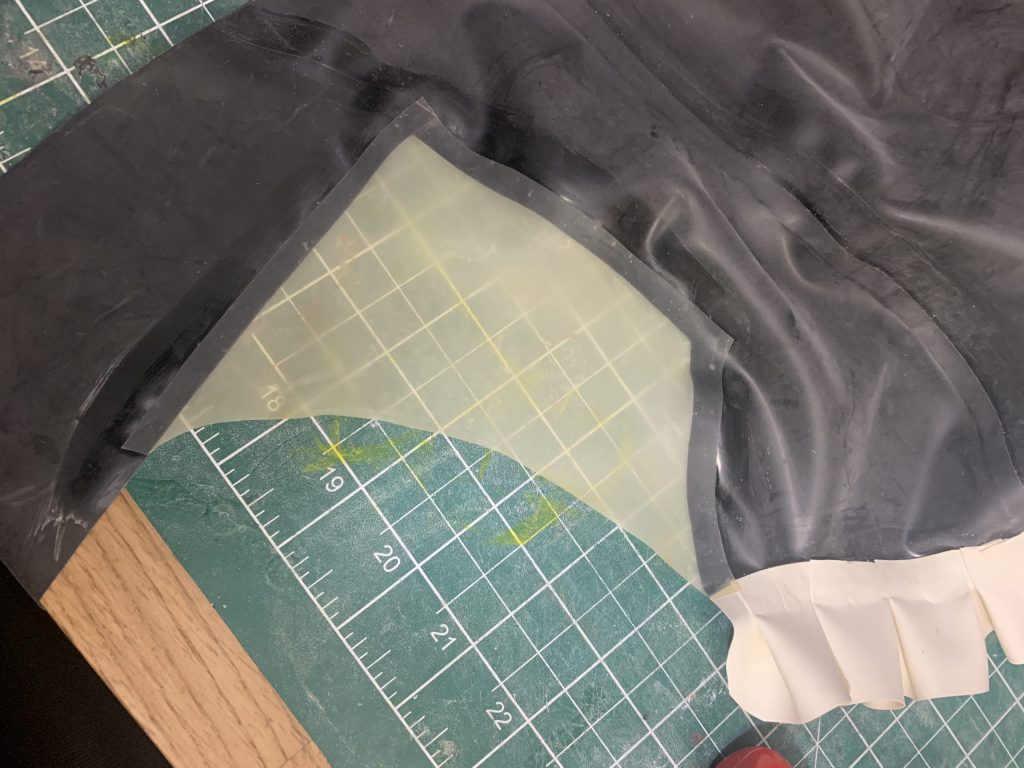
Here it is installed! You can see how the corners are a little tiny bit bigger on the seam allowance, that was just to make it fit exactly the way I wanted it to.
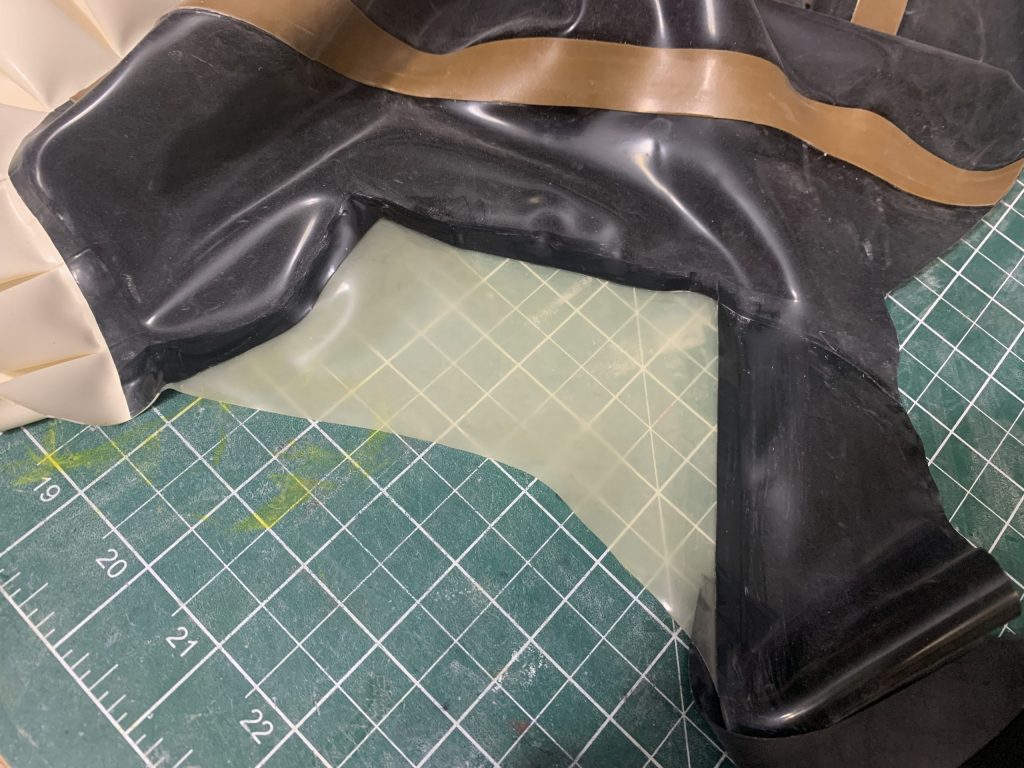
And here’s the panel from the outside!
Once that panel is in, and rolled, and cleaned, I attached the thong pieces together at the centre-back seam, and then once that’s together, I put the crotch together, too.
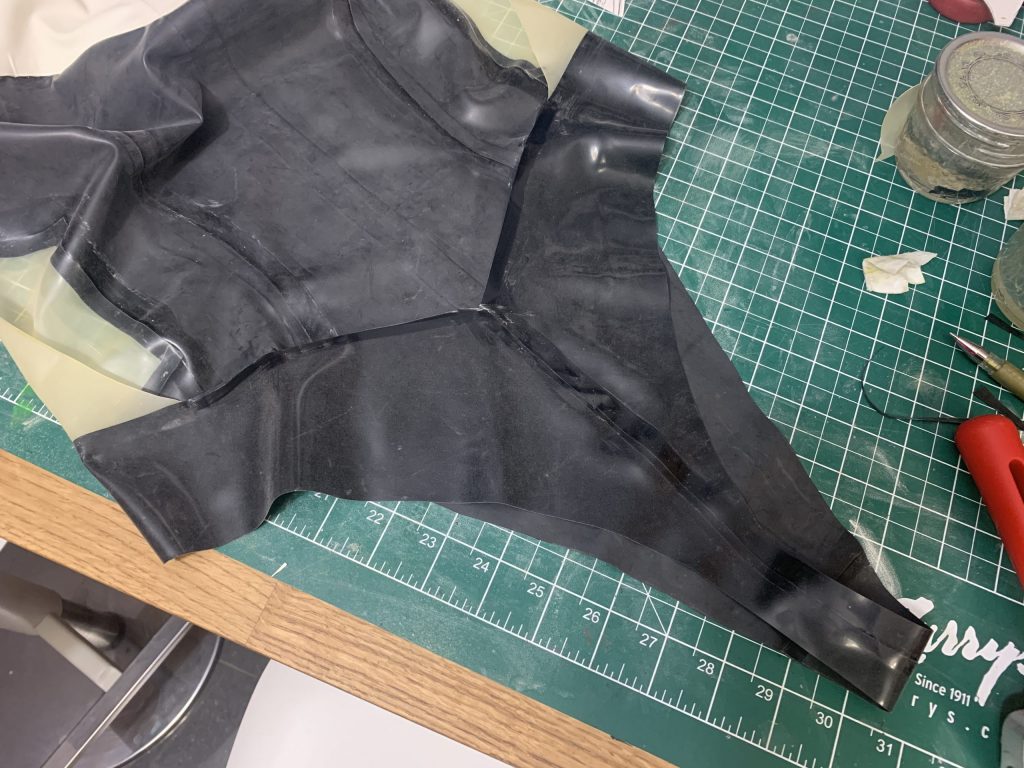
You can see the transparent panels curving around there, that’s why I wanted them in before I put the back seam together.
There’s still one part to put on that I’ve cut out — the back strap, that goes from the side of the bust cup, meets its counterpart in the middle of the back, and then up to the centre-back of the neck, one on each side of the closure we’re going to put there (so about 1/2″ from the end of the neck piece.)
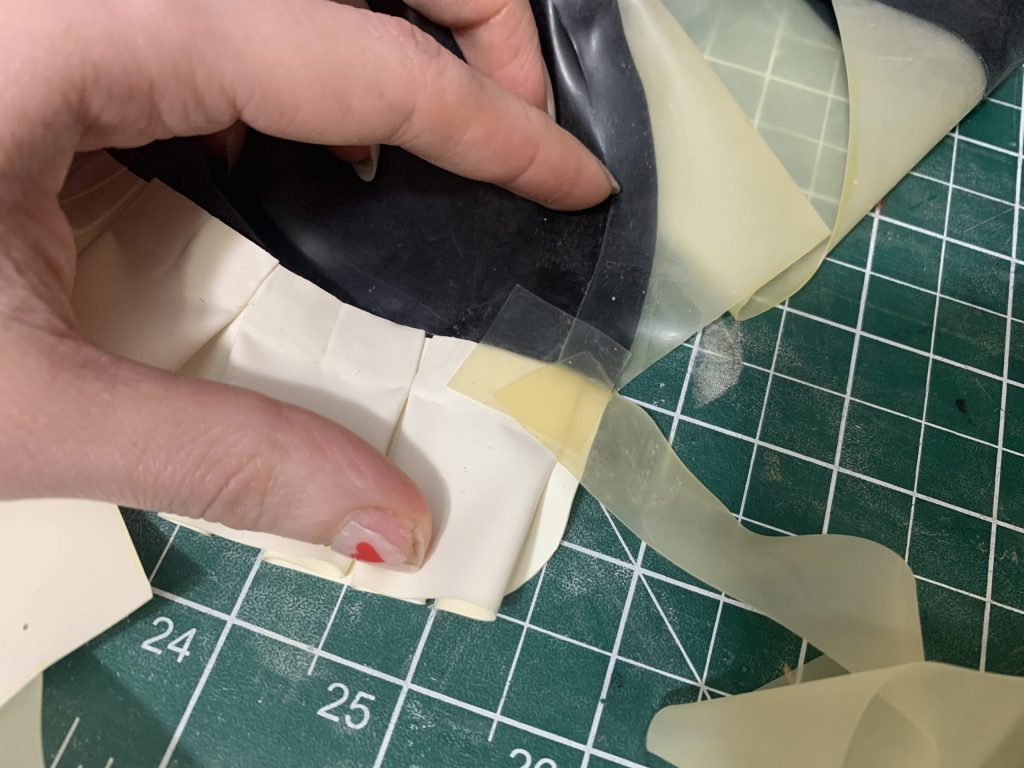
Here’s a photo of the strap, and the little patch of reinforcement I put at the side of the bust cup — above, you can see the transparent side-panel. I like to put larger patches on little straps like this, to reinforce them, just for the sake of longevity of the garment, sandwiching them in place. I did the same on the top, where it attaches to the neck.
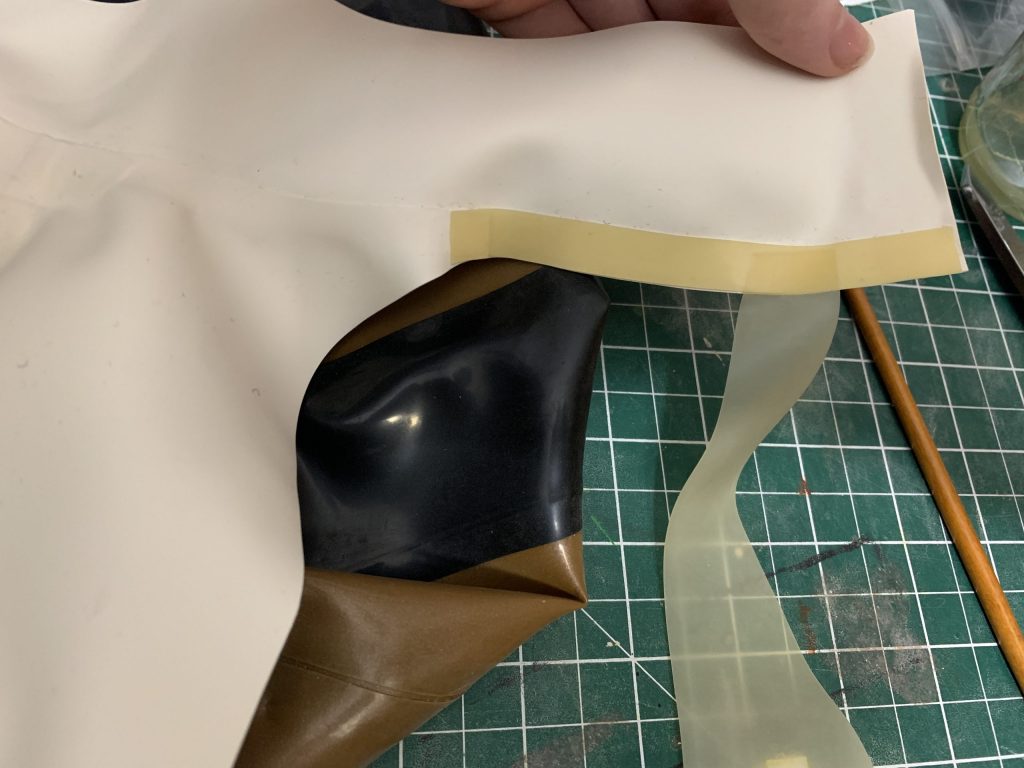
Like so.
Here’s a photo of the reinforcement on the rest of the box pleats as well — doesn’t really matter what colours you use for this, I like them to match as much as possible just for my own sense of aesthetic, but it’s on the inside, so do whatcha gotta do.
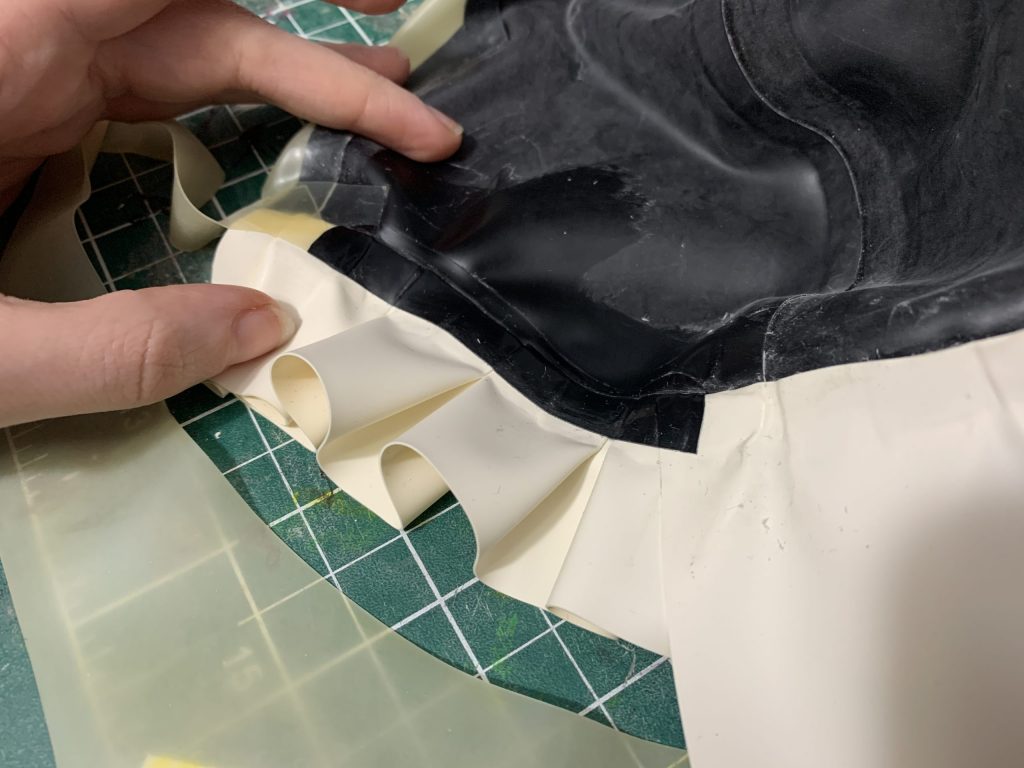
You’ll notice that on my reinforcements, I cover the edges of the “bib” piece — it’s good practice to reinforce any raw edges like that, because those will be the first points to come up with wear, washing, and shining.
At this point I also made an installed a bow —
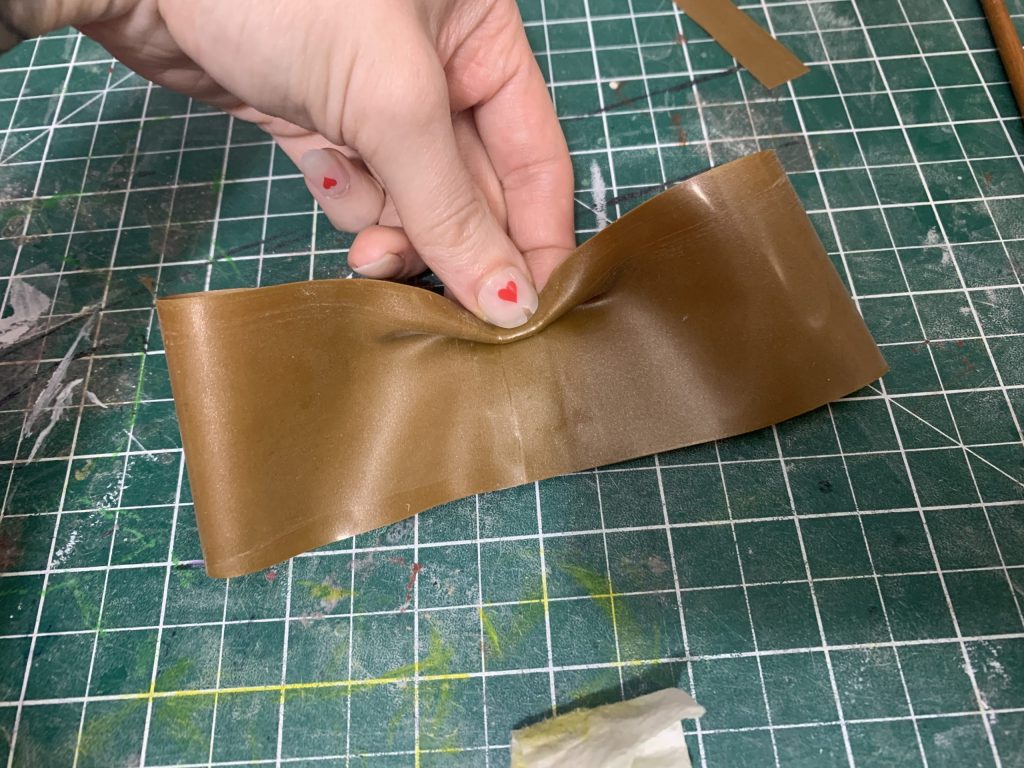
This one was 2″ by 6″ when finished, here I am pleating it. (If you need more information about making bows, head off to the Bow Tutorial!)
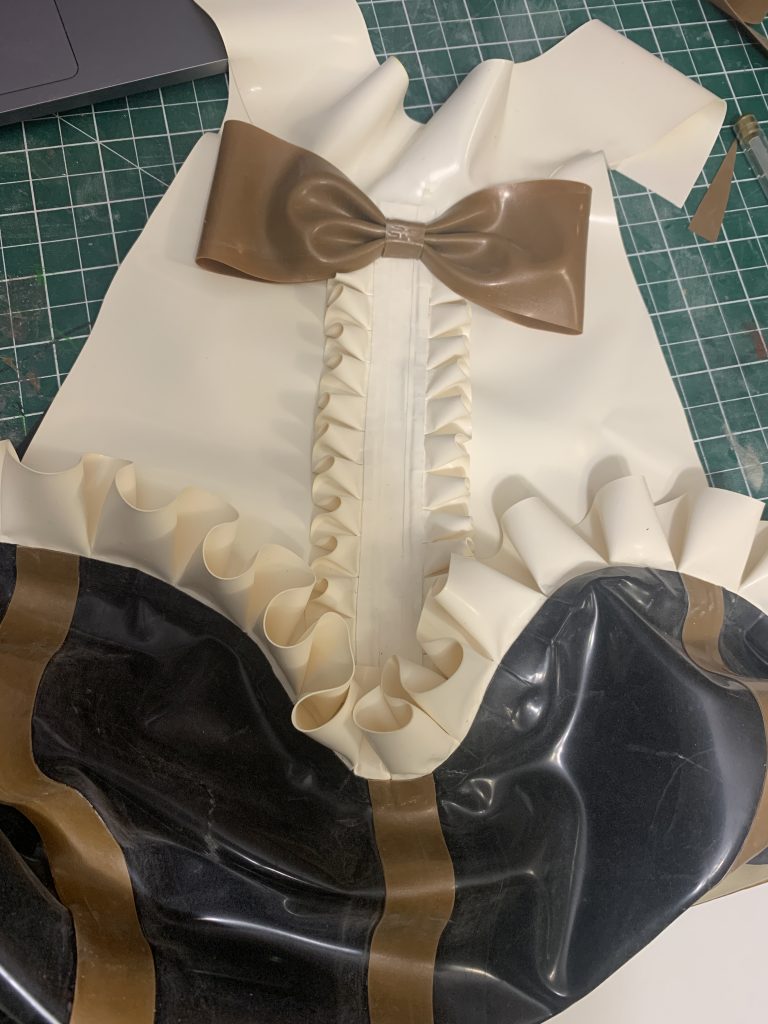
We”ll go a little more into this later, but just a small dab of superglue adheres things like this on Latex really well — for little details like bows, that can be accidentally pulled off, I’ve found it’s much better than rubber cement, so that’s how I attached this bow.
Then I did the last piece of reinforcement that I haven’t yet done — around the leg opening on the inside.
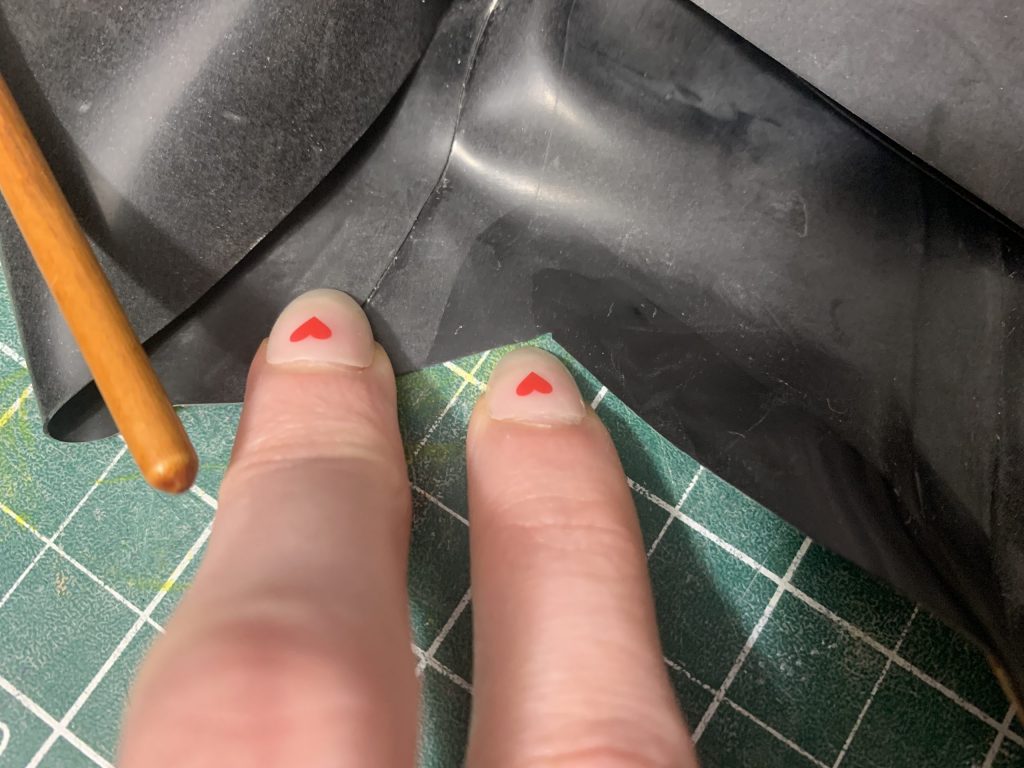
This is the hard angle at the top of the hip, just before where the thong back is attached. You can see where I’ve already applied glue. I started here, and then went around the whole inside of the leg with a strip of 1/8″ black trim, just to reinforce this, and the bottoms of all of the other seams that make up the front of the bodysuit. I continued it around the back of the leg, until it came back to this front part!
There are a couple more details — there are fake buttons down the placket on the front, remember, but we’re going to circle back around to that at the end, because I don’t generally install them until the next part is done, which is —
Part Three: The Tail.
Here’s where things get interesting! Inflatables are, in my humble opinion, one of the easier things to construct as long as you know how to do it. The actual construction of an inflatable is most like a latex glove (tutorial here), but with a few more steps.
Let’s revisit what the pattern looks like:

This is slightly more difficult than a “regular” inflatable because of the colour blocking; essentially, every seam becomes a potential leak for your inflatable, so the more different pieces you have, the more reinforcement you’ll have to do in order to insure that your inflatable is airtight.
Luckily, I’ve done this a lot and I have a system for it!
Re: pattern drafting for an inflatable, you have to remember that once the inflatable is inflated, it’s going to be round, so flat the pattern should look far too big. What I generally do is take a soft measuring tape and make circles, to judge how big around I’m going to want the thing, then take the measurement from half of the circumference of the circle, and use that for my draft.
That said, you may want to err on the side of slightly smaller by an inch or two — because, like a balloon, your latex inflatable can and will stretch! This is all stuff that you kind of just learn by doing, there are no hard and fast rules for it. It took me three pattern iterations of the honeybee tail before I got a size I really liked, I just kept making it bigger.
(For reference, for those of you at home, the biggest part around the middle of my honeybee tail measures nearly 15″ — fully inflated it’s roughly 32″ around. You’re not done inflating something out of latex until it’s stopped having any wrinkles in the edges. Yes, it will feel a little like you’re about to make the thing explode. 😂)
For this pattern, I’m planning to have the black stripes overtop of the gold stripes, so all of my seam allowance is on the gold stripes. For this, the black is on top because you’re likely to see the black underneath the gold if it’s done the other way around — this is an important distinction with latex colours, which ones are more transparent than others might change which colour you decide to put “on top” when you’re seaming together pieces for colour-blocking. (As a rule, anything that’s semi-transparent goes on the bottom, for a cleaner look.) Even latex that isn’t marketed as semi-transparent might be more transparent than colours like black, so it’s important to run tests to see what looks best when you’re working with new colours.
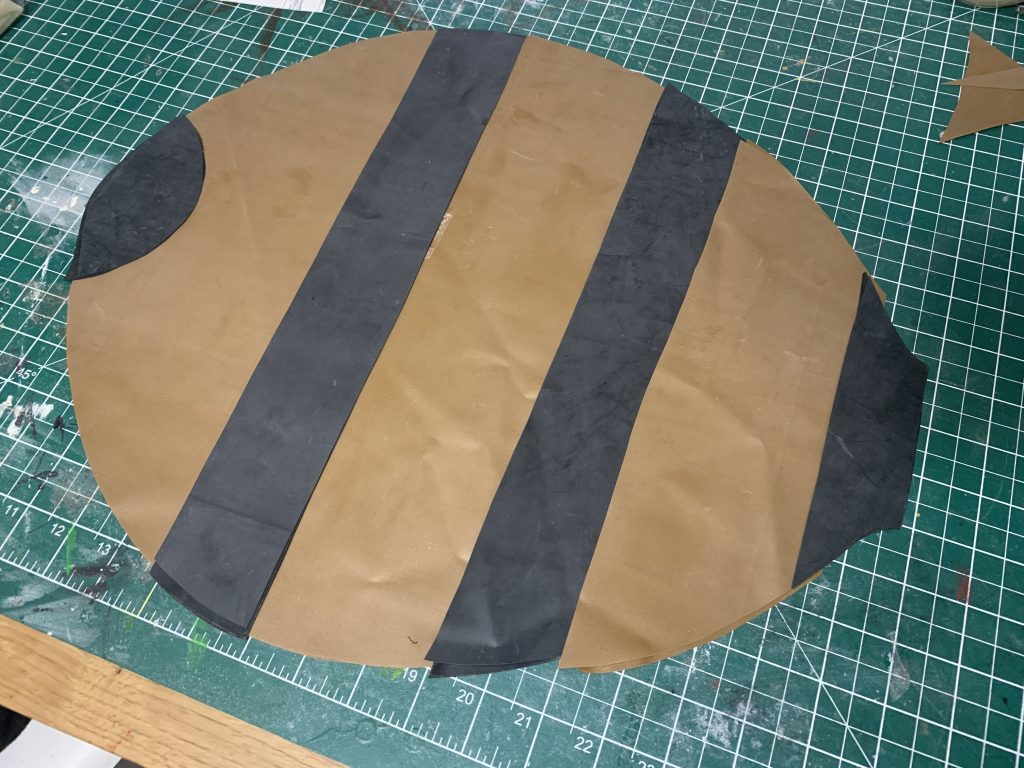
Here are all of the pieces cut out — remember, you need to cut two of every piece, and make sure they’re cut mirrored (by first cutting with the pattern right side up, then flipping it over and cutting right side down), because you need both sides of the inflatable.
You’ll also notice that I’ve added a “lip” on the first black piece on the right — on the pattern, I’d written “+S/A” which is shorthand I use for “add seam allowance”. This is very important for inflatables; that’s the part that’s going to attach to the rest of the bodysuit. (It’ll make sense when you see it, I promise.)
Glue these all together …
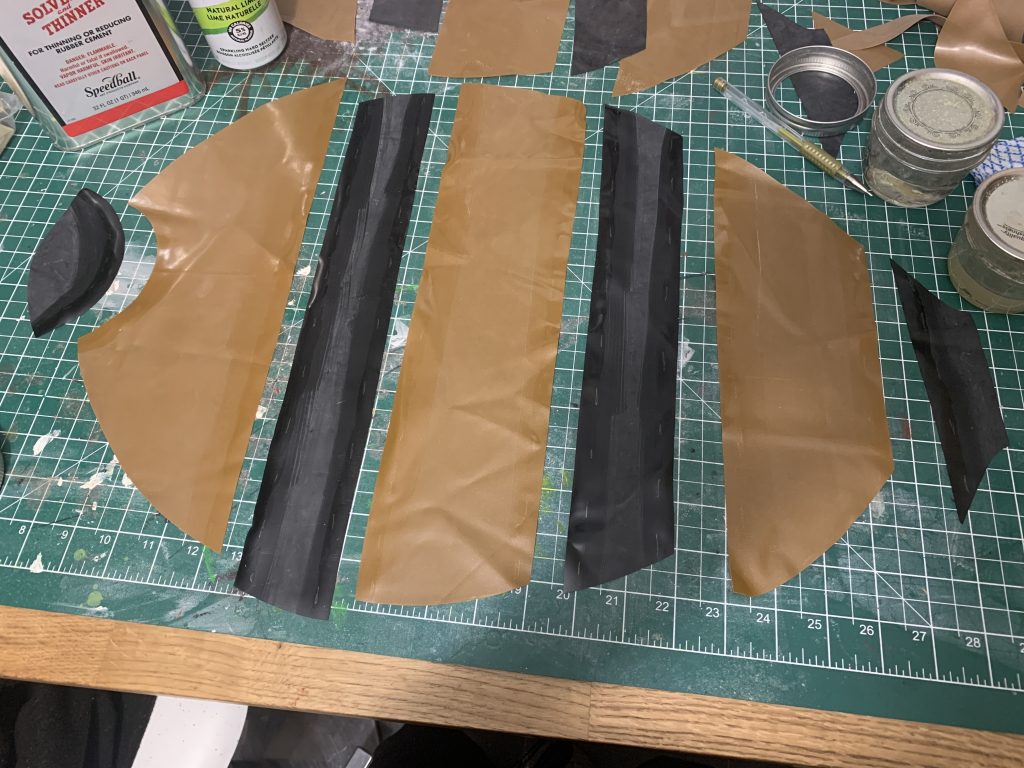
I like to prep everything at once, by flipping over all of the black stripes to the back (because they’re going on top), and just cleaning and applying glue to every seam. Then I can glue them all together at once.
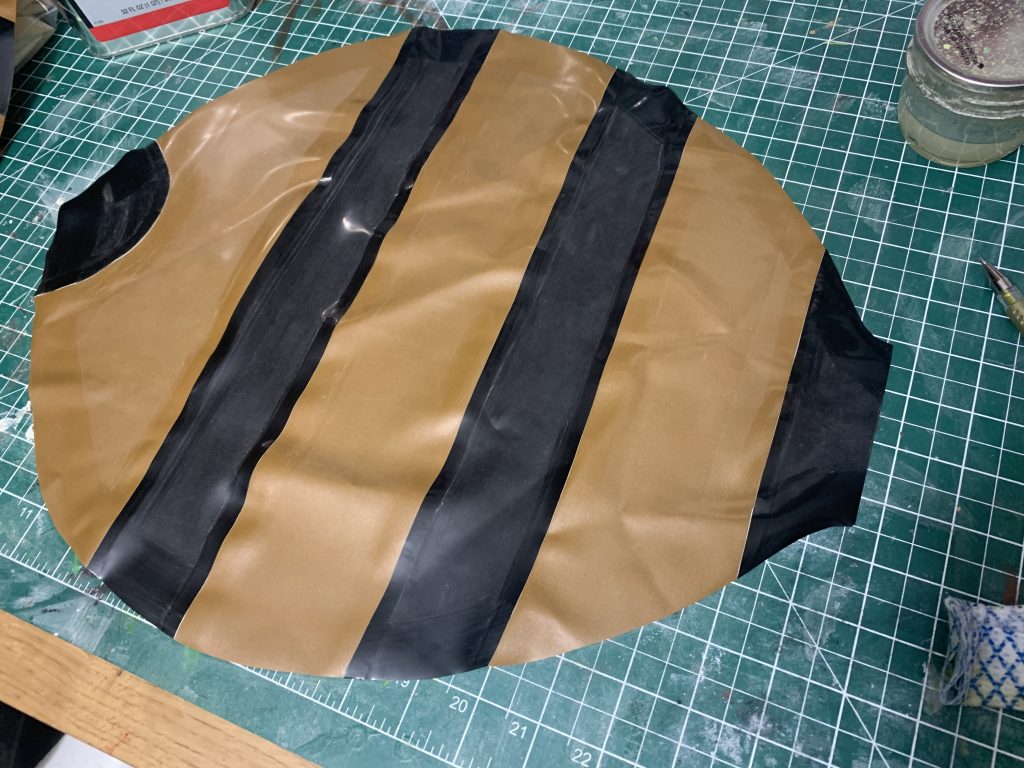
Here it is, all glued and cleaned! Do this to both sides, and clean and powder everything before the next step — which is attaching them together.
I know that seems daunting, but it’s actually done in exactly the same manner as putting gloves together. You’re going to clean the edges right-sides (which will ultimately be the outside of the honeybee thorax), I generally clean ~1-2″. And then you’re going to very carefully press them together, like you’re attaching two glued pieces flat together.
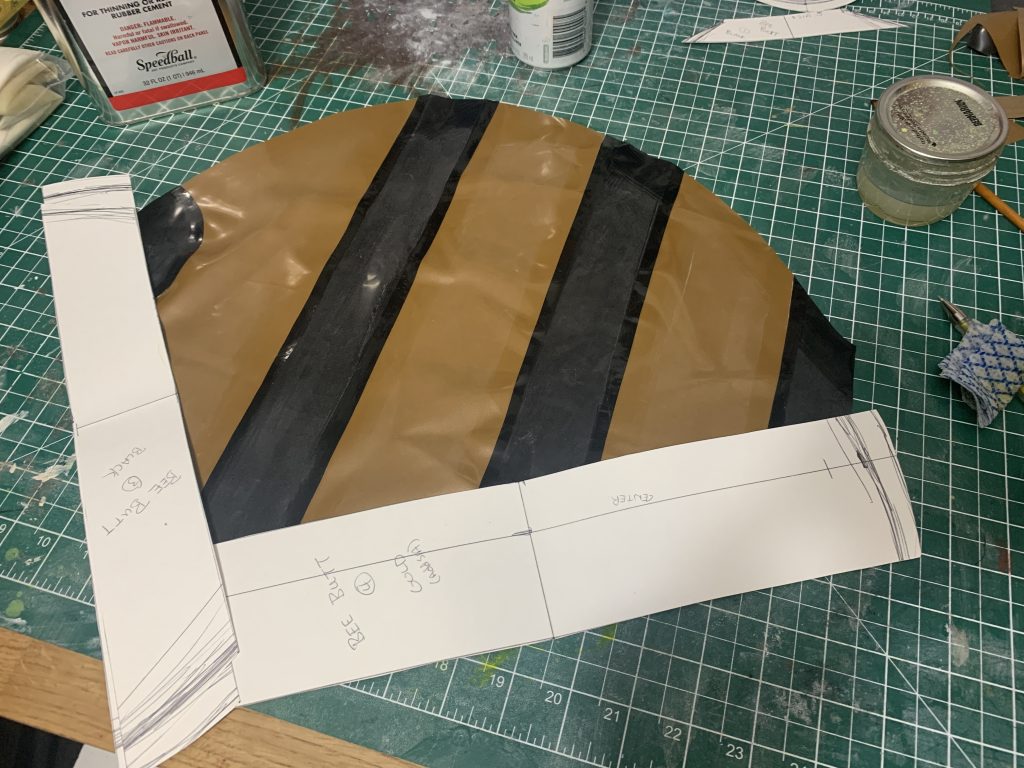
We’ll go through this slowly — here’s one half of the honeybee thorax, right side up. You can see the 1.5″-ish that I’ve cleaned on the top. Because this piece is so big, I’m using the pattern pieces to block off the bottom half of the shape, where I’ve cleaned. This will keep anything from sticking to them accidentally.
We’re using the natural propensity of latex to stick to itself when totally clean here, to hold these pieces in place while we adhere them together — by not using glue, there will be no glue to clean off later, when we have to pull these pieces apart.
Next, we have to take the other half (which has also been cleaned the same way), and apply it to this half.
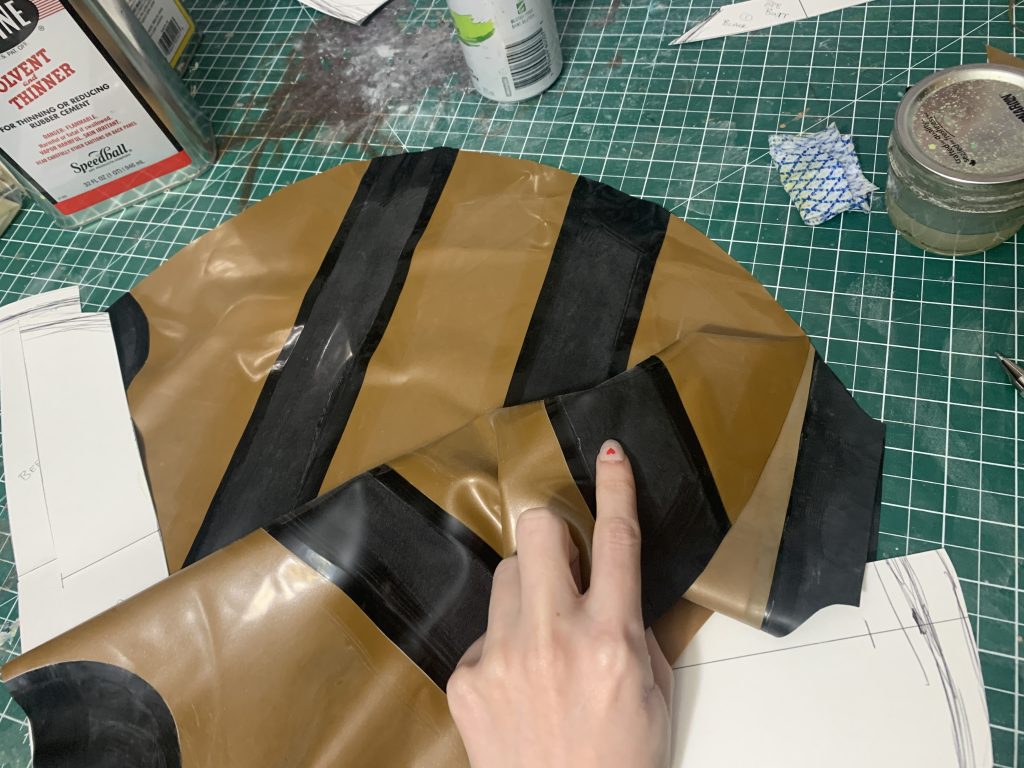
Because this inflatable is striped, you want to line up the stripes; this might involve a little bit of stretching and manipulating the pieces. Inflatables are more forgiving for this sort of thing, because the pressure of the air inside will cover up a lot of sins, but do try to have it as flat as possible.
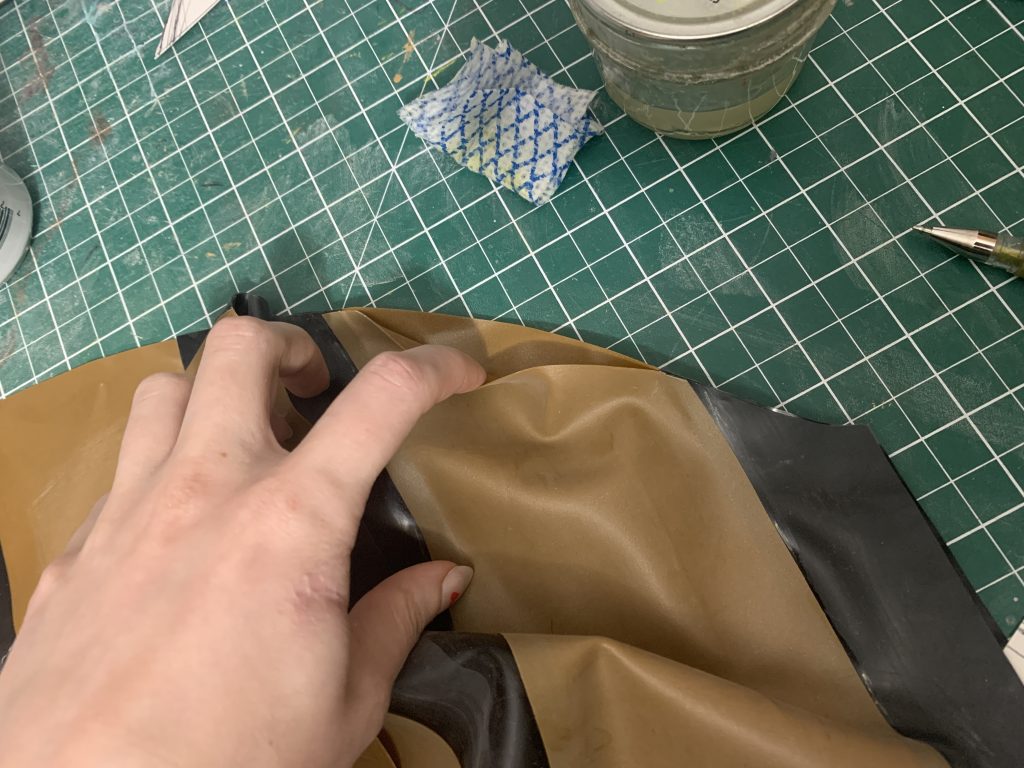
To make sure everything lines up for this, I put the edges of the black stripes together and then pressed the gold together after those were lined up.
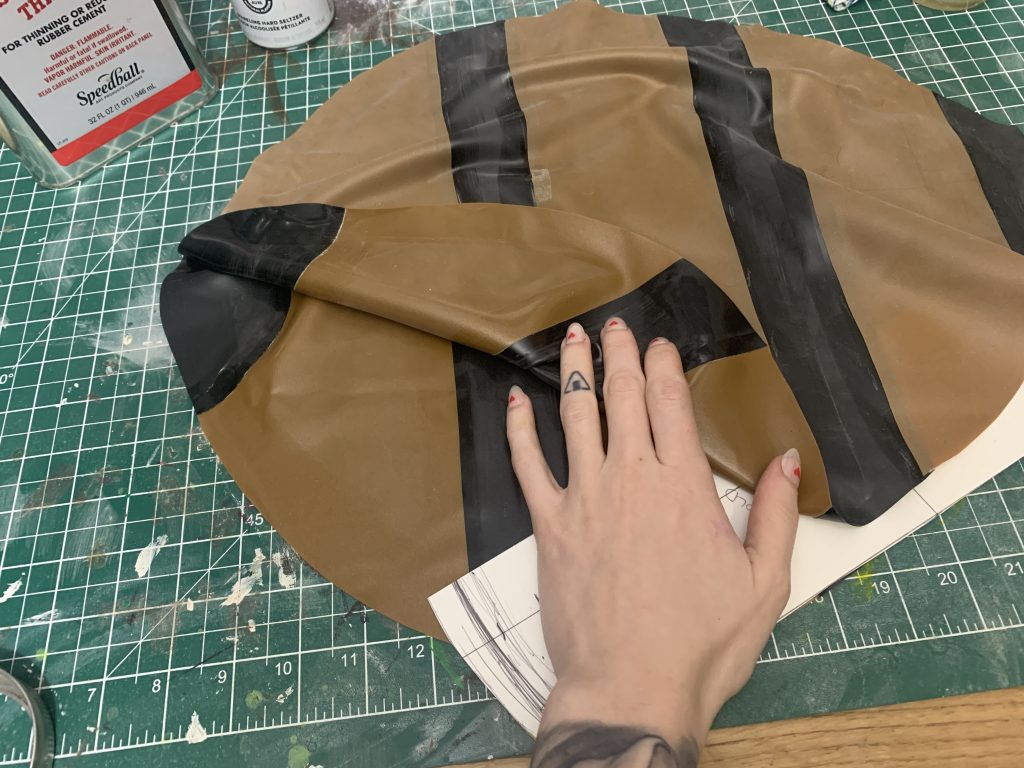
Once the top was all lined up I pulled the pattern piece from the first quadrant on the bottom …
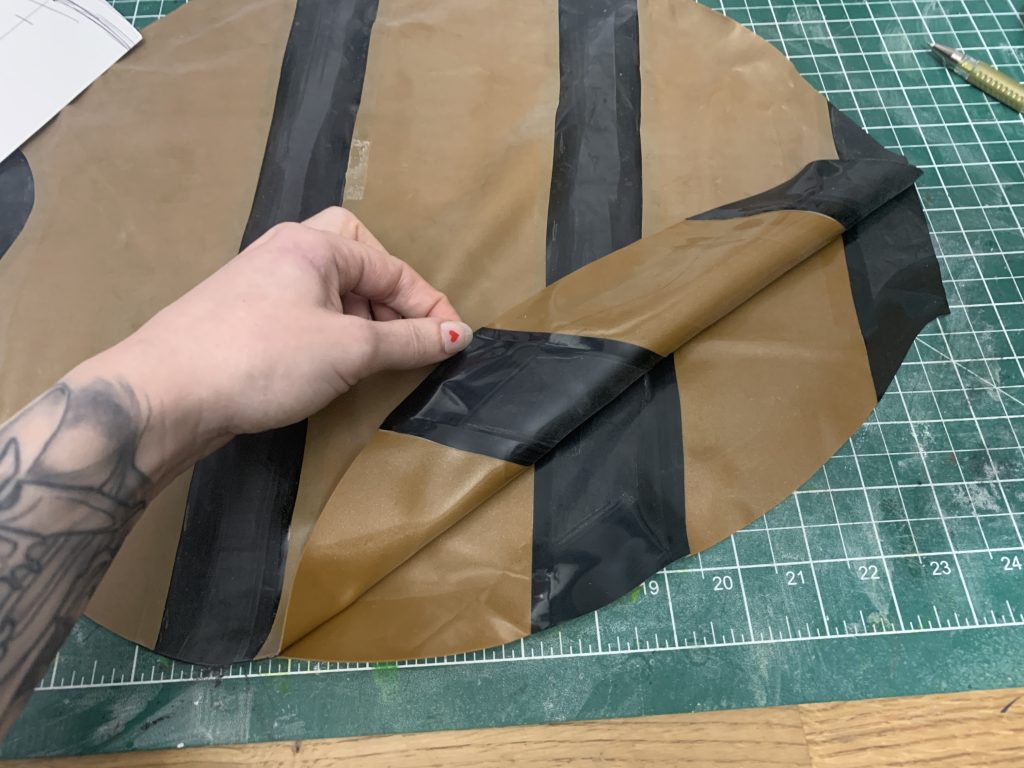
And then the last one! If you’re finding that things are overwhelming, put paper/pattern pieces over everything that’s cleaned except for the first stripe, and then work one stripe at a time.
Give everything a roll like a regular seam to really push it together, you want it to feel like it’s permanently adhered at this point, because if stuff slides around you’ll have to do all of that again.
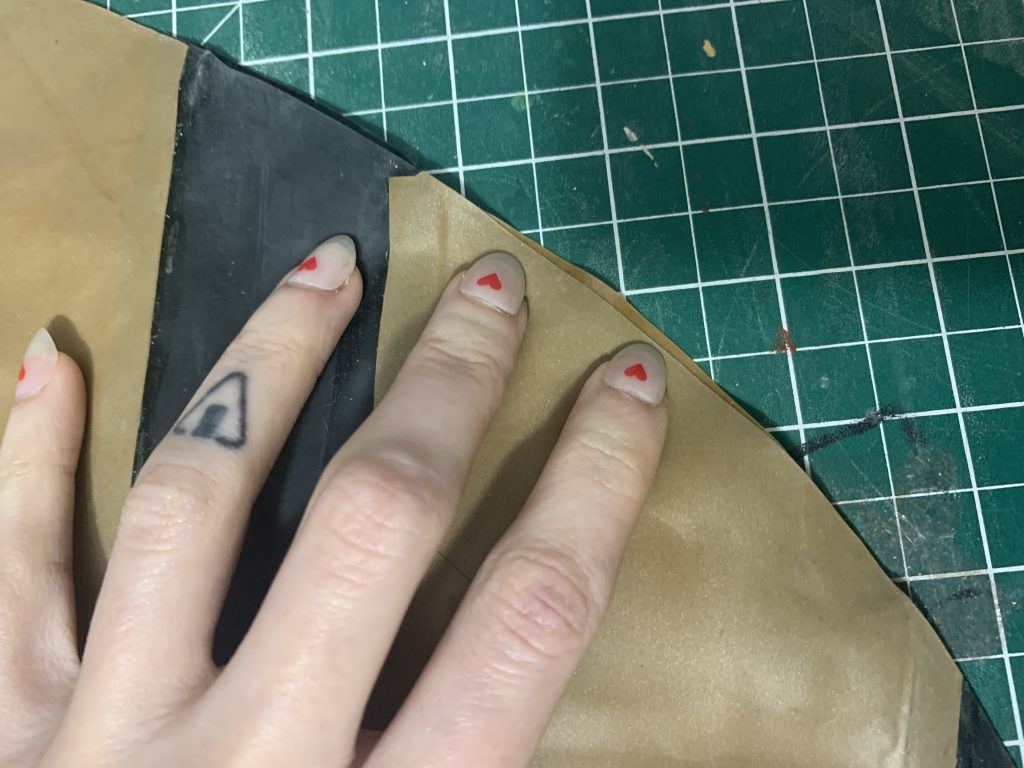
You’ll probably have little irregularities like this in the pattern because you’re human; go ahead and carefully rotary cut all of these off now. (Remember to flip the tail over and look on both sides.) You want the pieces to match up as near to exactly as possible.
The next step is to actually adhere the two halves together with glue.
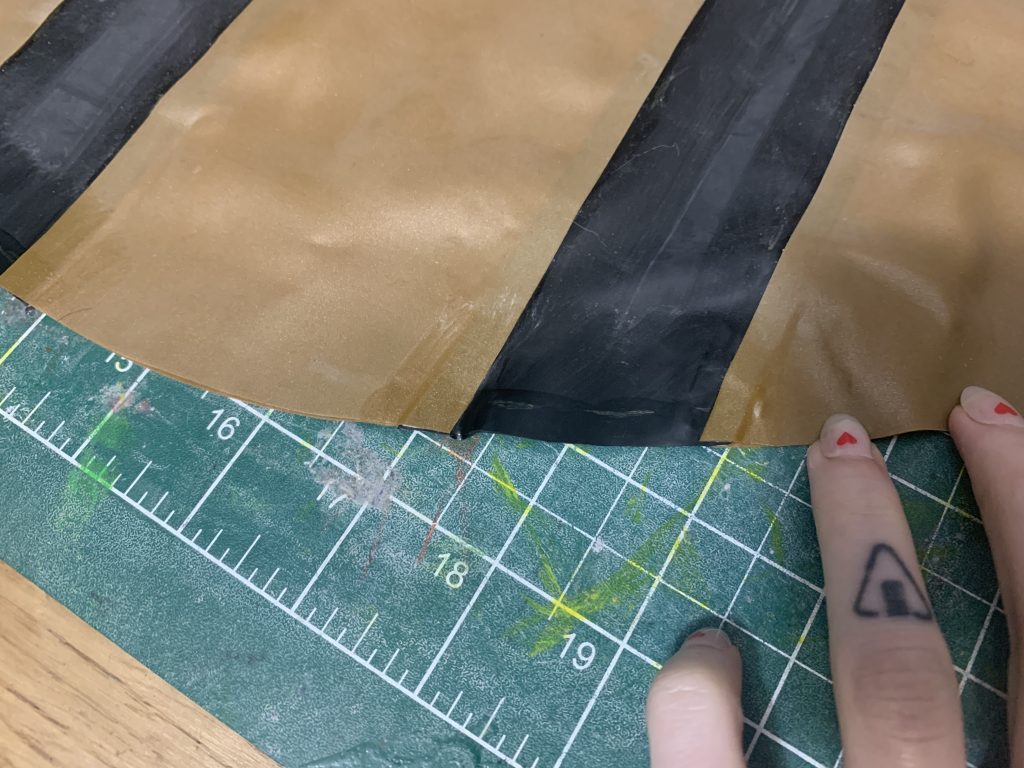
Now, remember you’re working from the inside, so everything that’s visible on the top has to go down first. Because the black is the top piece, we want the black reinforcements to match up exactly with the seams, so we’ll do those first.
I started by prepping all of the black bits, including their seam allowance, and a long strip of 1/2″ black trim. The seam allowance marked down for glue is 1/4″, so half of my strip of reinforcement.
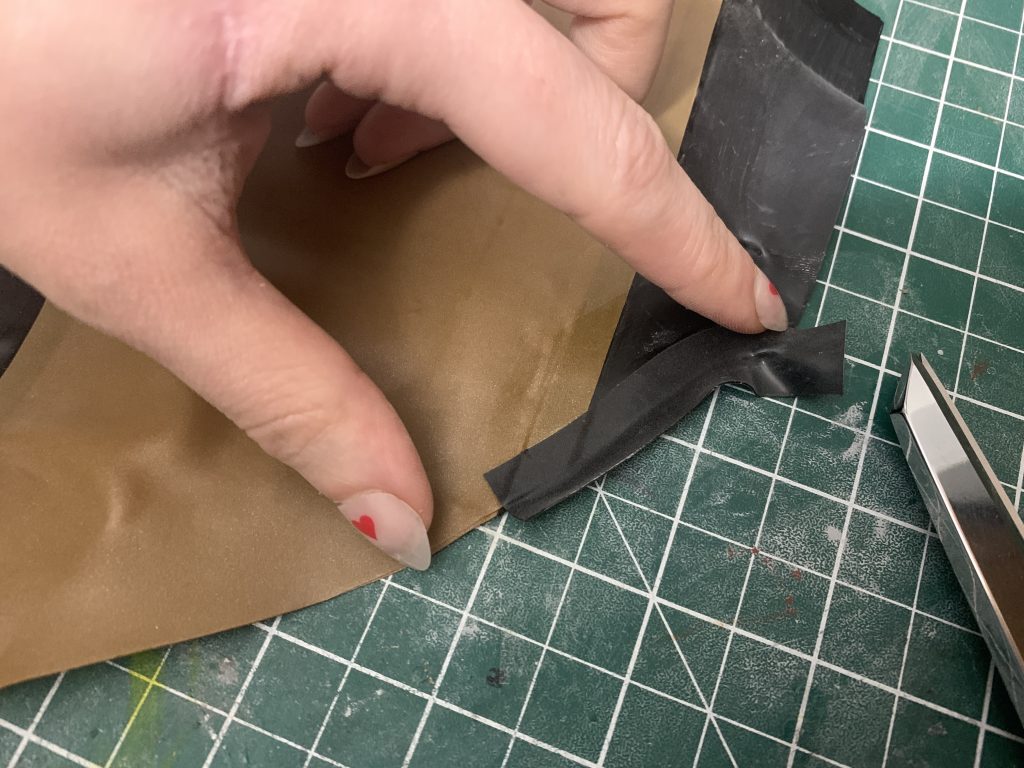
On the “base” of the inflatable (where it’s going to attach to the rest of the bodysuit), you’ll want to leave 1/2″ or so. (This will help reinforce this and really make sure that it’s 100% airtight.) Then for each bit, we want to line it up exactly with where the seam allowance ends. I generally do this by gently pressing the black down, marking where I want to cut with a gel pen line, pulling a 1/2″ or so back up (which should be easy before the seam has been rolled), and then cutting it with a very sharp pair of fabric scissors. (If your scissors are too dull, they won’t cut through the latex in one fell swoop, and it’s better to then pull up a little more and cut that with a rotary cutter; you don’t want stutter cuts on the edges of your reinforcement because they make everything more likely to give, and less likely to be airtight!)
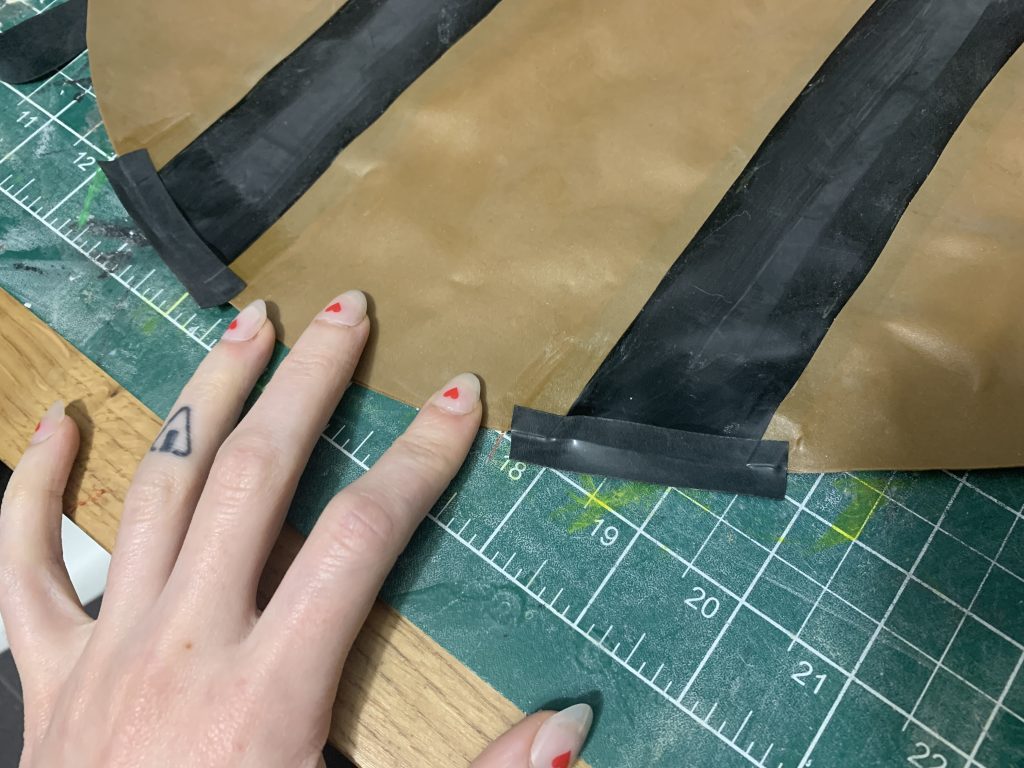
Do this for every piece of black, matching up the seam allowances in the middle of each piece of trim — the middle is the only part that will be visible from the outside when you’re done, so don’t worry so much about matching it on the inside. Roll all of them to set them in place.
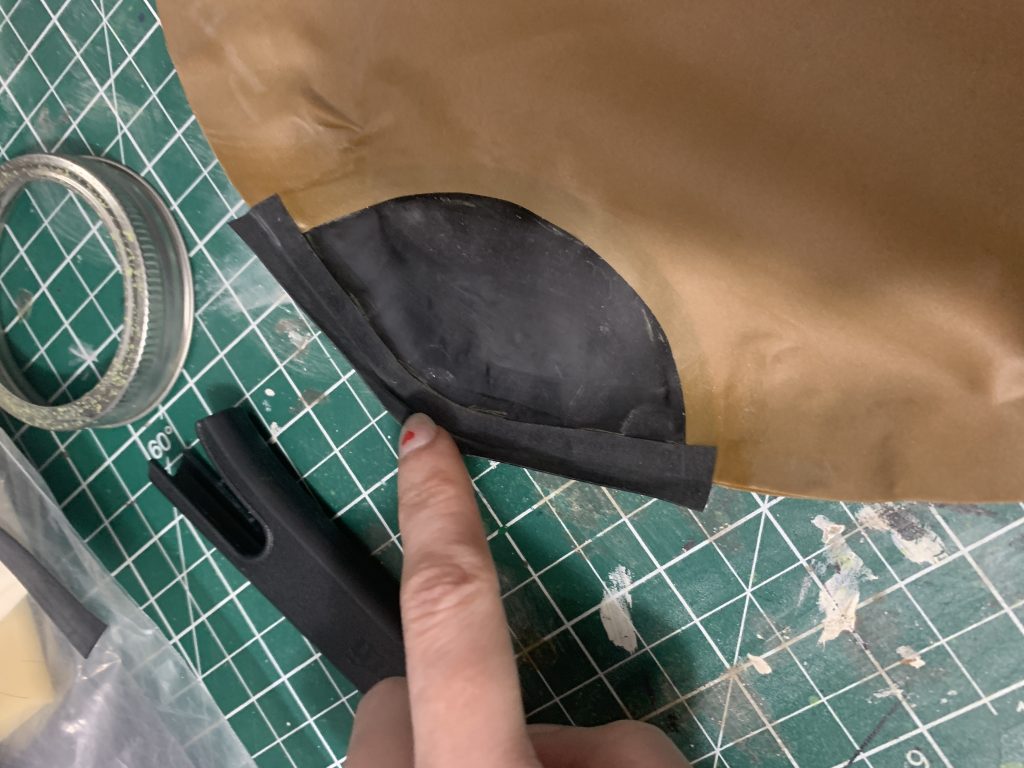
This particular piece of trim, you’ll have to put on like a curved seam, but all of the stretch is going to go into the piece of trim, and none in the inflatable itself.
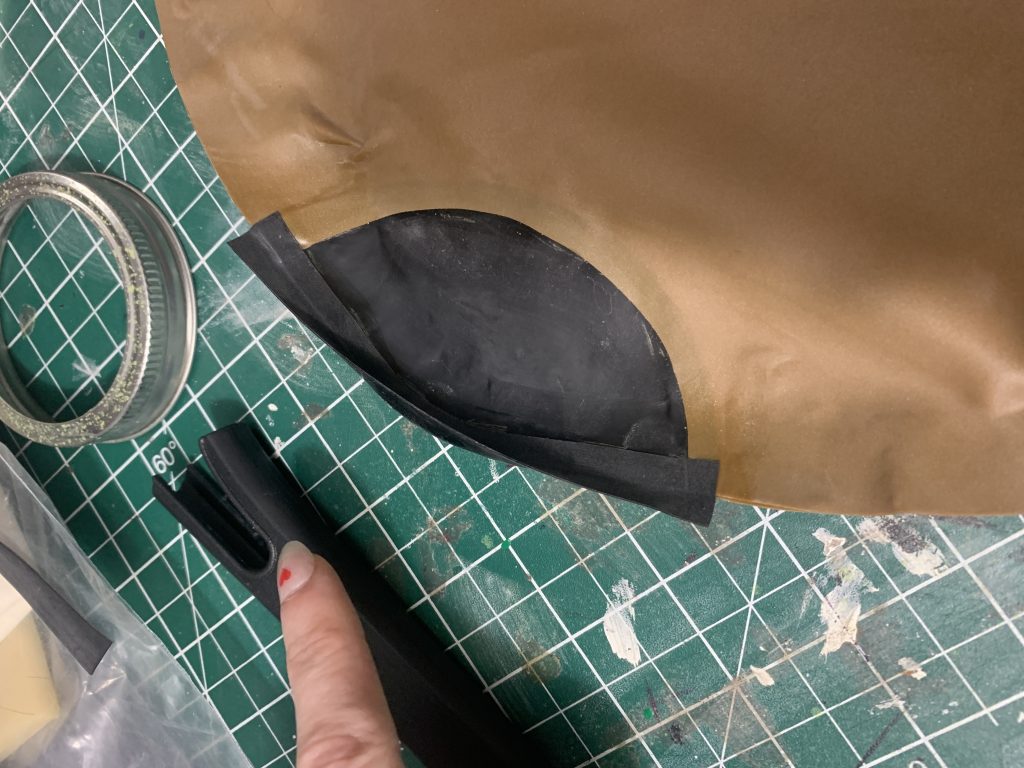
It’s going to look like this when you’re done, which is totally fine!
Now we’re going to flip the thorax and do the other side.
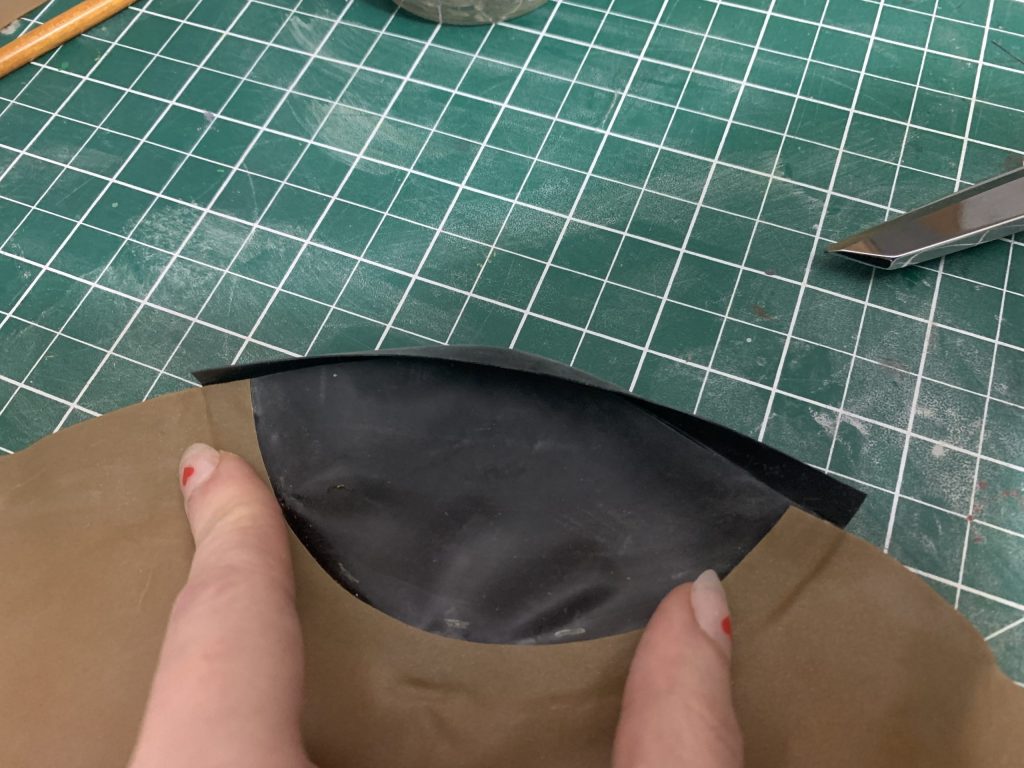
When you flip this curved piece over, it will do this, which will actually make your life easier installing it on this side. (Just like the tips of the fingers in gloves!)
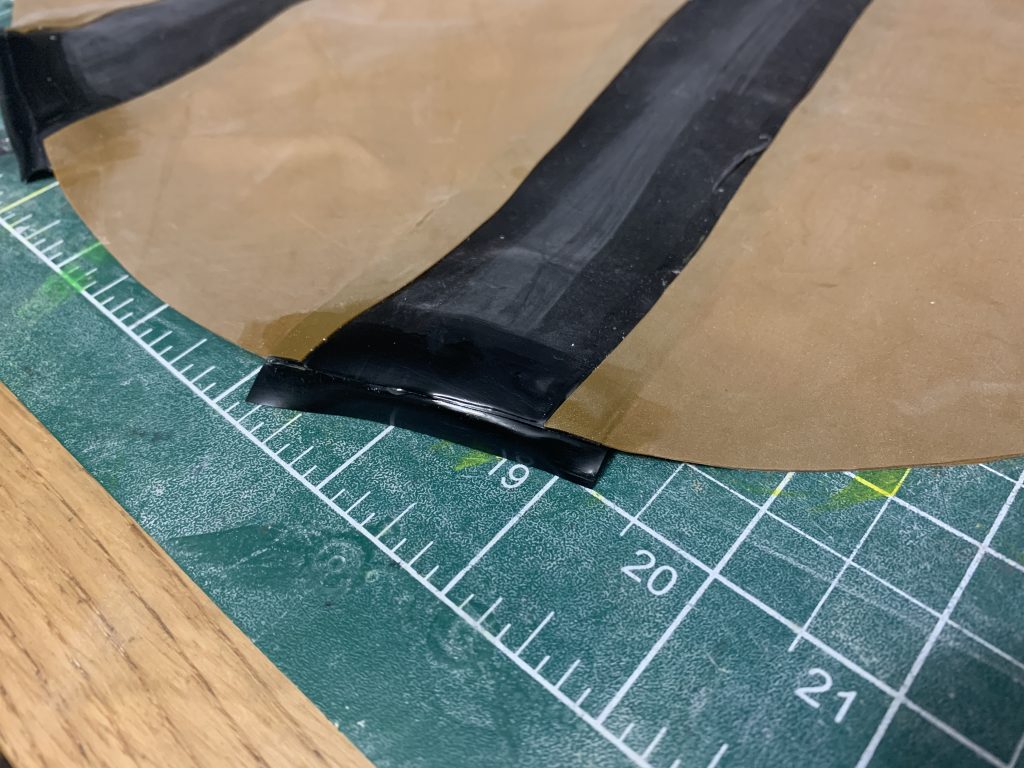
Clean and apply glue to everything again — I like to also clean and re-apply glue to the trim, just to make completely sure that I’m going to get the cleanest seal possible.
Folding these over has two parts — the easiest way to make sure this flips over easily and cleanly is to do the same thing as with the gloves, and push it up against the two layers, so that the trim piece stands “upright”.
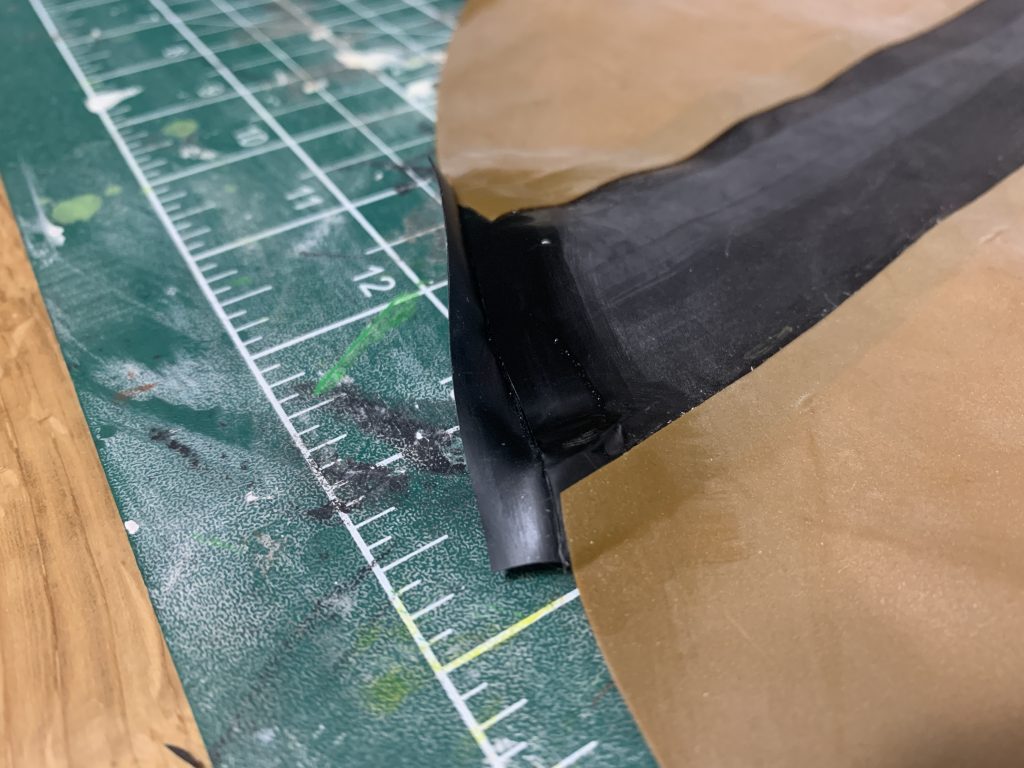
Here it is half pushed up; you’re basically just pressing the piece up so it adheres to the edge of your two layers that make up the tail. 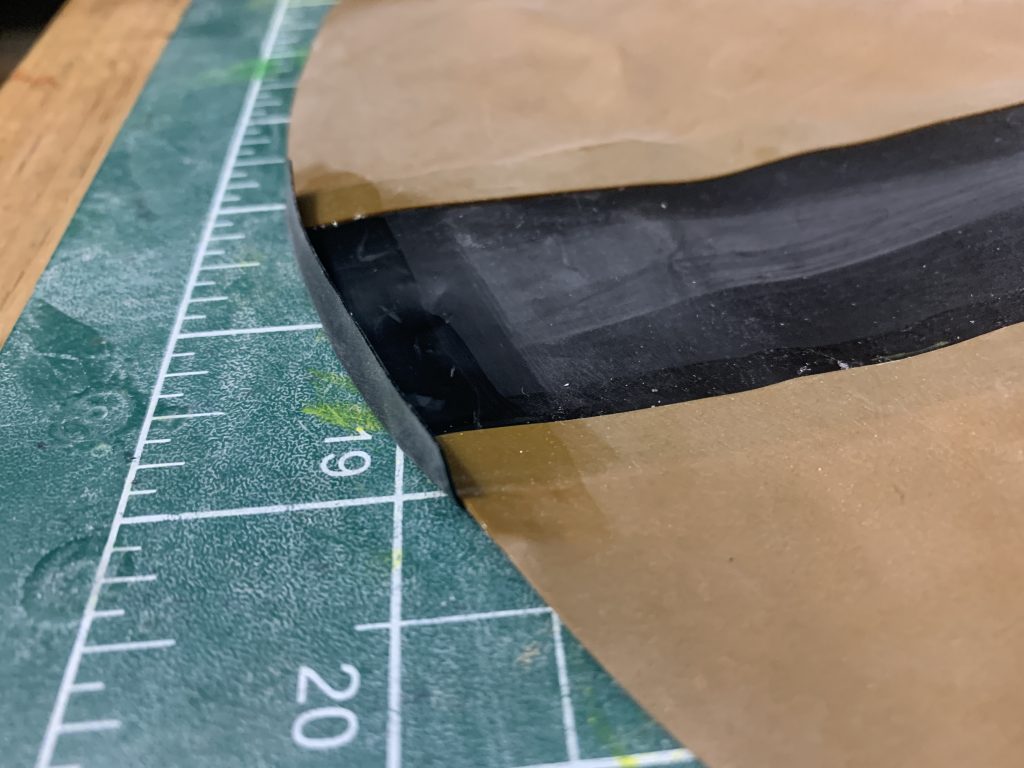
Then once the pieces are up like this, you can go ahead and push them over and roll them.
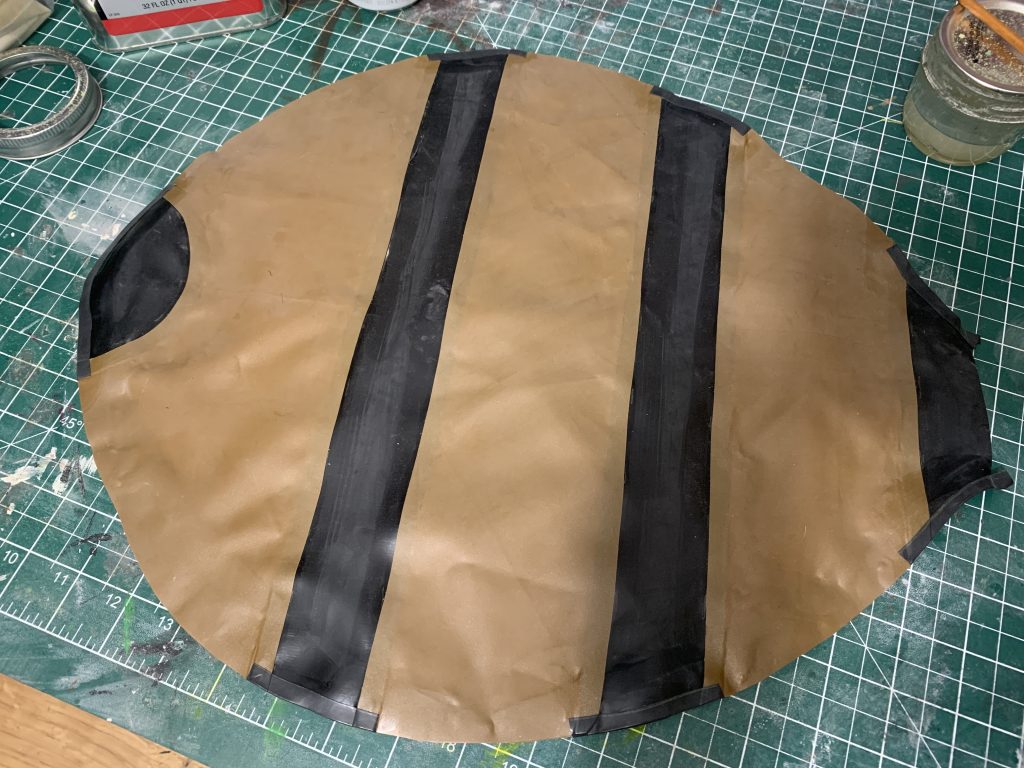
Don’t worry about the tabs on the base that stick out; don’t roll anything not on the tail, but don’t worry about them sticking together at this stage either, we’ll fix that at a later step.
Now it’s time to do essentially the same thing … but with the gold!
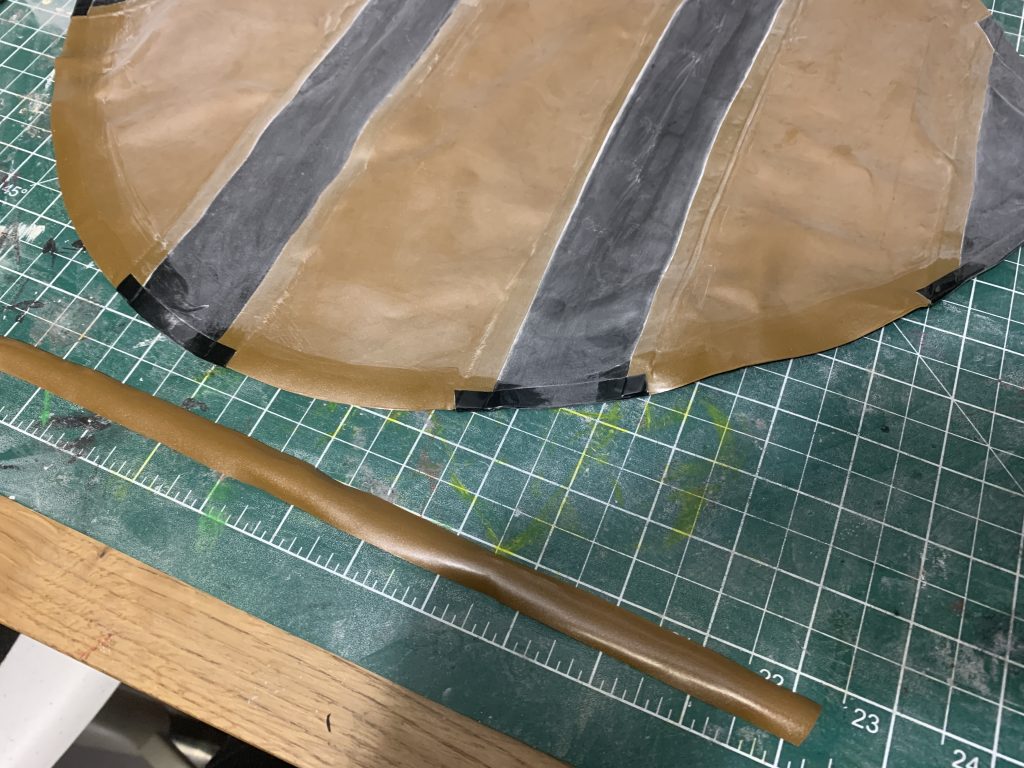
You’re going to do all of the steps we just did for black .. but with the gold! I generally overlap it about the same amount as the existing seam, just for neatness’ sake.
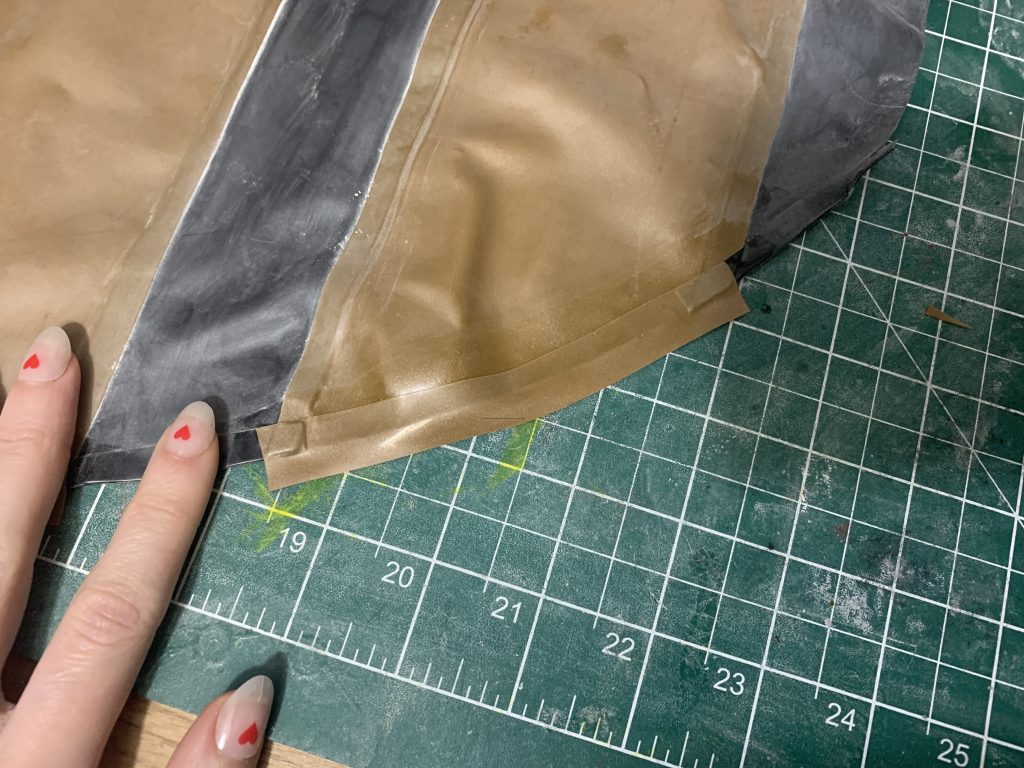
Apply all of the gold on one side, flip it over, repeat all of the steps for flipping it over, roll everything and clean up any excess glue, apply powder if you’d like — now we’re going to make sure this thing is airtight.
In an inflatable, anywhere seams on your reinforcement strips are a potential area of air leakage, as well as where tour colour blocking seams meet that reinforcement. Personally, I treat every one of these like it is already a leak, before I’ve ever inflated it. This has cut down on my troubleshooting time immensely — I’ve made three of these Honeybee Butts this way, and I’m three for three on them being 100% airtight.
To plug a leak in an inflatable, you fill the leak with liquid latex — which you should already have on-hand if you’ve been doing zippers! I just use regular ol’ mold-making liquid latex from the art supply store, but there’s no real different between mold-making liquid latex and cosmetic liquid latex except for the thickness, so feel free to use whatever you can get your hands on.
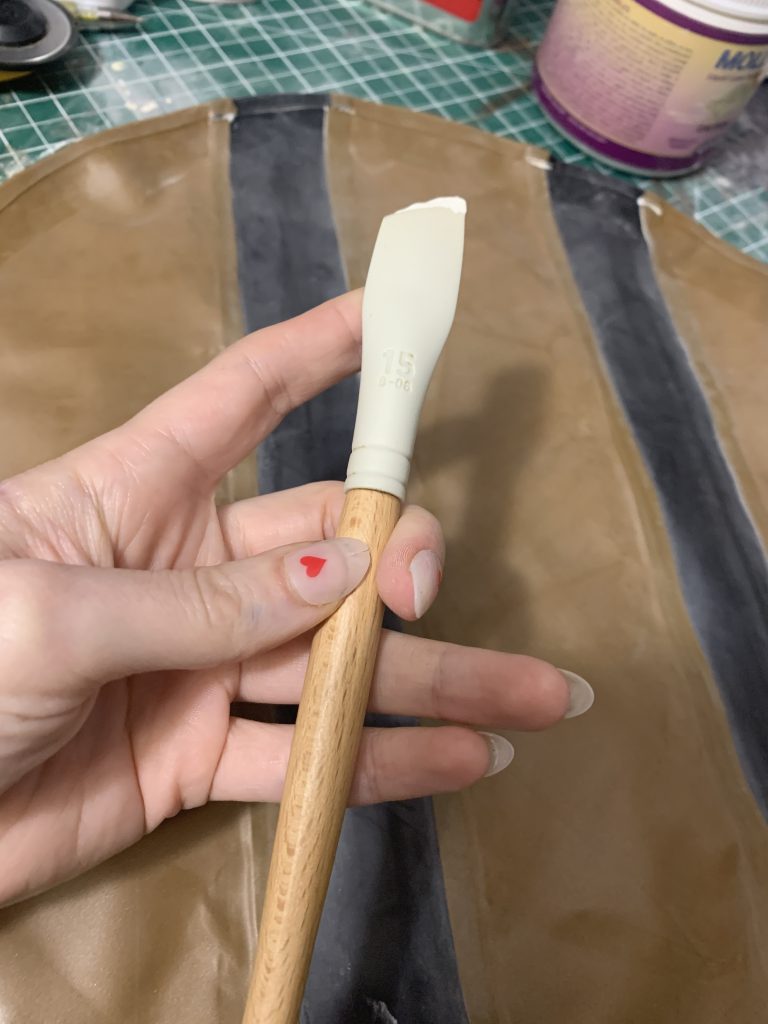
I apply my liquid latex with one of these — this is a silicone brush, again from an art supply store. Latex doesn’t adhere permanently to silicone, so you can either wipe the liquid latex off while still wet, or peel it off when it’s dry. This was a great investment for me, as usually if you use bristled brushes, you have to throw them out after a couple of uses, when they get too gunked up from liquid latex in their bristles to function properly.
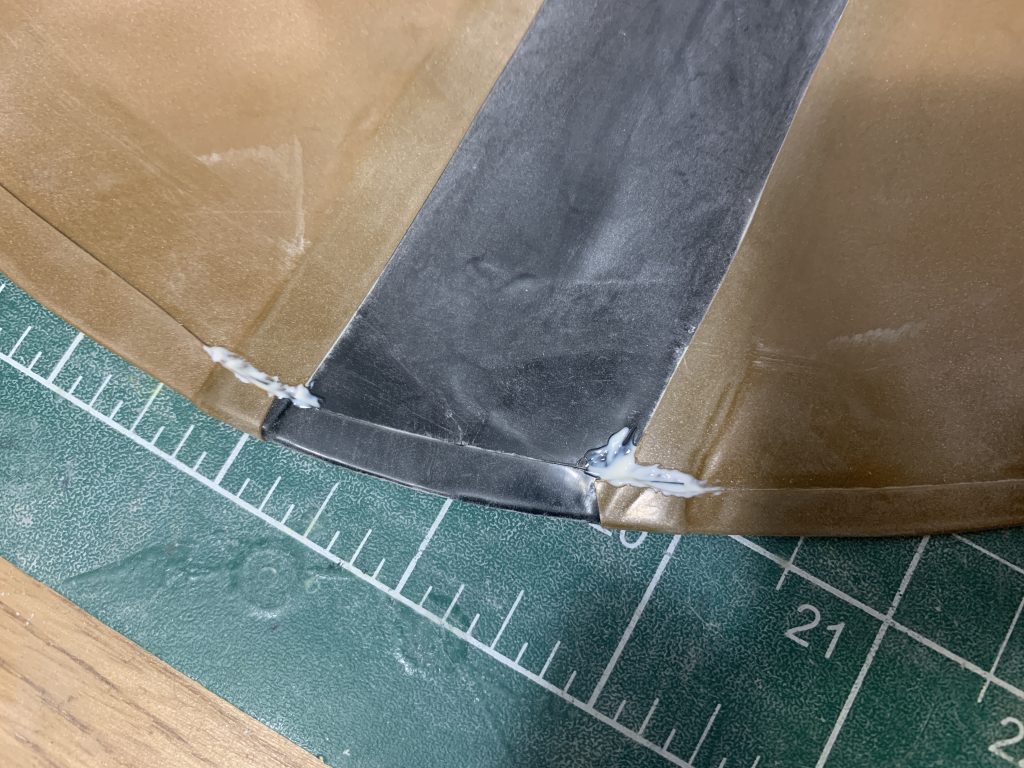
This is how to reinforce the edges! I pack everywhere there’s an overlap with liquid latex.
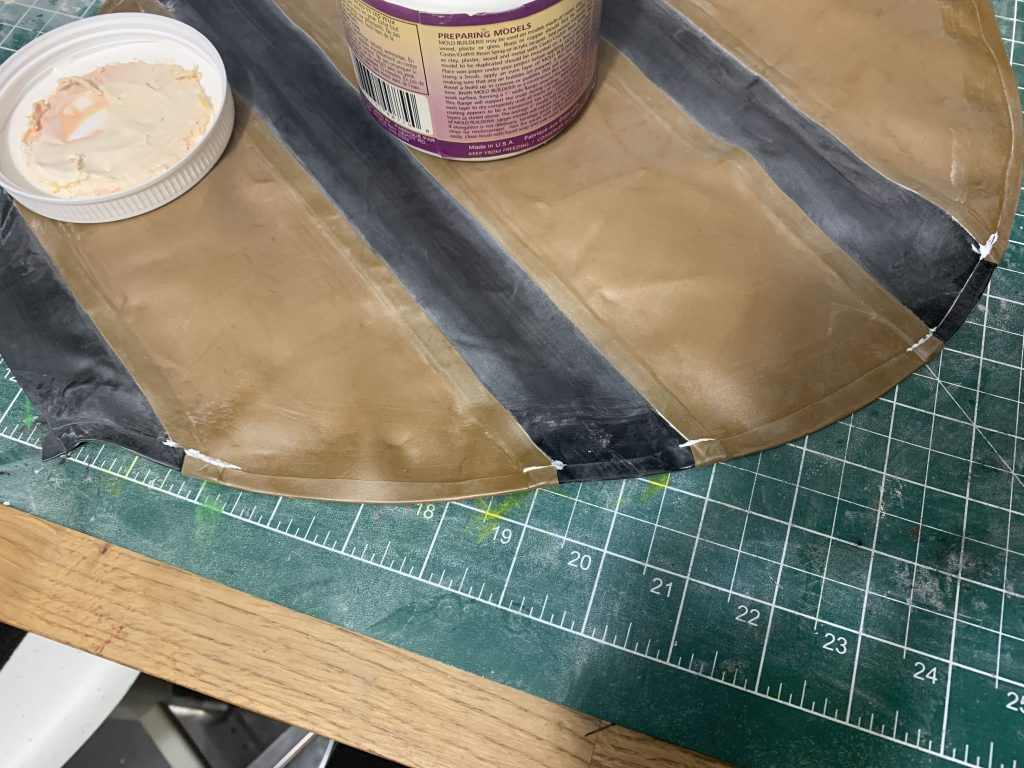
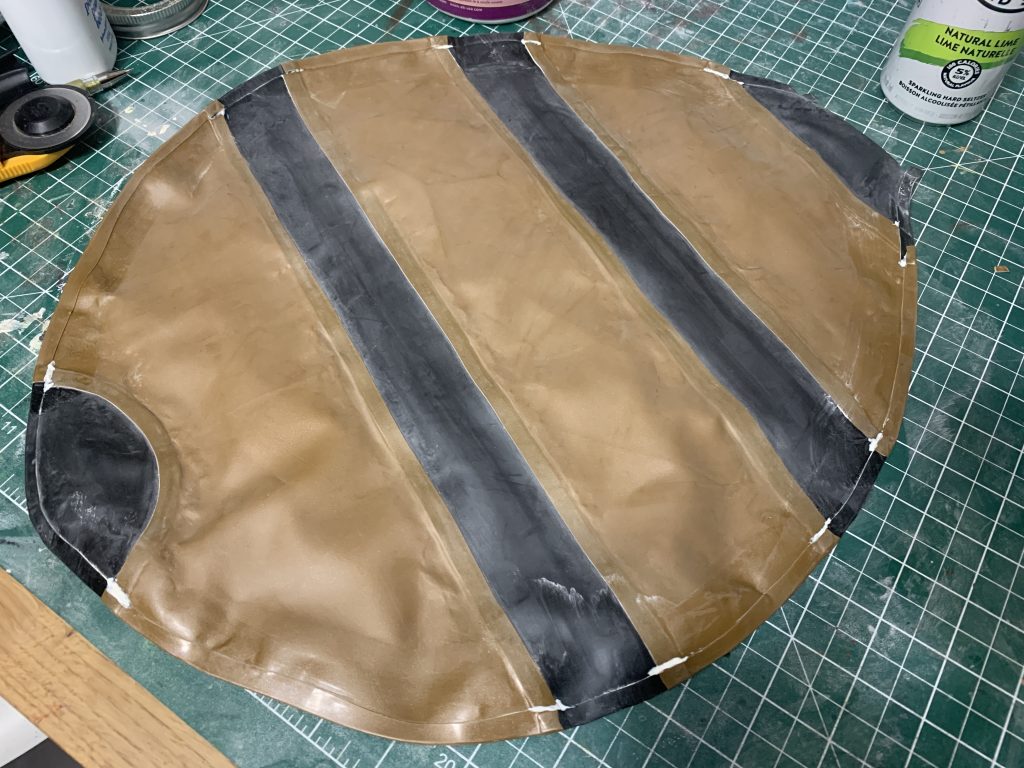
Leave this to dry completely — you’ll be able to tell it’s dry when the liquid latex has gone more or less clear.
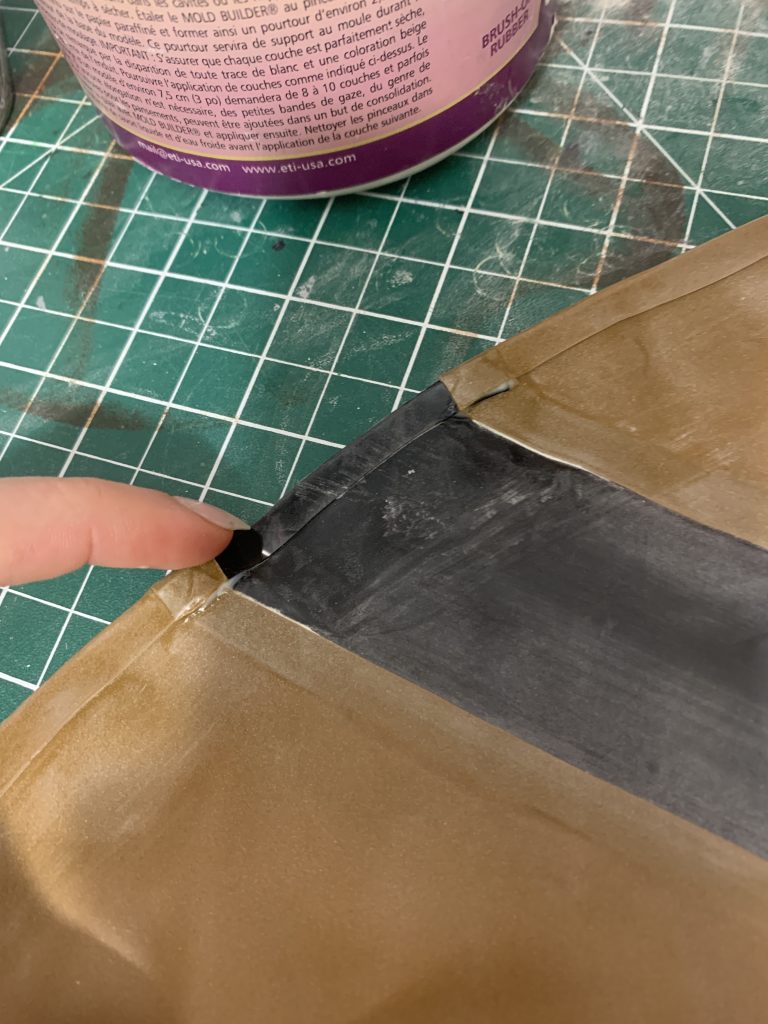
You’ll see the one by my finger is only mostly dry, while the top seam is just about completely dry.
Repeat that process, but on the other side of the inside of the tail, and leave that to dry as well. This whole process will take a couple of hours.
Now we have to do that, but on the outside.
To flip the tail to the right-side-out, we’re going to pull it through the “base”, where the tail is eventually going to attach to the back of the bodysuit.
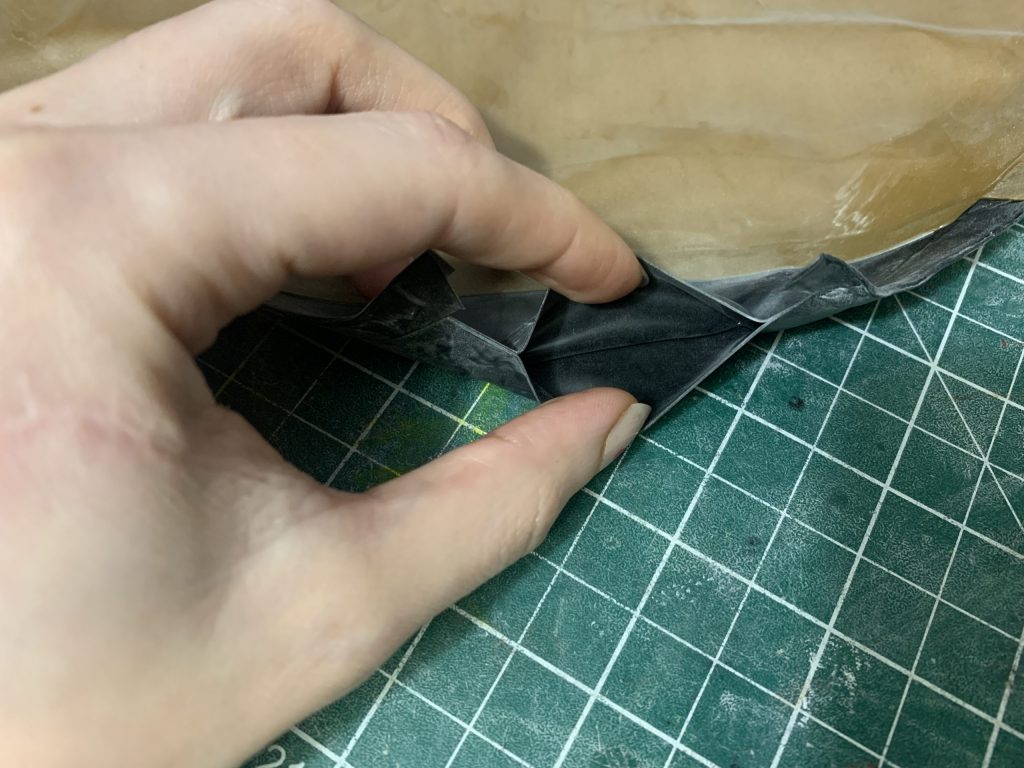
Here it is! This should pull apart easily, but if you were overzealous with your cleaning, it might be adhered to itself — in which case, just pick a part further back in the tail that isn’t stuck to itself, and gently pull the two sides apart until you get back to the opening.
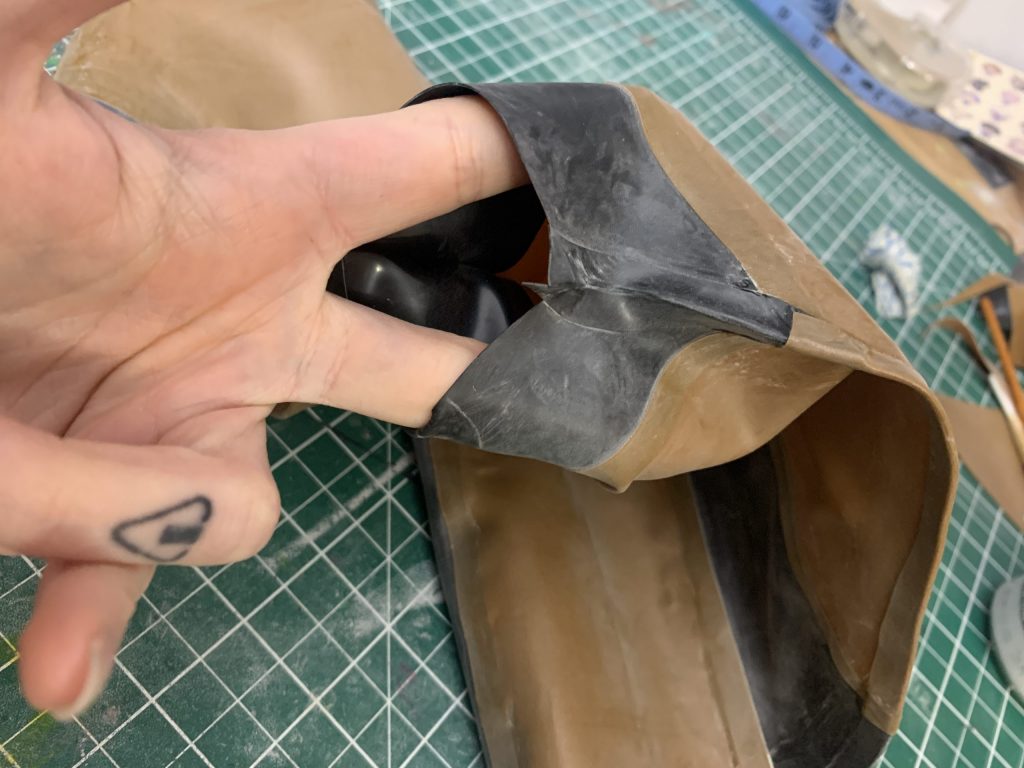
You should then be able to gently pull the edges that are just adhered with cleanliness, like so, and then pull the rest of the honeybee tail through this opening.
Once it’s right-side out, finish pulling any of the edges that are still adhered to each other, you should be able to see how good a job you did on colour-matching your colour-blocking with your reinforcement!
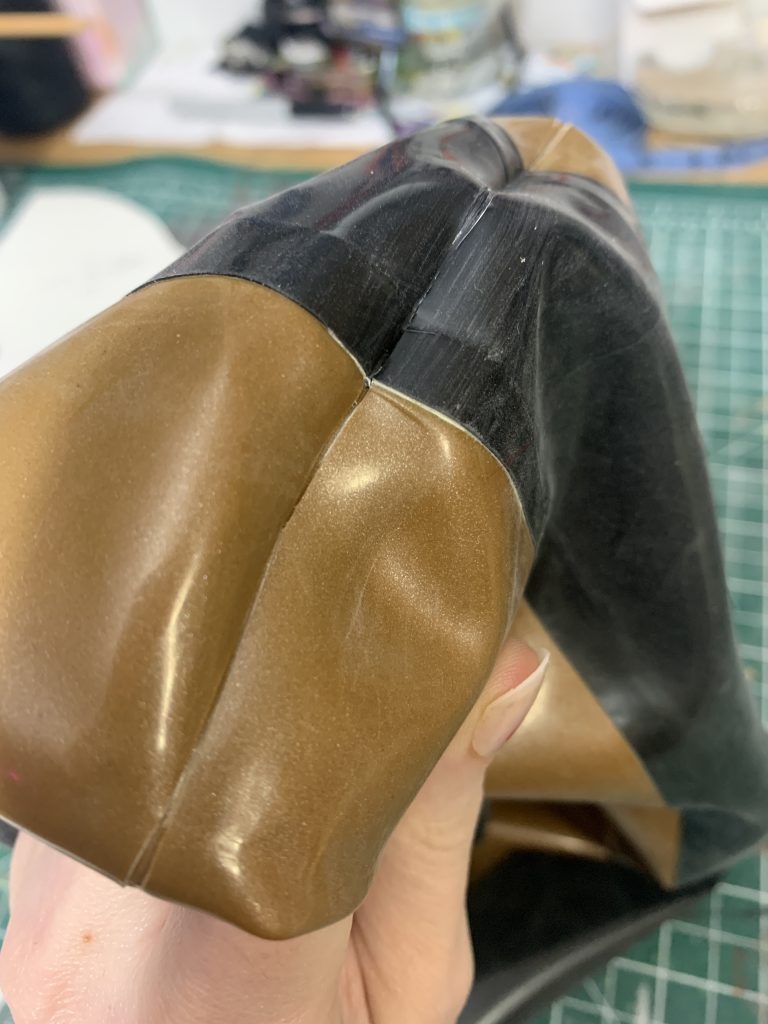
This is the time to clean this as well, gently scrub the seam here until it more or less lays flat. It’s ok if it still pushes inwards a bit, like you see in the photo — don’t scrub so hard the glue on your seams start to come undone. It will probably look something like this, laying flat on your table:
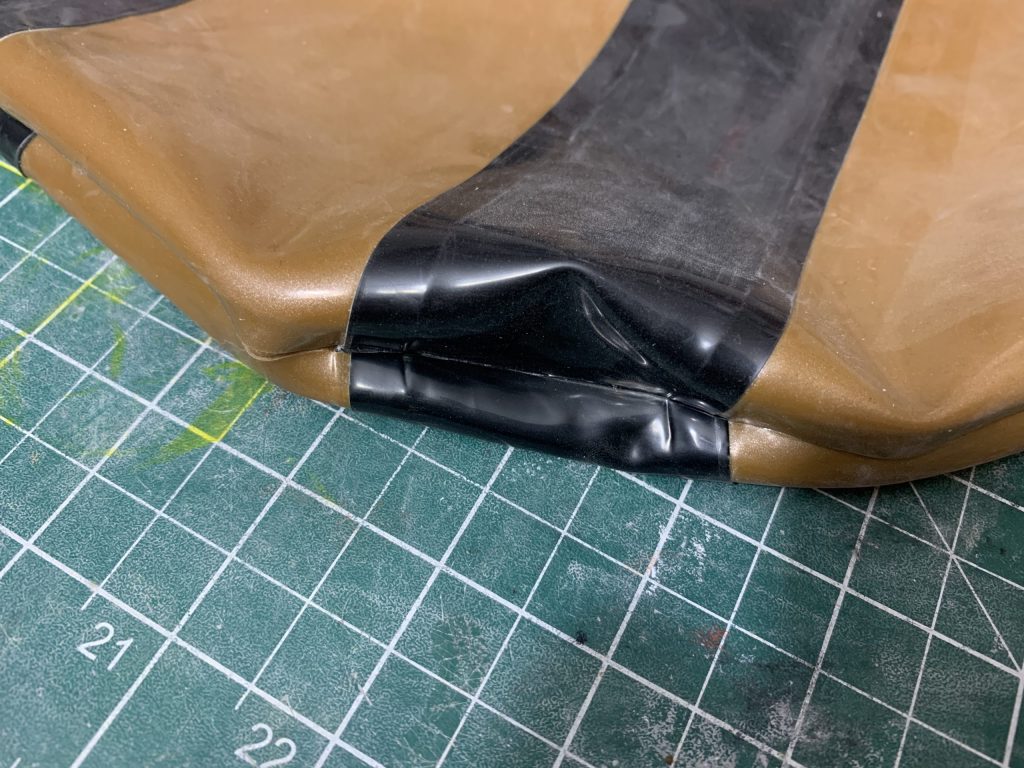
This is fine, the air inside of the inflatable will force this outwards. Just make sure you give everything a good cleaning and powdering.
We’ll reinforce all of this with liquid latex as well, but here I took a brief break to deal with the “base” of the inflatable. (I was just tired of waiting for liquid latex to dry and wanted to accomplish something! 😂)
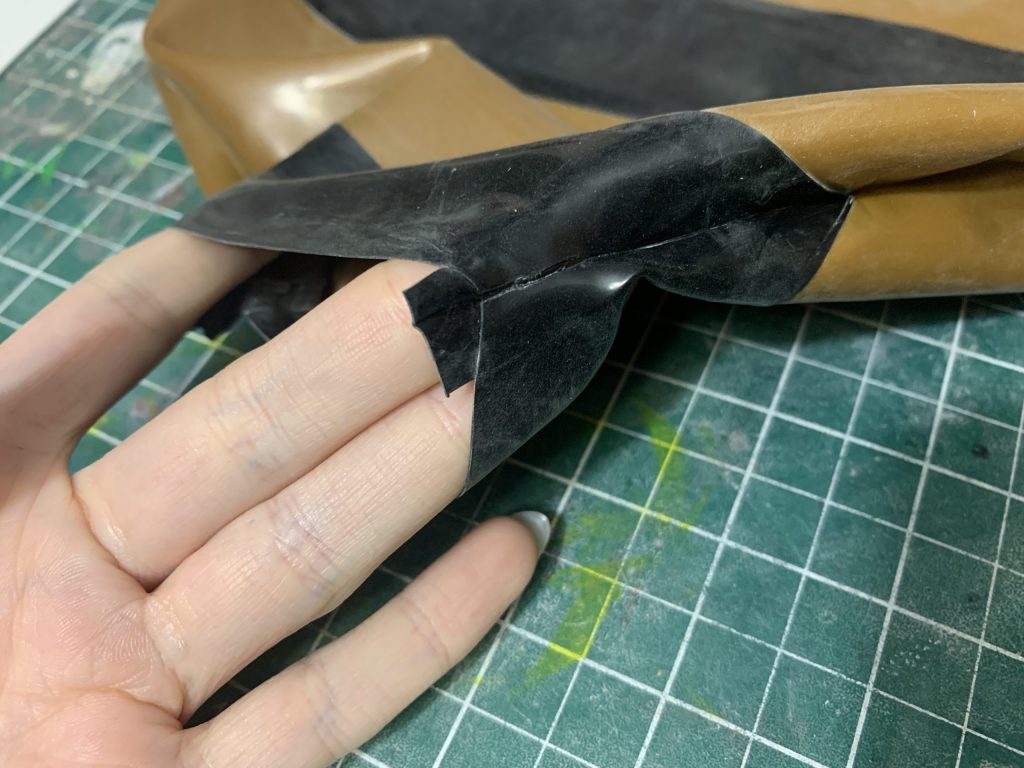
Remember this little tab? Clean and glue that and the area you’re going to fold it over onto, and then do that. This finishes the reinforcement on the end of the inflatable, and it doesn’t matter if it looks pretty, this will wind up on the inside of the inflatable.
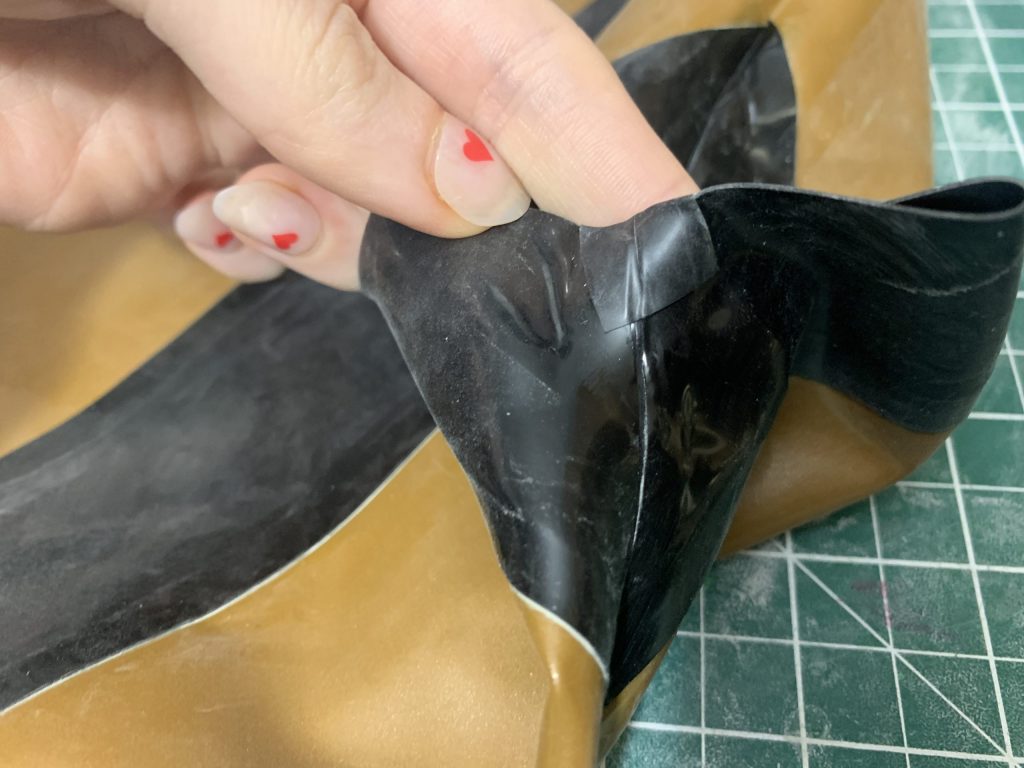
Now we’re going to take this Seam Allowance that we added on, and we’re going to fold it under. This will make a lip that we can adhere to the bodysuit. Ultimately, we want one lip inside, and then we’re going to apply another piece of trim outside of the inflatable, which will make a seam like an upside down “T” — one half of the top of the T is the inside lip, one half is the additional piece of outside trim, and the body of the T is the inflatable.
It sound complicated, but it’ll make sense when we finish.
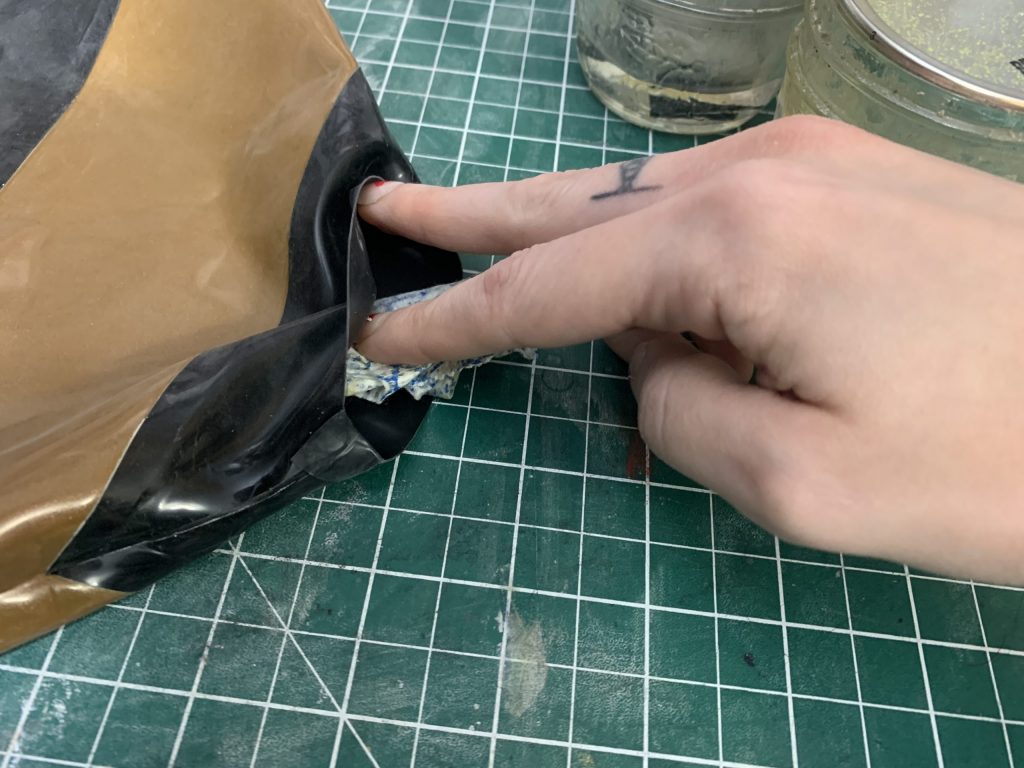
We’re going to fold this lip under, but we don’t want it to be permanent, so we’re going to use the same cleaning trick we did with the body of the inflatable. Clean the inside of this lip really well …
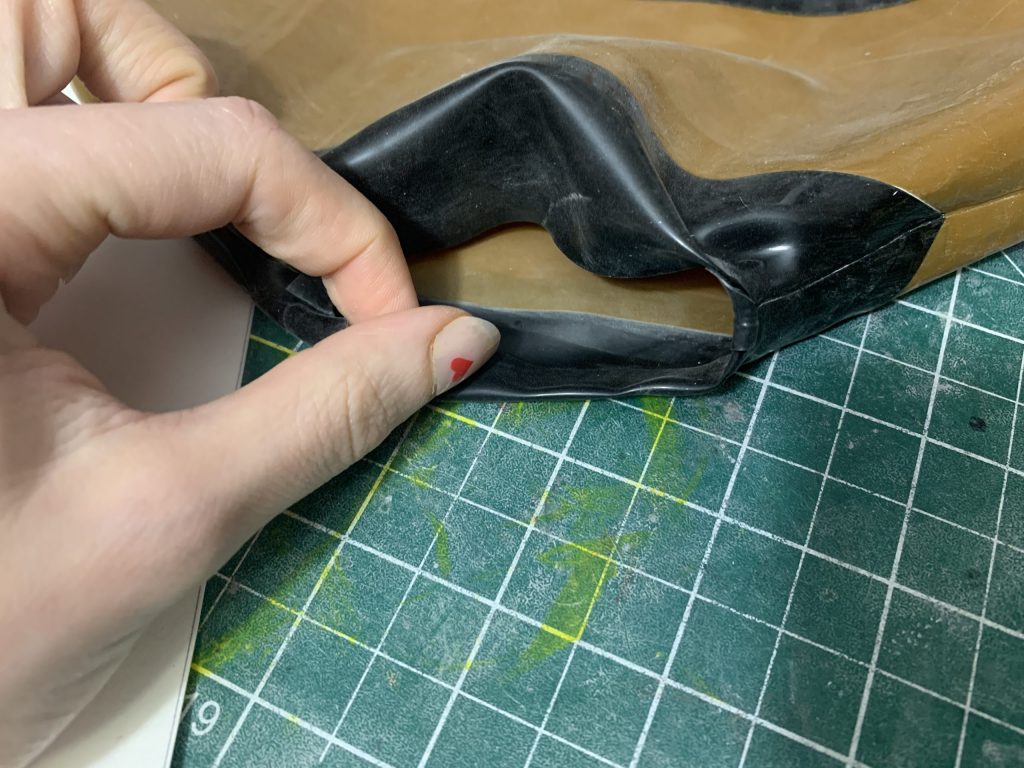
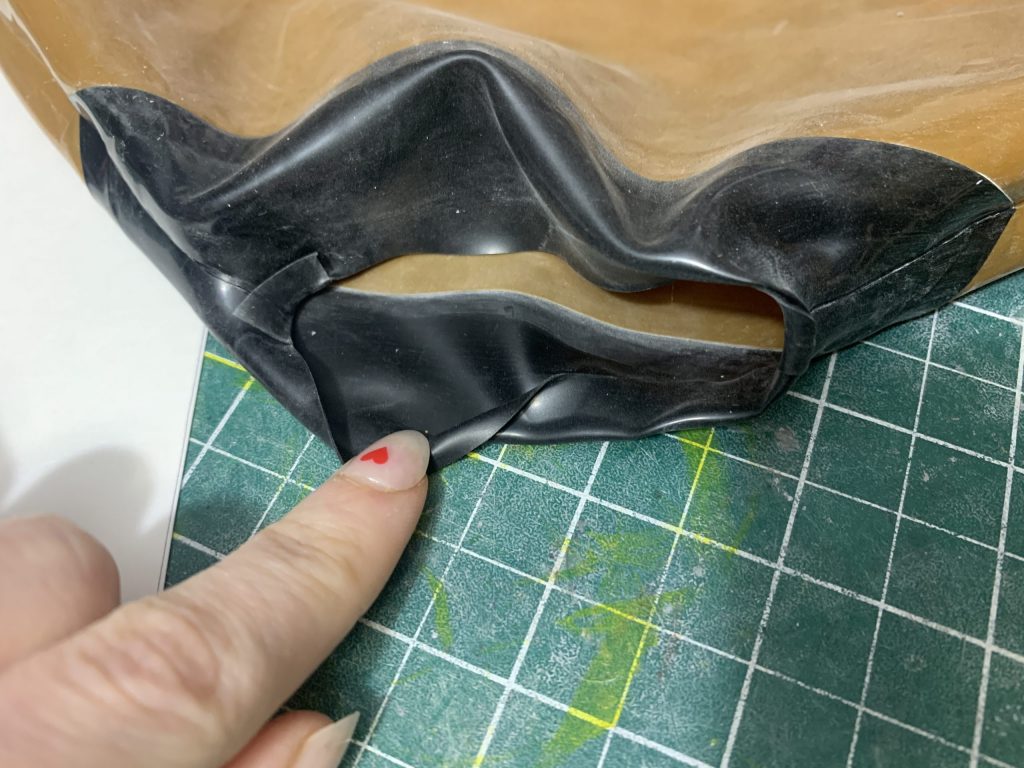
Then gently fold it over and adhere it to itself on the inside of the inflatable. This doesn’t have to be super clean, it just has to adhere and stay in place until you pull it out again, which will be after it’s glued to the bodysuit. I generally roll this part, to really make sure it stays.
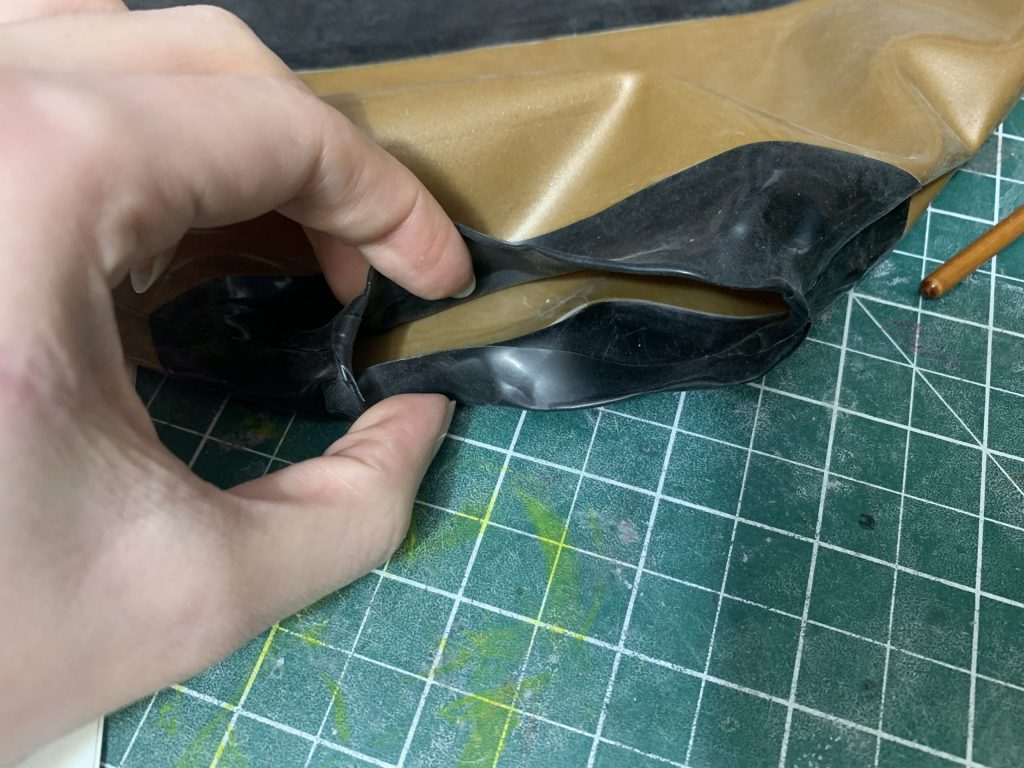
Here it is, after it’s been rolled.
Alright, that accomplished, it’s back to waiting on liquid latex to dry. 😂
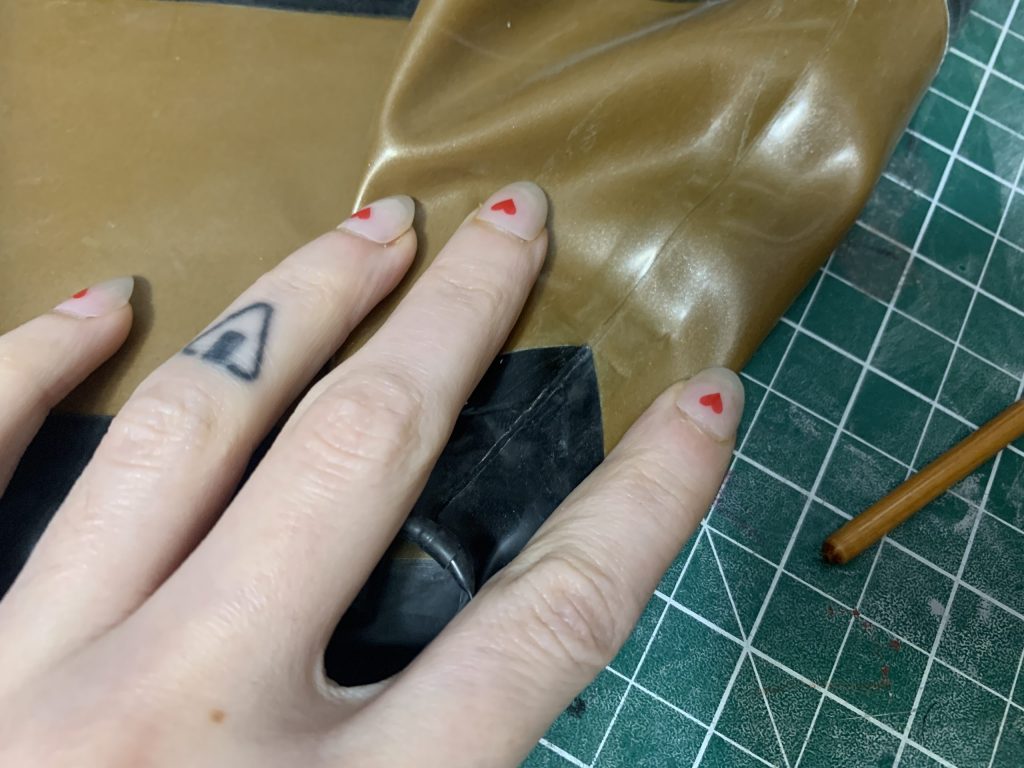
Here’s the outside of one of the colour-blocked seams. On the outside, I try to apply less liquid latex, and neater, even though you’re likely not going to see it much once it dries clear.
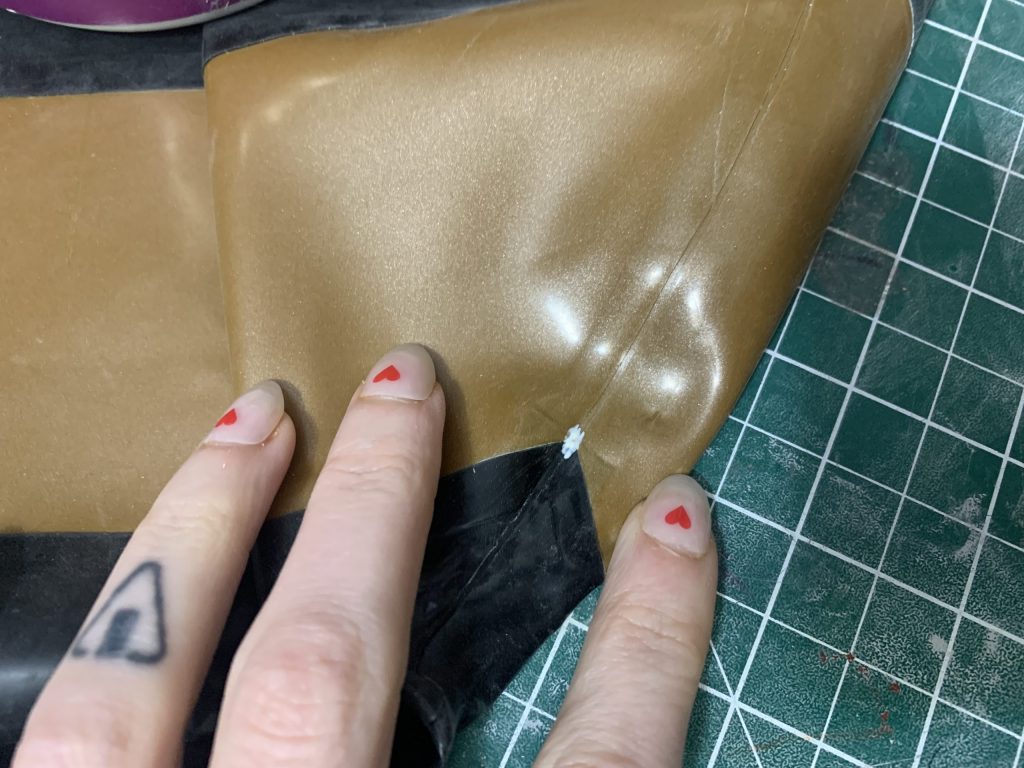
Do this on every join in your reinforcement, all the way around the outside, and leave it to dry. (Again.)
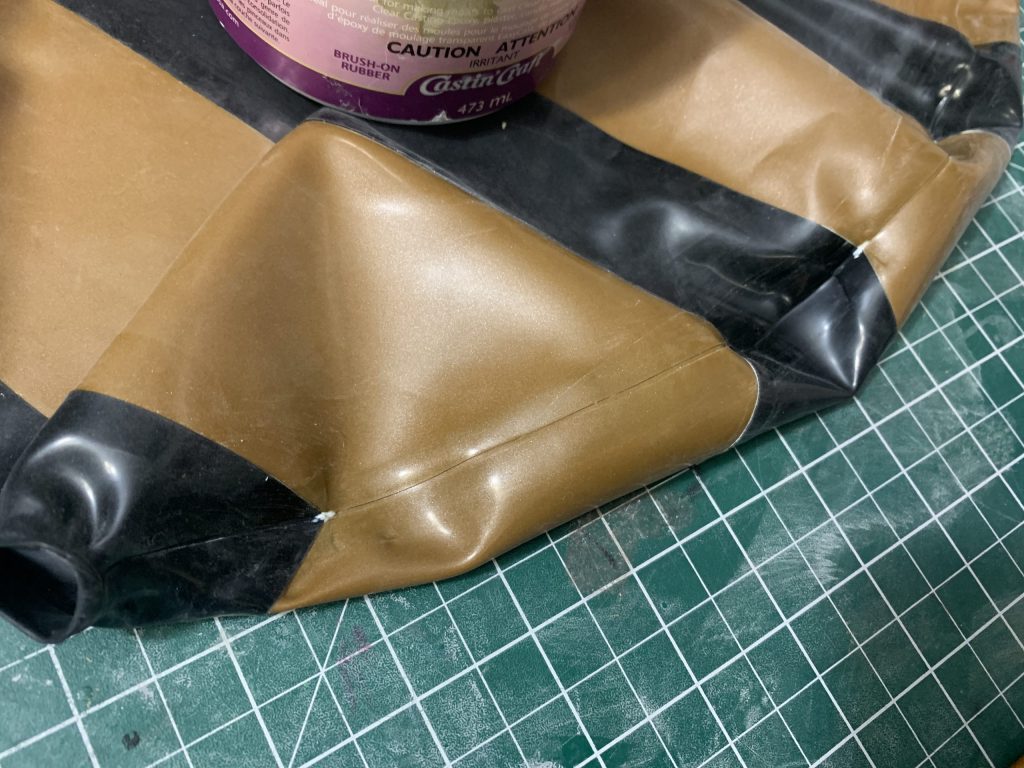
Once that’s done, it’s time for the inflatable valve!
Part Four: Inflatable Valves
There are a couple of different options for inflatable valves, but we’re going for the tried and true method with the Honeybee (because I’m still running experiments on some of my other options and haven’t gotten them 100% airtight all of the time yet).
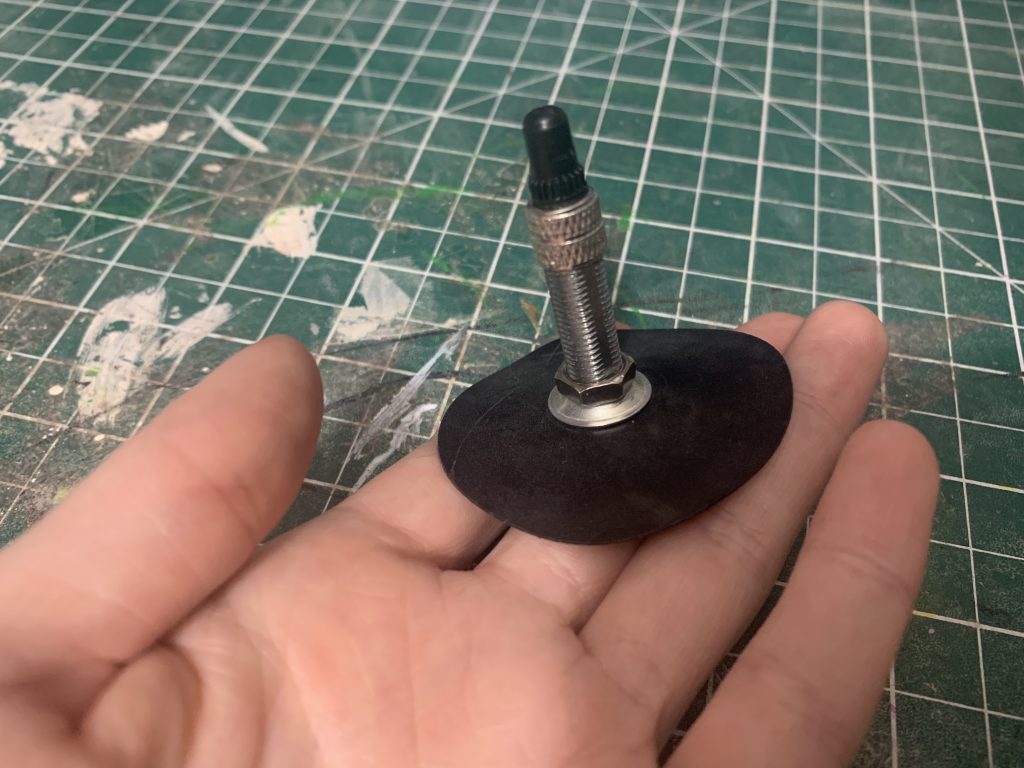
This is an airtight valve from Kink Engineering (not a sponsor, unfortunately, but you can purchase them here)!
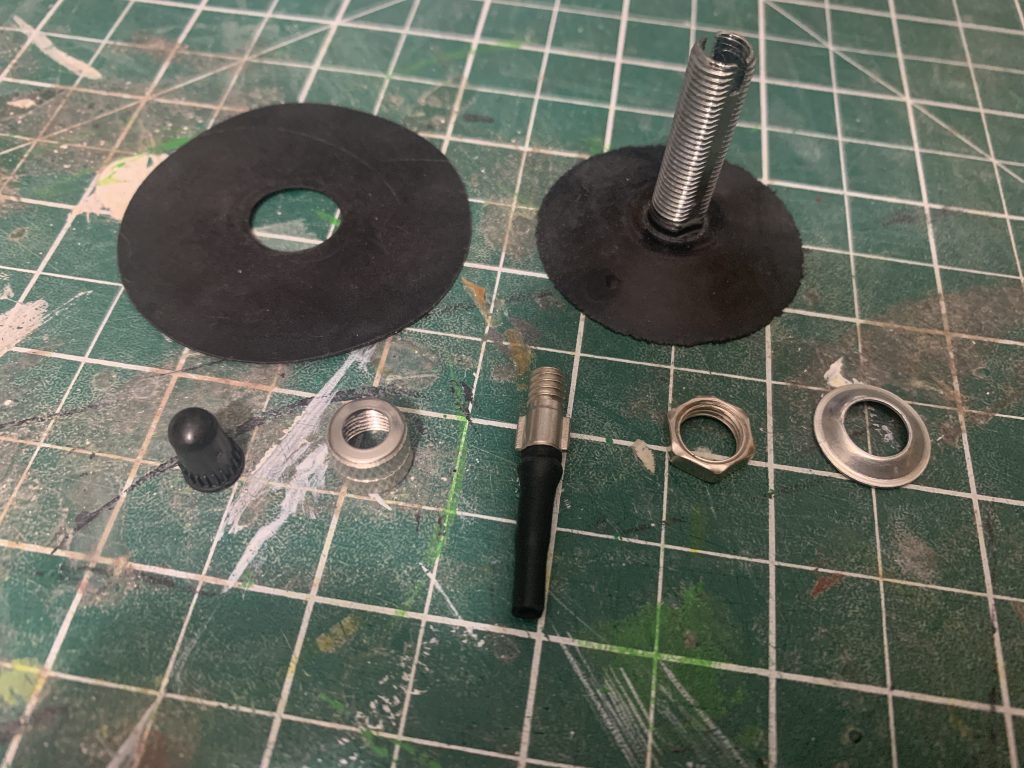
Here are all of the pieces pulled apart — top right is the “body” of the valve. Top left is the laser-cut latex piece that’s made to go over the base. The two round pieces on the right are to “finish” the bottom of the outside of the valve, the middle piece is the insert that toggles whether the valve is airtight or not, and the bottom-left two pieces are what you use the seal the valve.
The main part of the valve that you really need to be acquainted with is this part:
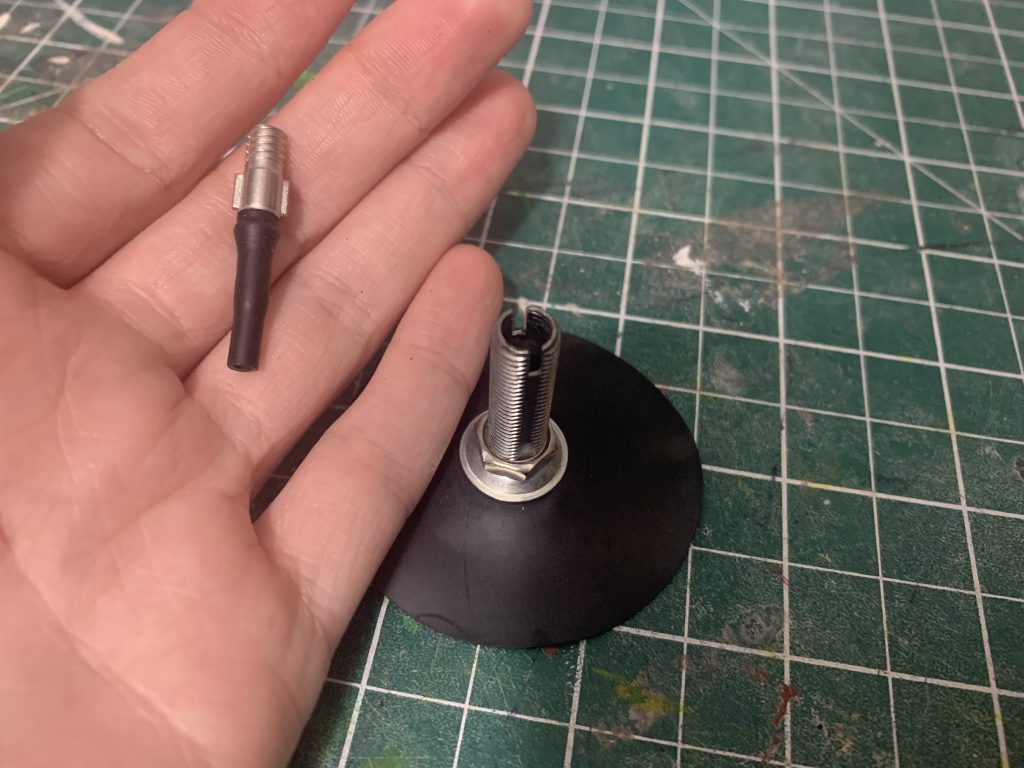
This is the part that makes the whole valve airtight. It’s actually two pieces — the metal piece, and the black rubber piece that’s pushed up over it — if that black rubber piece starts to fall down, it will make the whole inflatable leak, even with the cap on, so make sure that’s butted right up where it belongs.
When pressed all the way in, it will keep any air from going in or out. That looks like this:
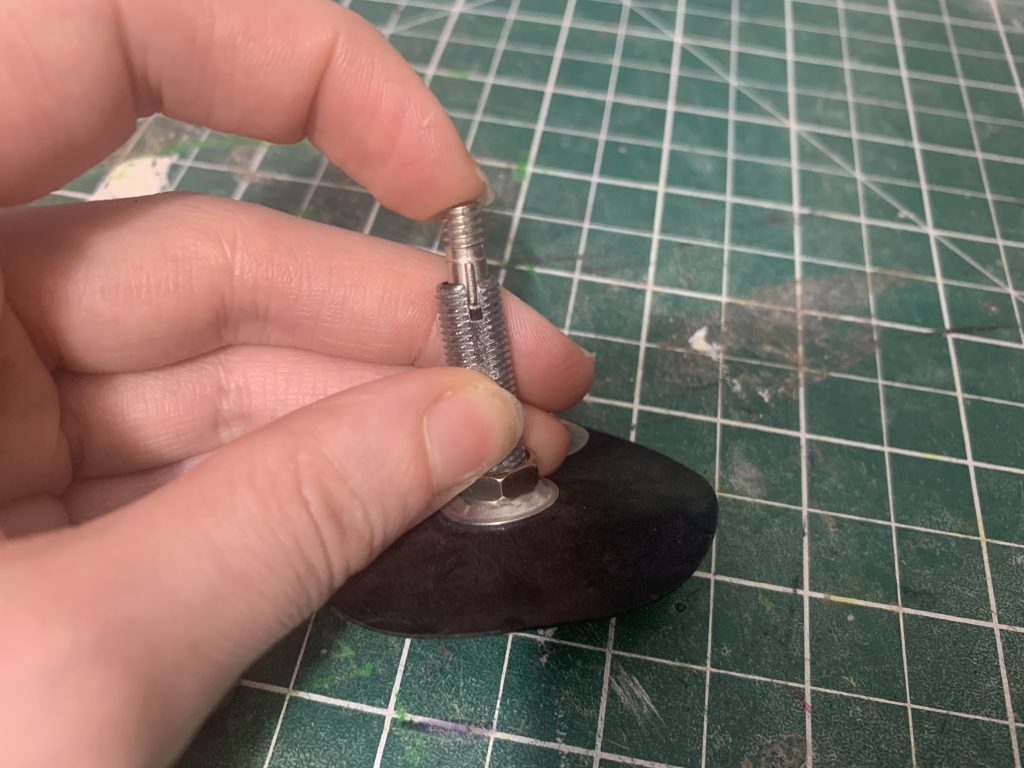
The little wings on the outside go into the matching channels in the body of the valve. When this is pushed all the way down, no air should escape.
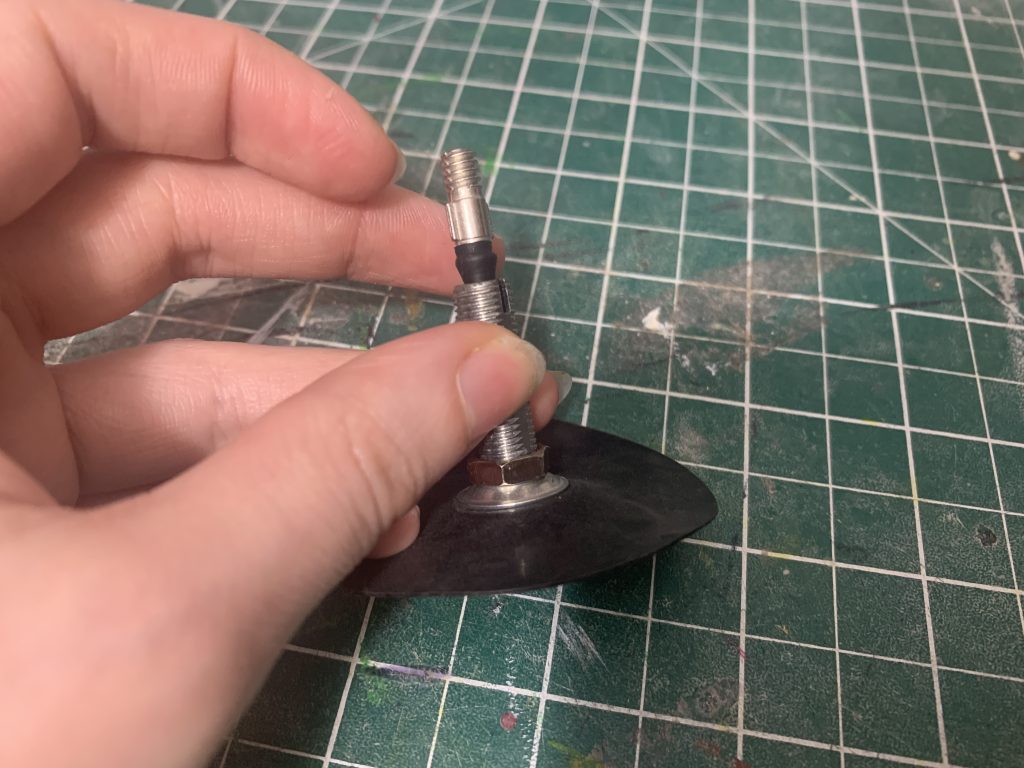
To inflate the inflatable, this piece needs to be part of the way out — I tend to pull it out and hold it just under the metal part with my teeth, and then push it back in with my tongue to stop airflow while I catch my breath during inflation of the piece.
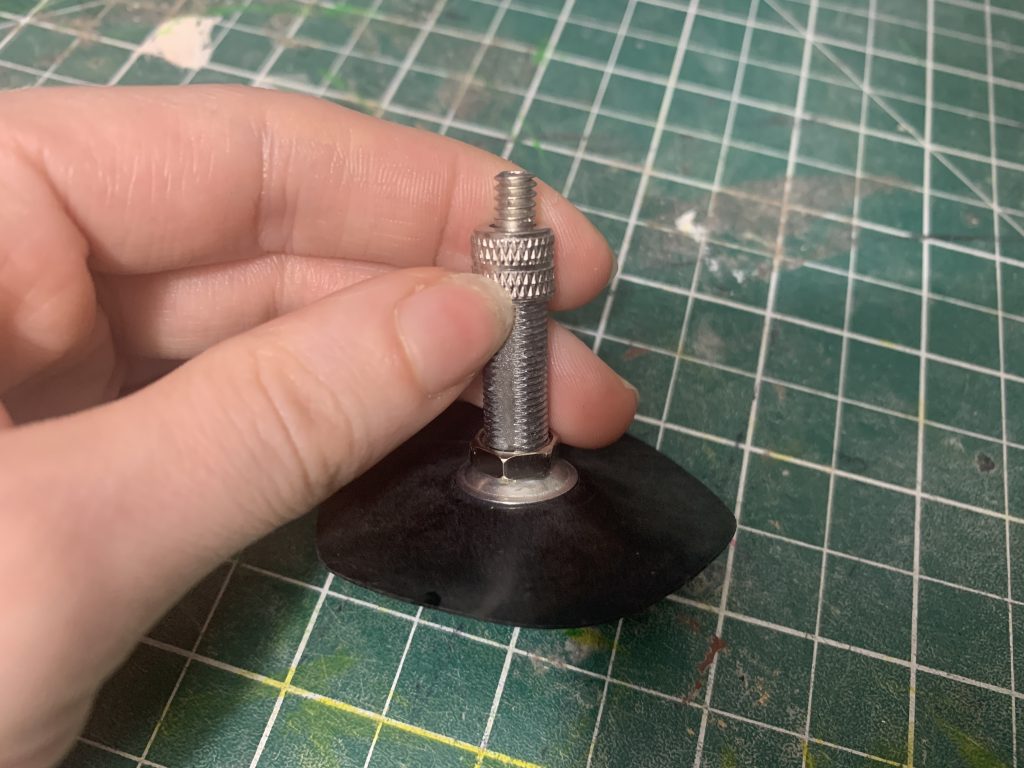
This is the piece that actually holds the inner piece in the right place; if there is air escaping (which you will be able to hear) from this piece before the final cap goes on, the final cap will not help. The top cap is just decorative. This is the part that’s airtight.
Now that we’ve learned about the valve itself, it’s time to actually install it!
Part Five: Installing the Valve
Once the thorax is all dry again, it’s time to actually install the valve. For the Honeybee Thorax, it was easy to decide where to install the valve: under the stinger!
The first thing I did was cut a hole, very carefully, with a sharp pair of fabric scissors — you can also punch a hole like this with a leather punch and a hammer, but to be totally honest with you, I was doing this at 4AM. I did this by drawing around the shaft of the valve, and cutting something just a little bit bigger.
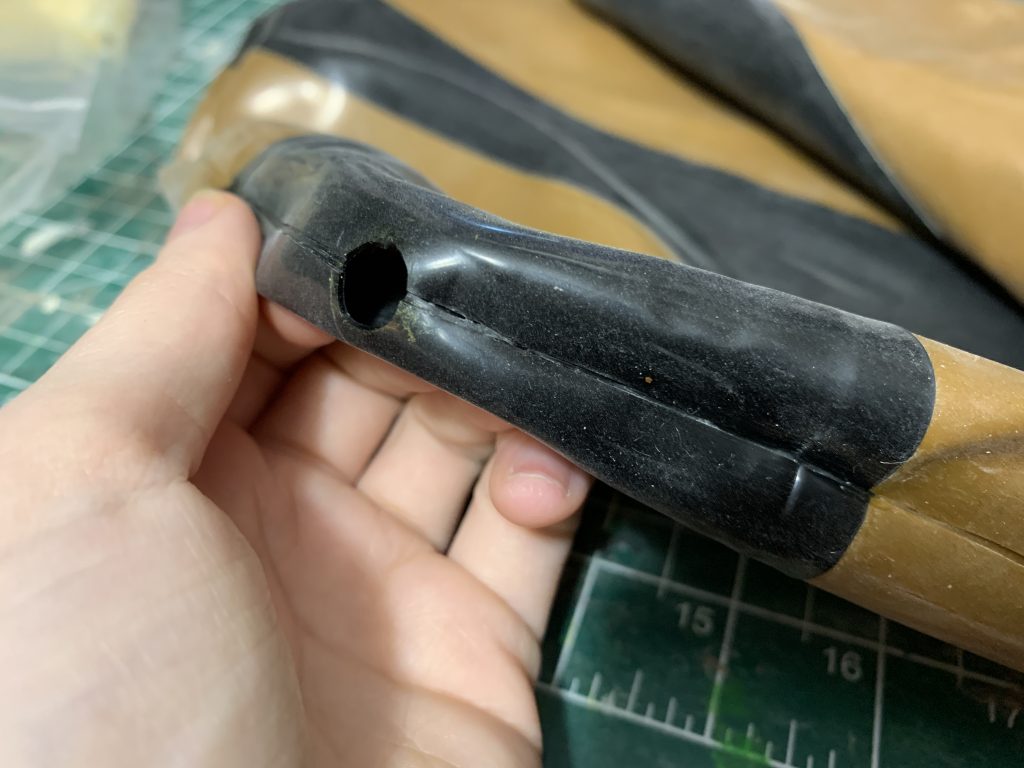
Make sure the hole is as small as you can get it — if it’s messy at all, it’ll be covered with those two metal pieces at the bottom of the valve shaft, and it’ll be reinforced by the base of the valve from the inside.
Once this bit is done, you have to turn the honeybee tail inside out again — you should be good at it, by this point!
Clean and apply glue to the top of the valve base, and the area around the hole you’ve cut or punched, and then once they’re dry, you can slide the valve into place.
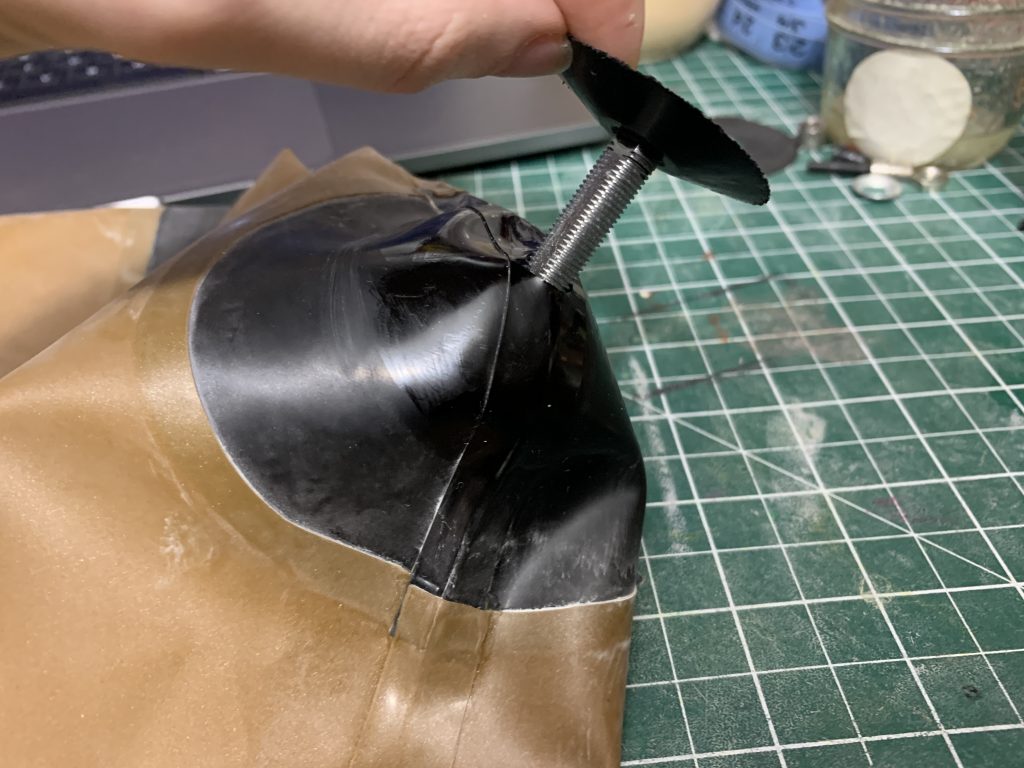
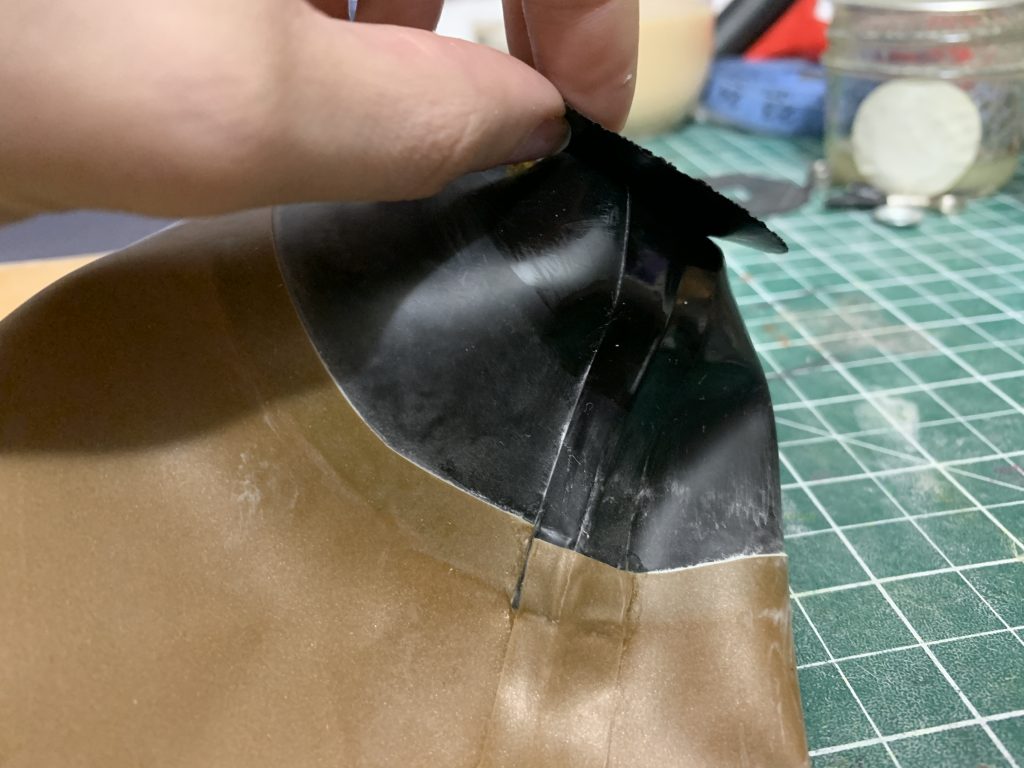
I do this like this, and then gently push the glued surfaces together, making sure they go together smoothly.
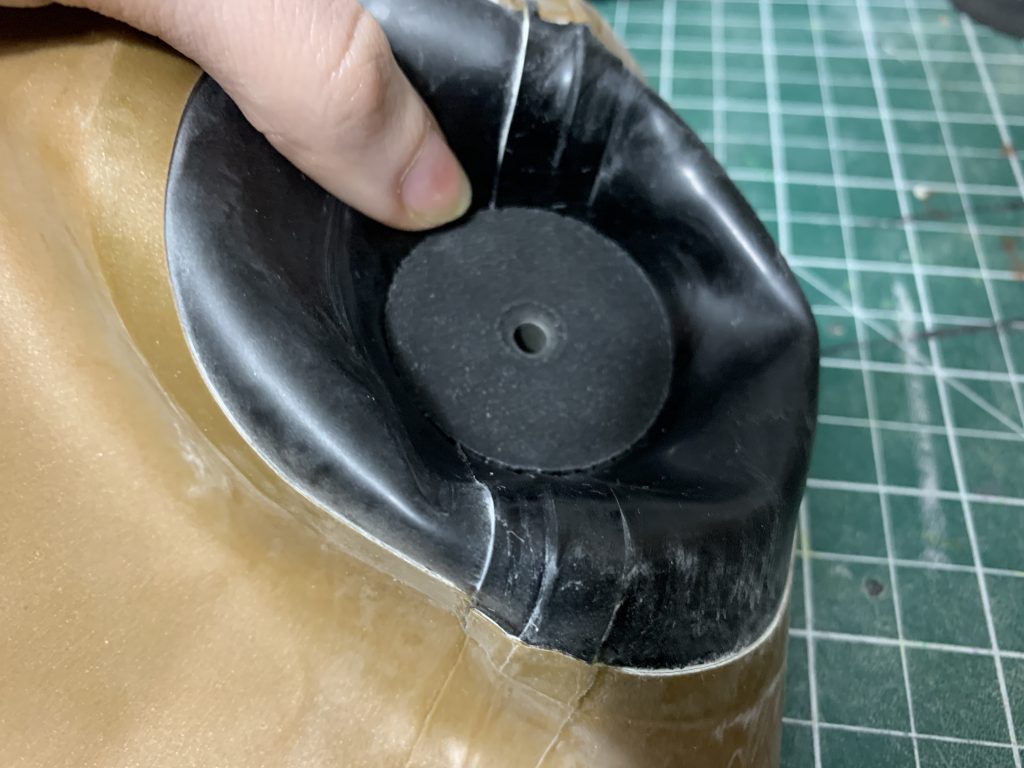
It should look like this from the inside, once it’s in. Now we just need to reinforce this — the valve itself is rubber, but to make sure it’s as airtight as possible, we want to sandwich it entirely inside latex.
Clean and glue the bottom of the valve, and the wrong side of the little latex patch that’s come with your valve, then carefully press the patch onto it. When you’re done, it should look like this:
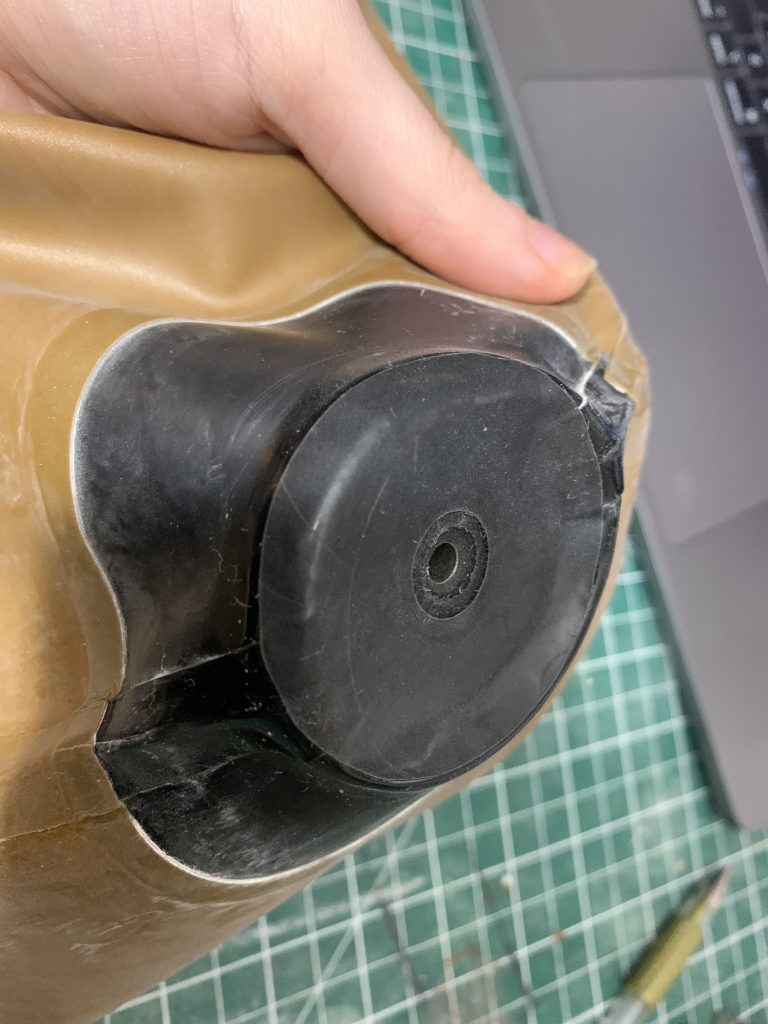
Roll this down to make sure it’s adhered properly on both sides. Clean any excess glue off, and powder it, and turn your Thorax right side out again —
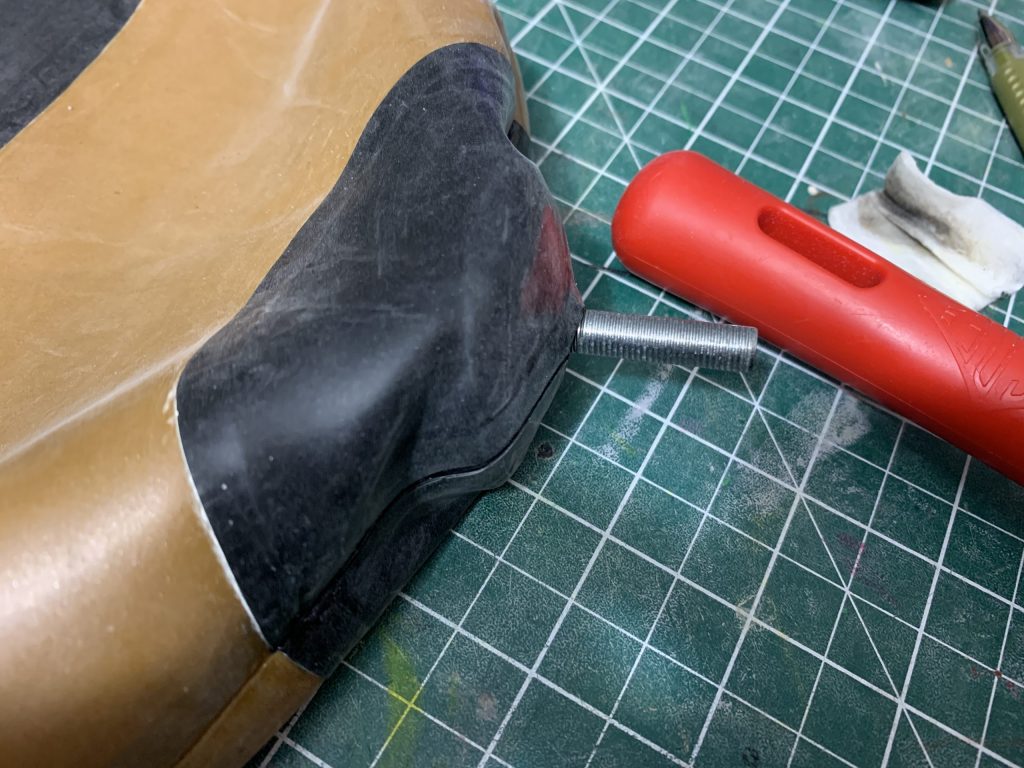
It should look like this when you get it flipped back over. You can then reinstall all of the pieces it came with.
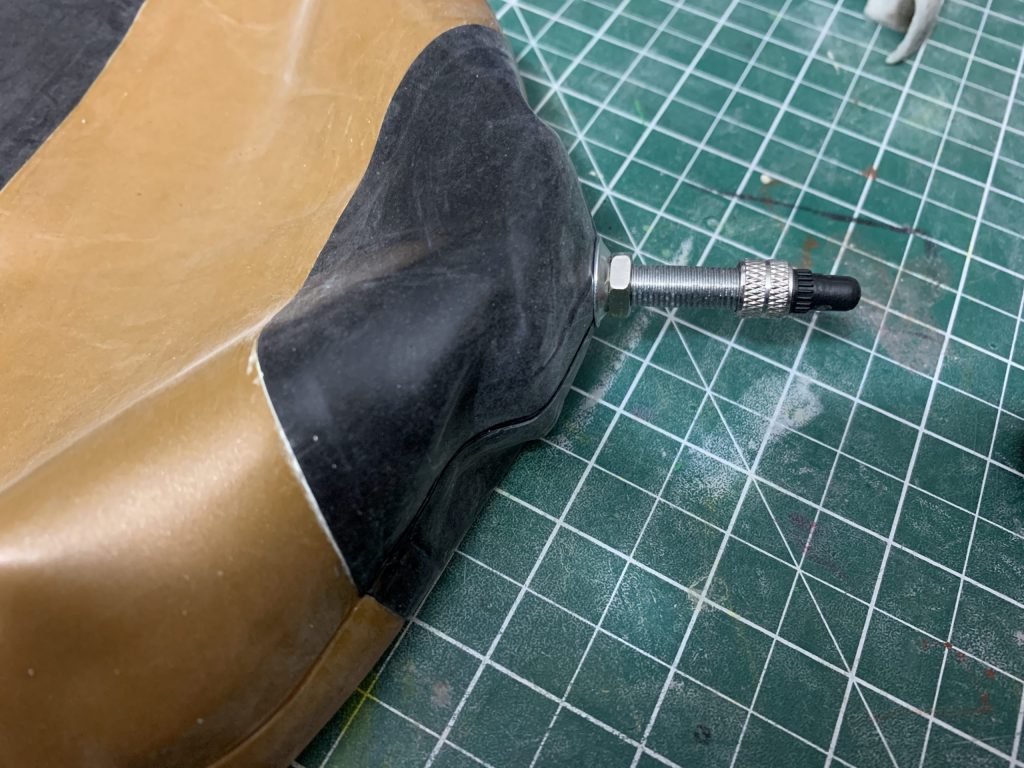
Now there’s just one more step to do before you can test the air-tightness on this —
Part Six: Attaching the Inflatable
We’re in the home-stretch of making the Honeybee now, marrying the two separate pieces together! Remember that inner lip we made on the base of the honeybee? Now we want to actually glue that down.
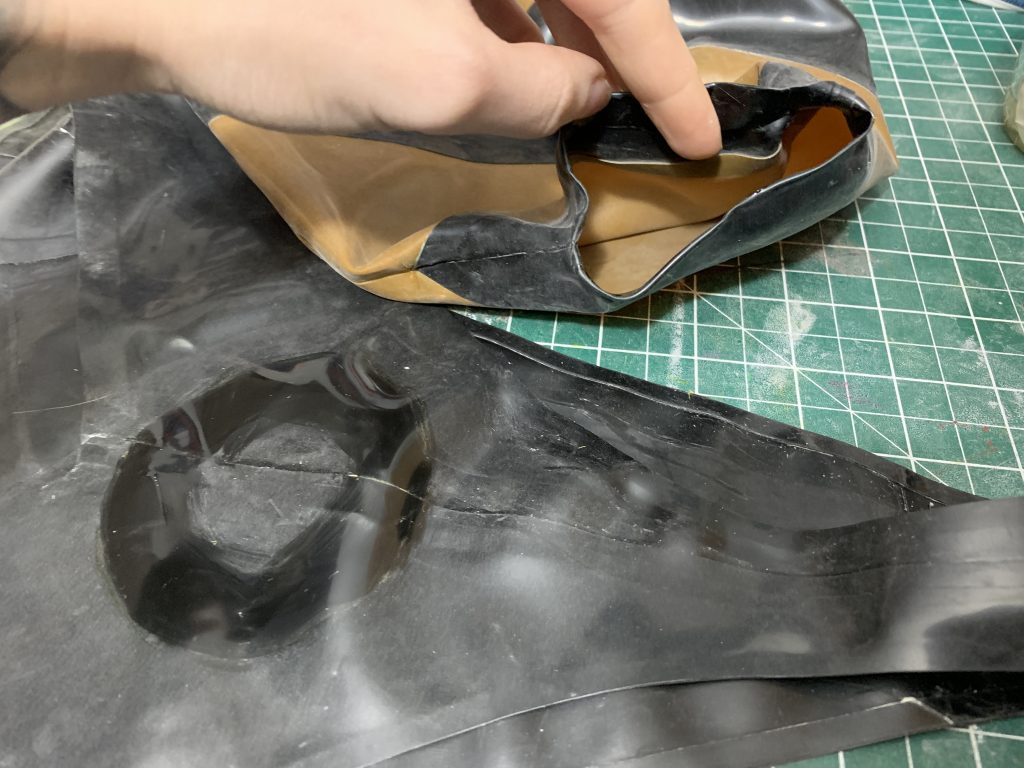
I always draw this out, by measuring around the circumference of the inflatable base, and then plotting a circle that’s slightly bigger on the area I want to stick it down (to account for any stretch the might happen while I’m putting it down). Clean and glue both this circle, and the inner lip of the inflatable.
Now: putting these together.
In this case, I had a visual reminder of where to line the seams of the inflatable up, since the bodysuit has a centre-back seam, but generally I mark the top and the bottom with gel pen, so that I know I’m on track as I push this down.
As for actually putting it on, this is most like a curved seam, my hands do almost the same thing. 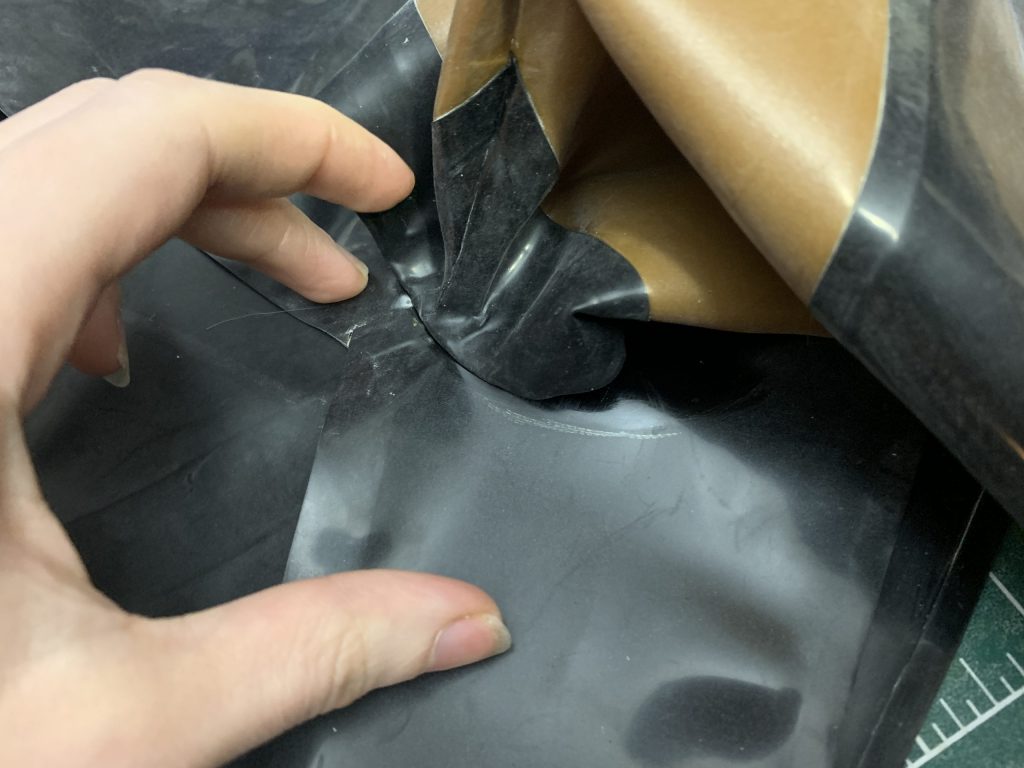
Without any stretching of anything, I press down the inside lip at the top, lining up the seams. Then, using the same sort of finger placement and gentle stretching as with a curved seam, I work my way around the circle of glue that I’ve put down.
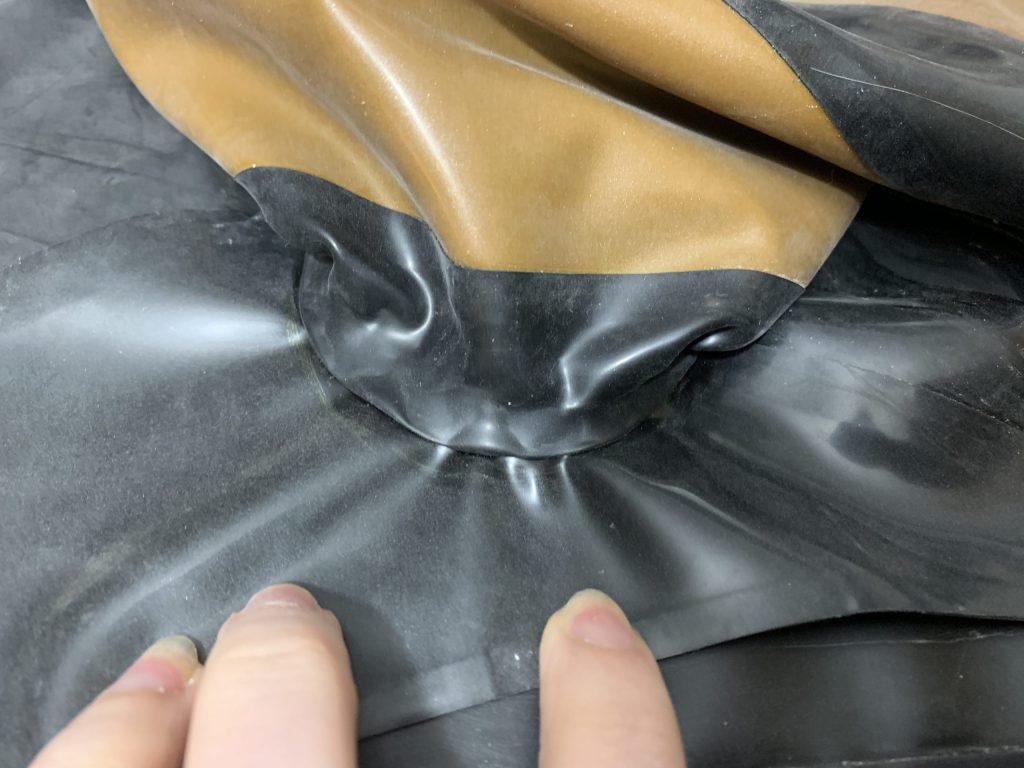
You’ll notice that the tension has the bodysuit puckering a little bit — that’s ok, this will smooth out when you’re wearing the outfit.
Roll this down; you want this to adhere permanently. Now we’re going to put an outside reinforcement down — remember the upside-down T seam we talked about earlier. We need the other half of the top of the T.
Clean and apply glue to ~1/4″ of the outside of the lip, and about the same on the surrounding area, and prep a 1/2″ piece of black trim to be glued down.
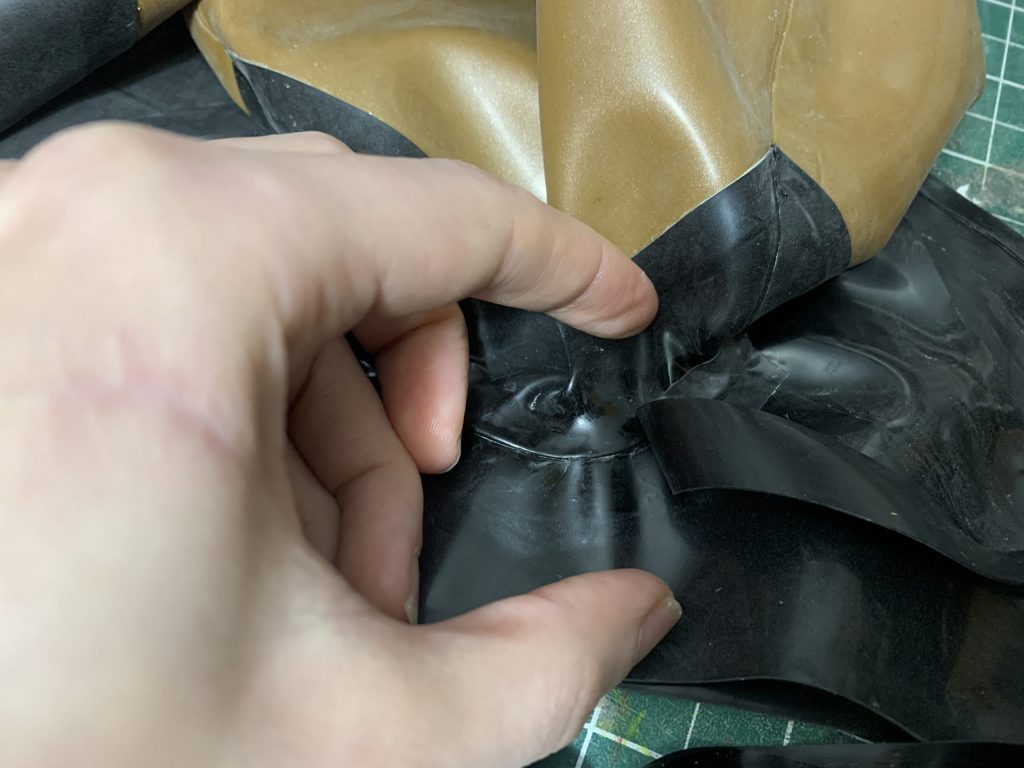
Applying this is tricky; I tend to start at the centre-bottom (where the seam will be the least likely to be seen), and then use my left hand to gently stretch and smooth the area I’m about to apply the trim, and my right hand to stretch the trim over it. It’s more or less like installing a curved seam (again, this is something you’re going to use a lot.) Take this slow, and don’t be afraid of stretching the top piece of trim — a little stretch will help you get around the curved, in this case!
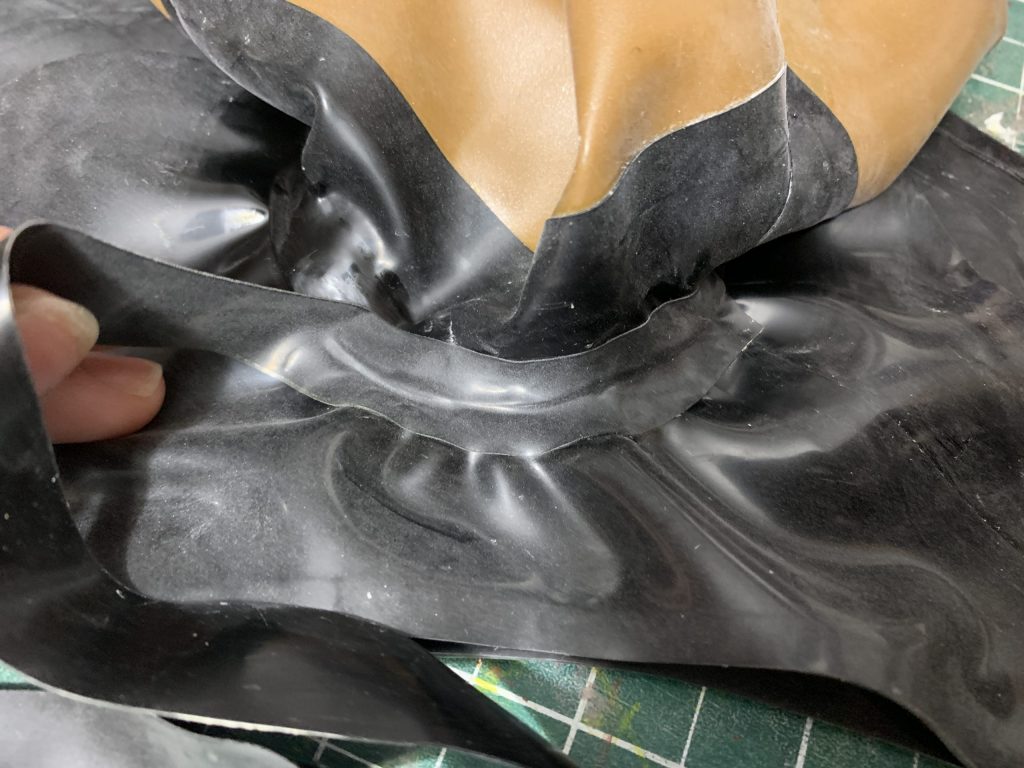
The puckering is still there — again, that’s ok in this case, it’s very likely that you’ll get puckering. This should disappear as it’s stretched against the body.
Install this all the way around, and overlap the bottom by ~ one seam allowance. Roll, clean and powder this — now it’s time to run that airtightness test!
Go ahead and begin to inflate the tail — not all the way yet, because you still have one thing left to do. But inflate it enough that it has the rough shape.
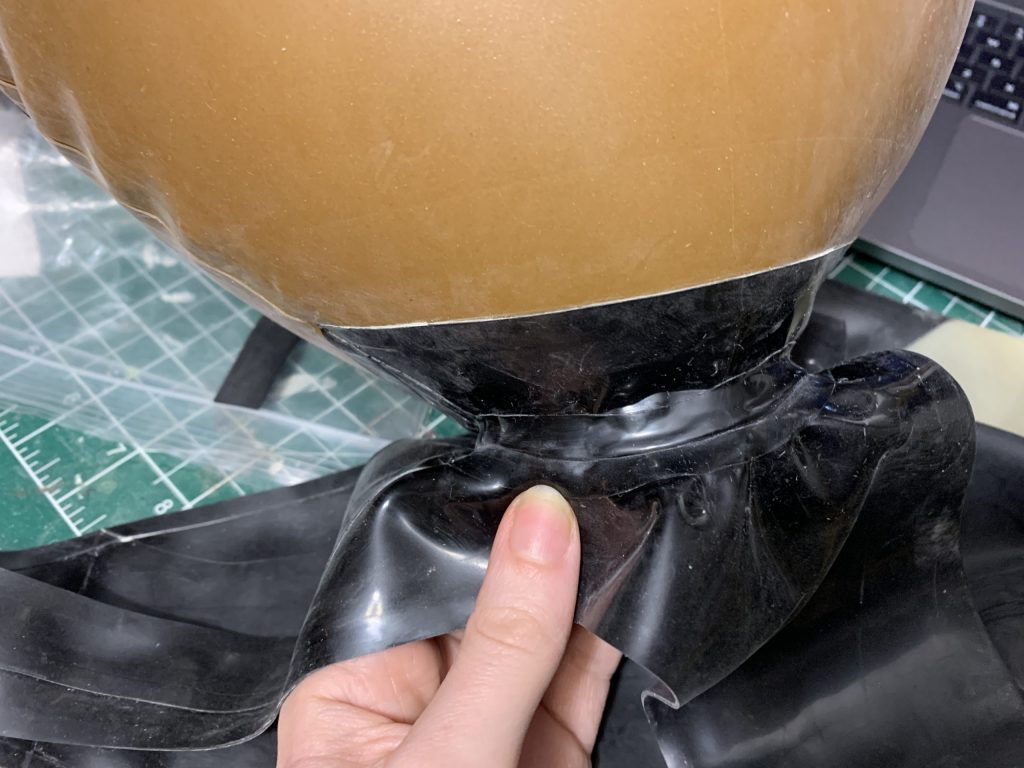
You can see that there’s still some wrinkling along the edge of the reinforcement — that’s fine for now, we’re going to inflate it more in a minute. First, we’re going to pull that inner lip off of where it’s currently stuck, which, remember, we did without glue. Some of the edges might have already pulled away, with the inflating, which is a bonus for you, less to do manually!
I generally do this by grabbing a hold (carefully if you have nails) and pulling it away. Be gentle, and patient, and eventually —
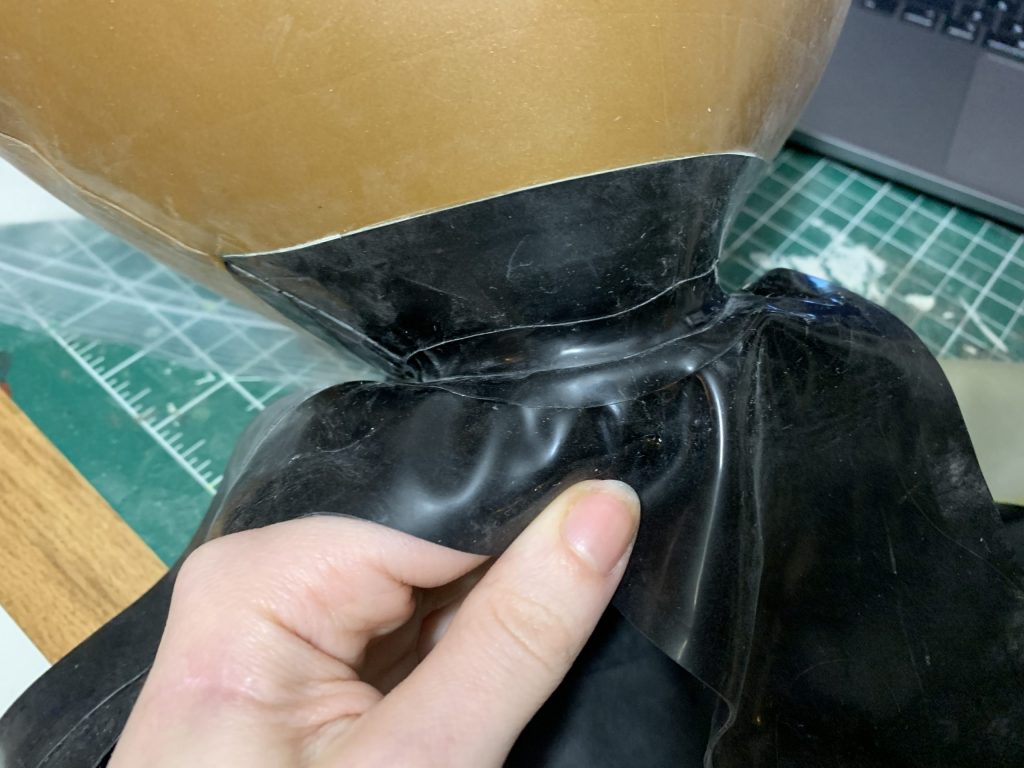
It should look clean like this! All of the inside lip is stuck to the bodysuit, not the outside of the inflatable.
Now you can finish inflating the thorax — you should no longer have any wrinkling anywhere on the outside of the inflatable. Generally, I get it to that point, and then inflate it roughly another inch. Remember, latex stretches up to 200% of its original proportions, so forcing your inflatable to be an inch bigger than its original pattern dimensions isn’t a big deal.
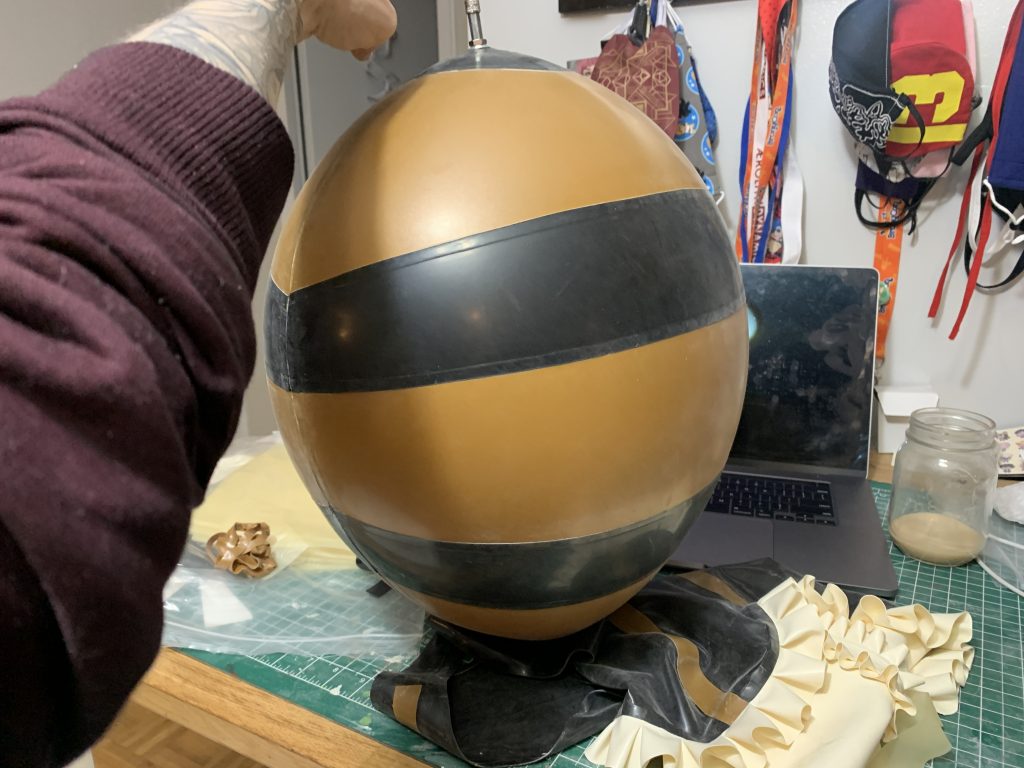
There we go! No wrinkles to be seen.
This is where you should pause again — put this somewhere where it won’t be in direct sunlight, make sure everything is powdered, and leave this overnight. If it still looks the same in the morning, then congratulations! Your inflatable is airtight.
If it deflates a little overnight … you have a leak. This is where things can quickly get frustrating.
An Aside: Troubleshooting a Leaking Inflatable
The easiest way to find a leak is to submerge your inflatable entirely in water and apply some gentle pressure. Once you find the leak, dry the inflatable off and apply liquid latex, without deflating the inflatable. At first, if you’re using thinner liquid latex, you’ll get bubbles, as the air continues to escape — keep applying liquid latex, in small amounts, until the bubbles stop. If it’s a very active leak, you might need to let that big of liquid latex dry and do it again, until the bubbles stop.
If you don’t have something big enough or deep enough to put your inflatable in, you can also cover the seams of your inflatable in dish soap, and then apply pressure — the dish soap should bubble as the air comes through it, which will also allow you to find the leak. Clean off the dish soap and do the same as stated above with the liquid latex until the leak is plugged.
I’ve had good luck with just being extremely liberal in the building steps with liquid latex on all of my seam joins, especially on the inside — like I said earlier, I’m 3/3 with Honeybee Tails being completely airtight with that method. Haven’t had to troubleshoot anything in some time!
Part Seven: The Stinger
Now we’re on to almost the last part of this monstrosity … the stinger. This, and the inflatable itself, are the most time-consuming parts, in my opinion.
The stinger itself is made of 3mm thick craft foam. I haven’t covered making things out of foam in my tutorials because, to be honest, I still feel like I’m not terribly good at it, but I’m learning all the time, so I’m hopeful that at some point in the future I’ll be able to do one!
Here’s what the pattern for the stinger itself looks like:
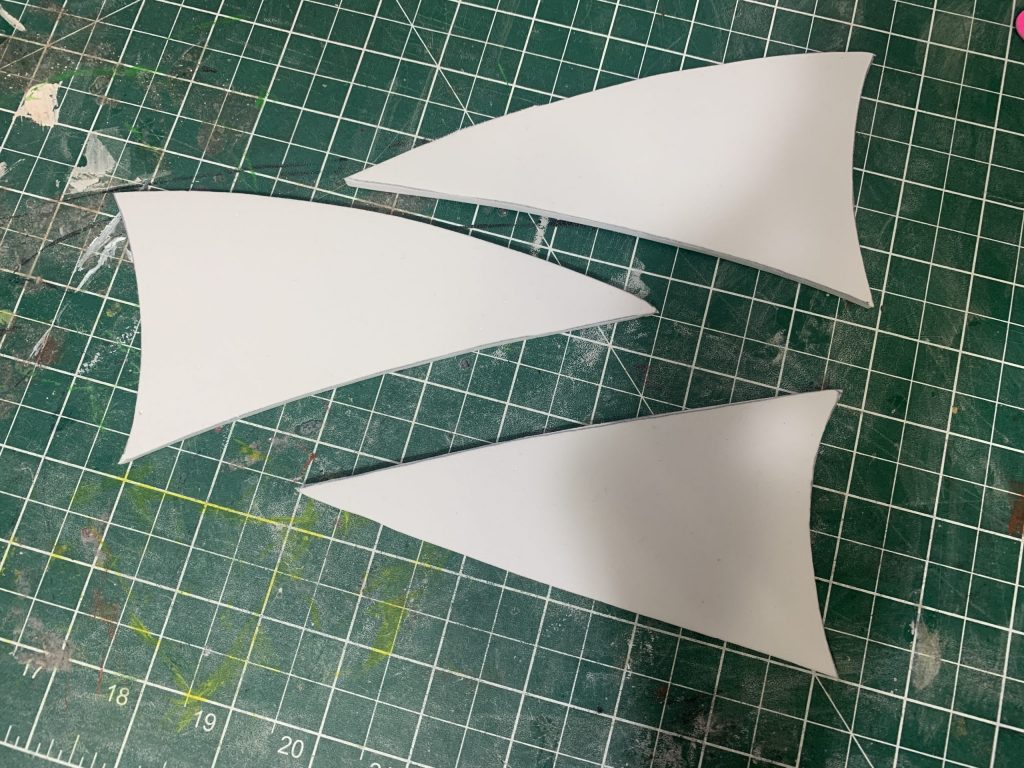
The two top pieces are the sides, and then there’s the bottom below them.
My quick tutorial for cutting foam isn’t all that different from cutting Latex, really — use a sharp blade, in this case a utility knife. Press hard. And try to do each cut in one smooth stroke. With foam, you can sand out stutter cuts with a high-grit sandpaper or a Dremel, but it’s less work and ultimately still looks nicer to just get the cut right. With foam, I also sharpen my knife blade on a kitchen steel every few cuts, just to keep it really as sharp as it can get.
Gluing foam together also reminds me a lot of gluing latex together … you put glue on, you wait for it to be ready to dry mount, you gently apply the pieces together. You just don’t have to worry about stretch as much!
For foam, you’ll need Contact Cement to put the foam together!
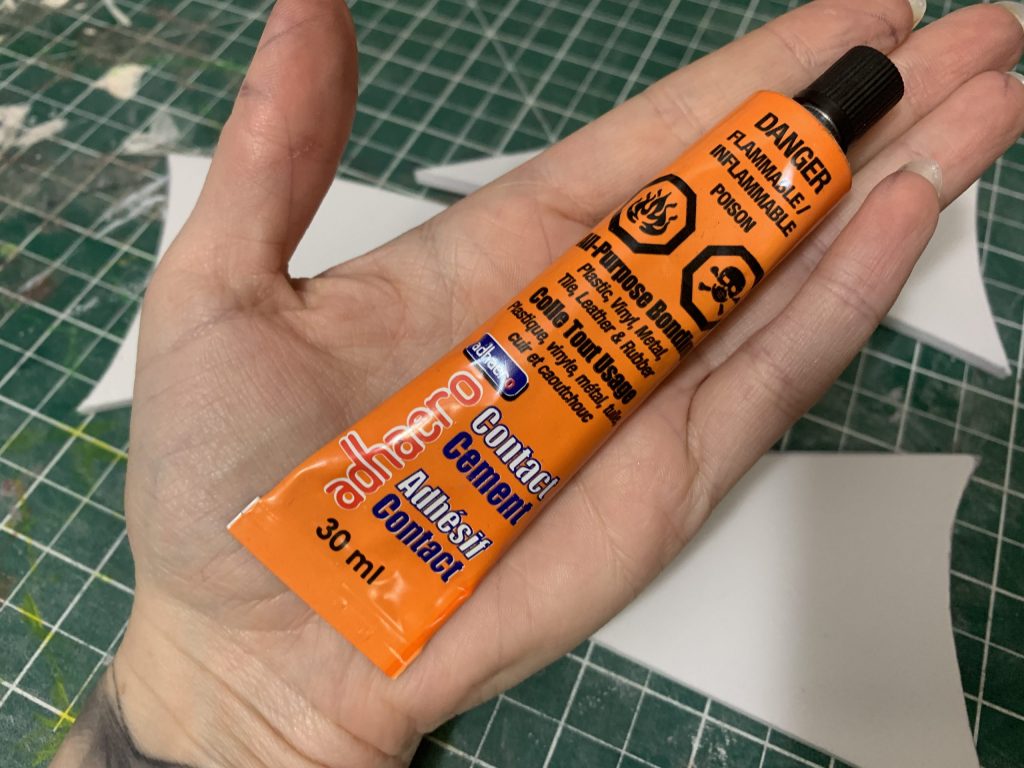
I don’t do that much foam, so I just get small squeeze tubes of contact cement from my local dollar store.
Personally, I put the two top pieces together, and then put the bottom on. I applied contact cement along the top of one of the side pieces, and along the cut edge of the other …
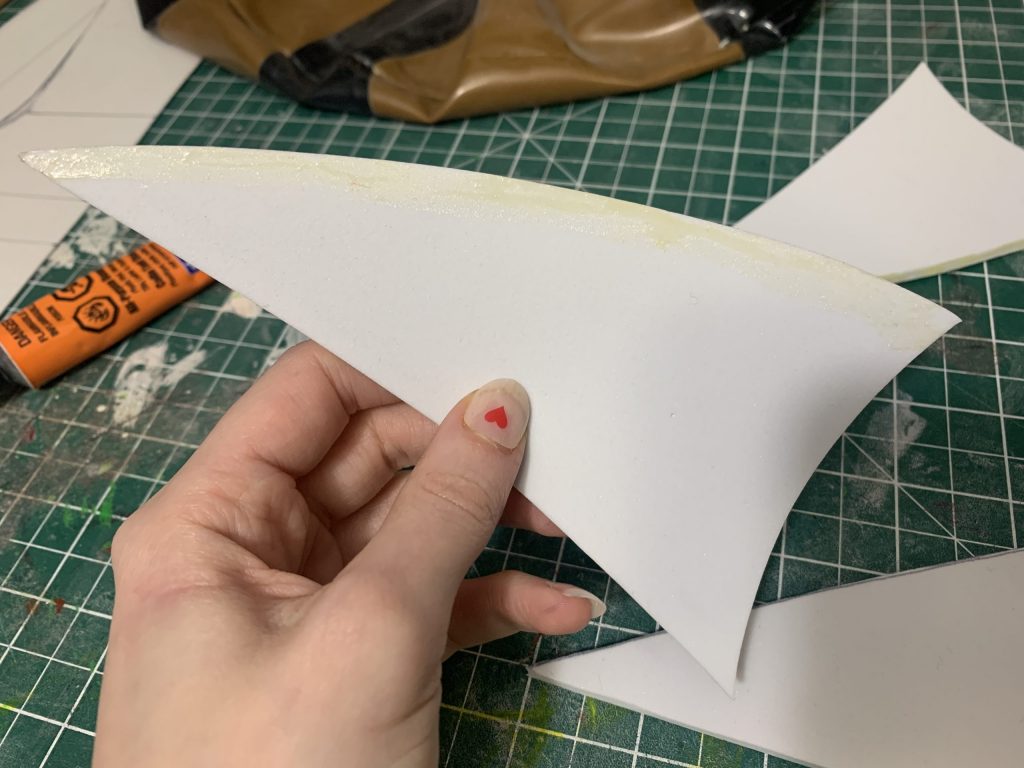
And then gently put them together like so.
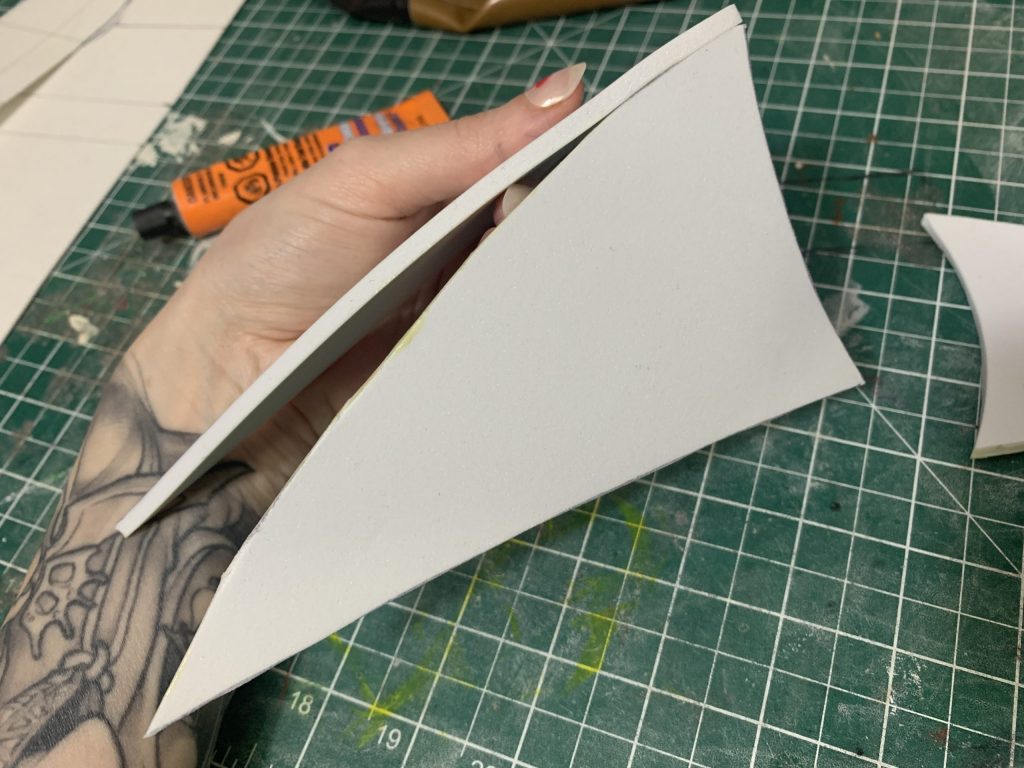
Then I applied contact cement to the insides of this shape that formed, and along the cut edges of the bottom piece.
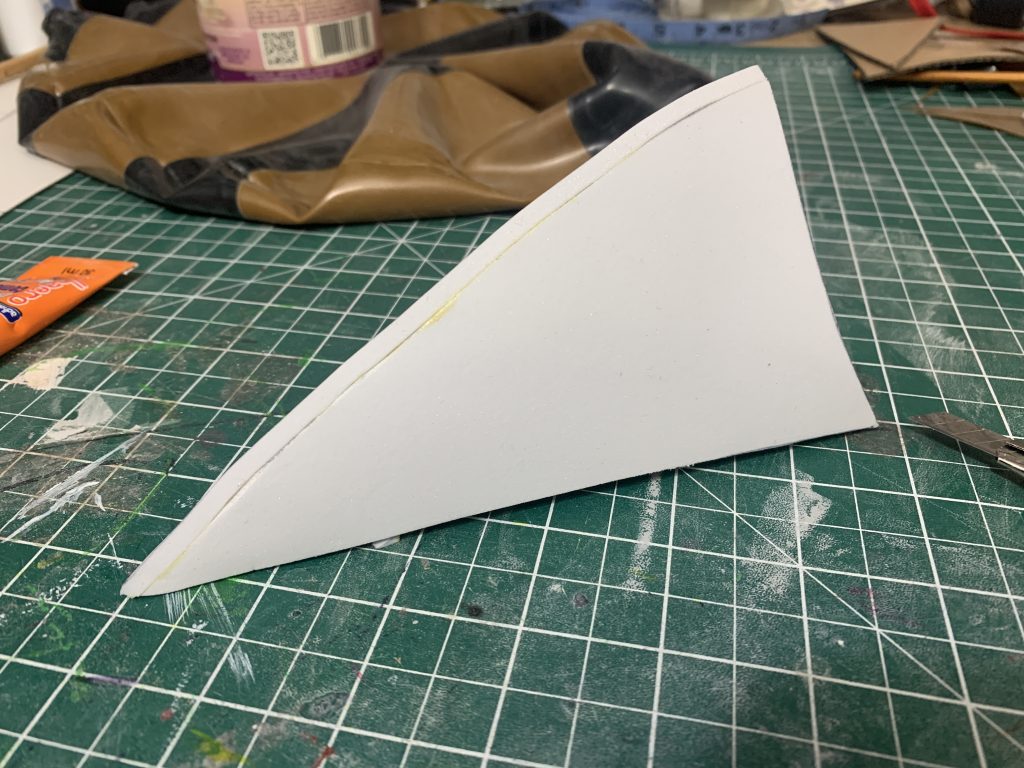
Doesn’t have to be absolutely perfect, because we’re about to upholster this in latex, so that it will match everything else.
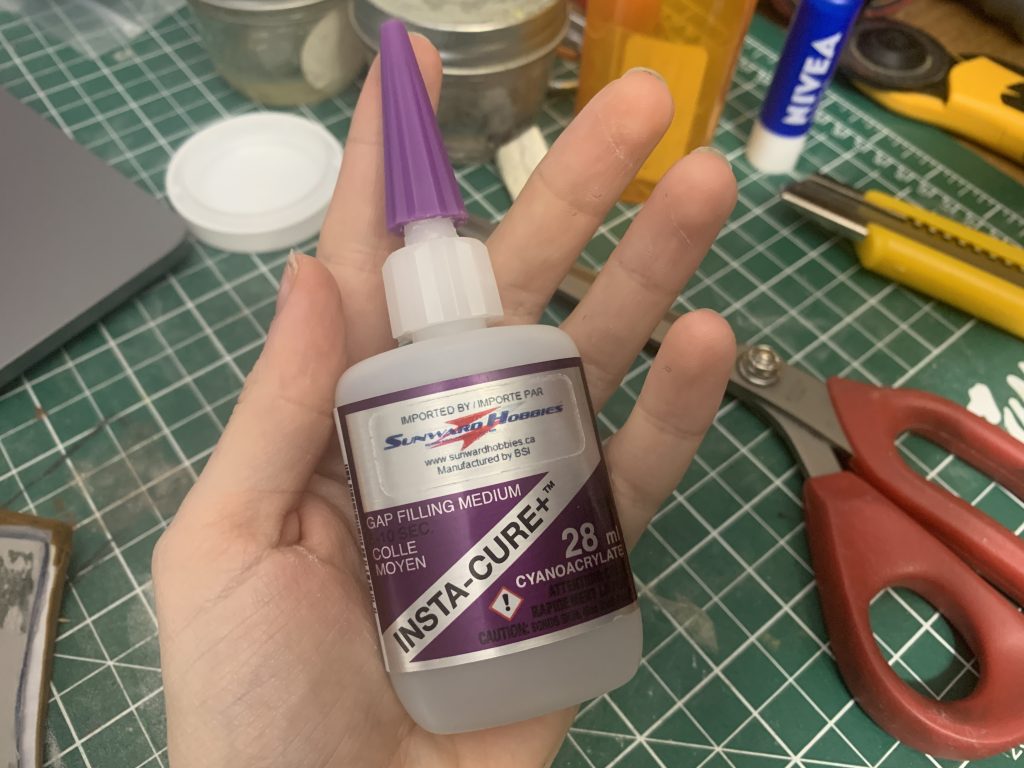
Now, if you’ve been reading my tutorials, you’ll know that I’ve used super glue on latex a little bit — and this is one place where it really shines. Specifically, I like to use Bob Smith Industries Cyanoacrylate glues — I find that they’re less likely to have a chemical reaction with the foam than just regular Kray Glue/Super Glue. I’m not certain why exactly that is, but I’m happy not to question it.
What we’re going to start with is covering all of the edges of this shape — then we’ll adhere large pieces of latex to the edging, to cover the bulk of the shape.
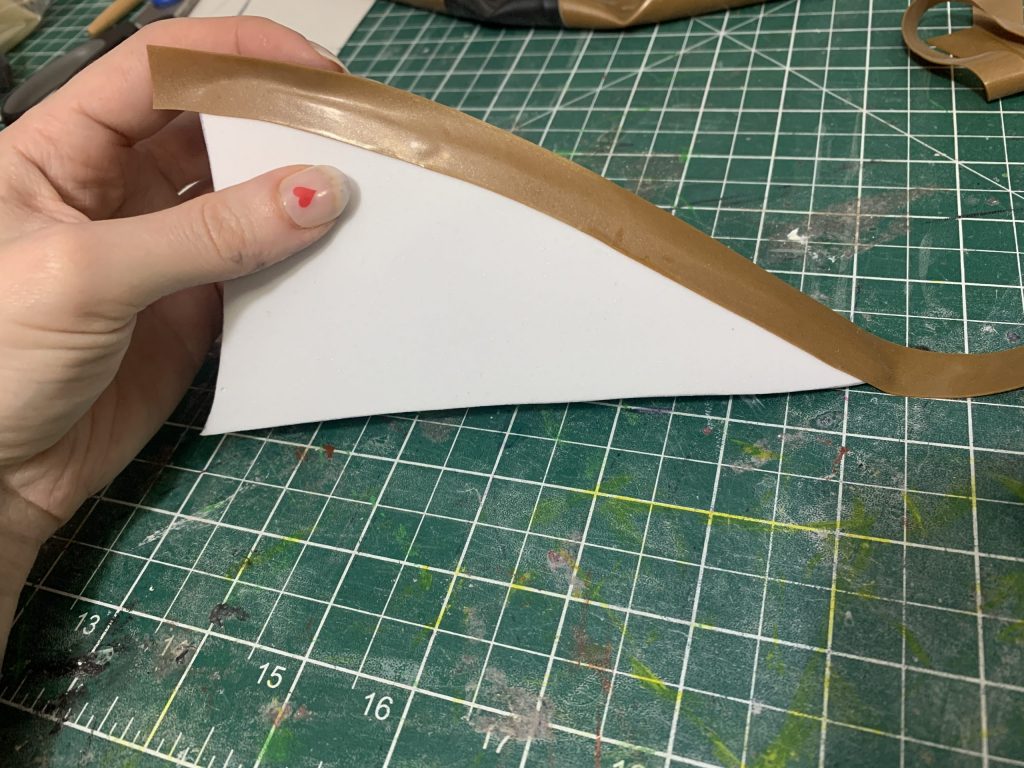
This is a 1/2″ strip of latex, just like I was using to reinforce the inside of the inflatable. Wha I’ve done here is apply a little drop of glue at the top, and then spread it as far as it would go down the seam allowance with a toothpick, then pressed the latex down, and held it in place until the superglue dries. Then applied another small dot of glue, spread, continue, all the way down. (I got really good at this, and started managing to do the whole seam at once, but this is my third one of these.)
Try not to get the superglue anywhere that isn’t the seam, and especially not on the latex; it will change the surface texture of the latex if it gets on the “outside” of it. You can see a little splash of it on mine there, about three-quarters of the way down.
Then I had to turn it and do the other side …
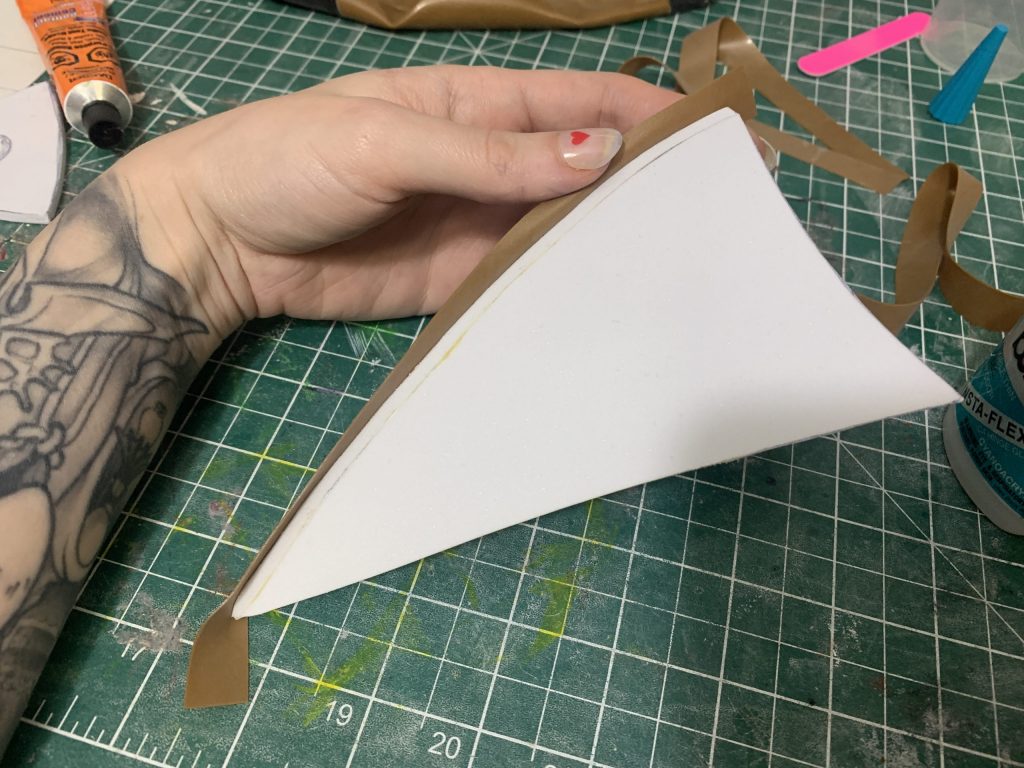
Do this pretty much the same way as the first side — I found this a little easier, since the latex was already stuck in place on the other side.
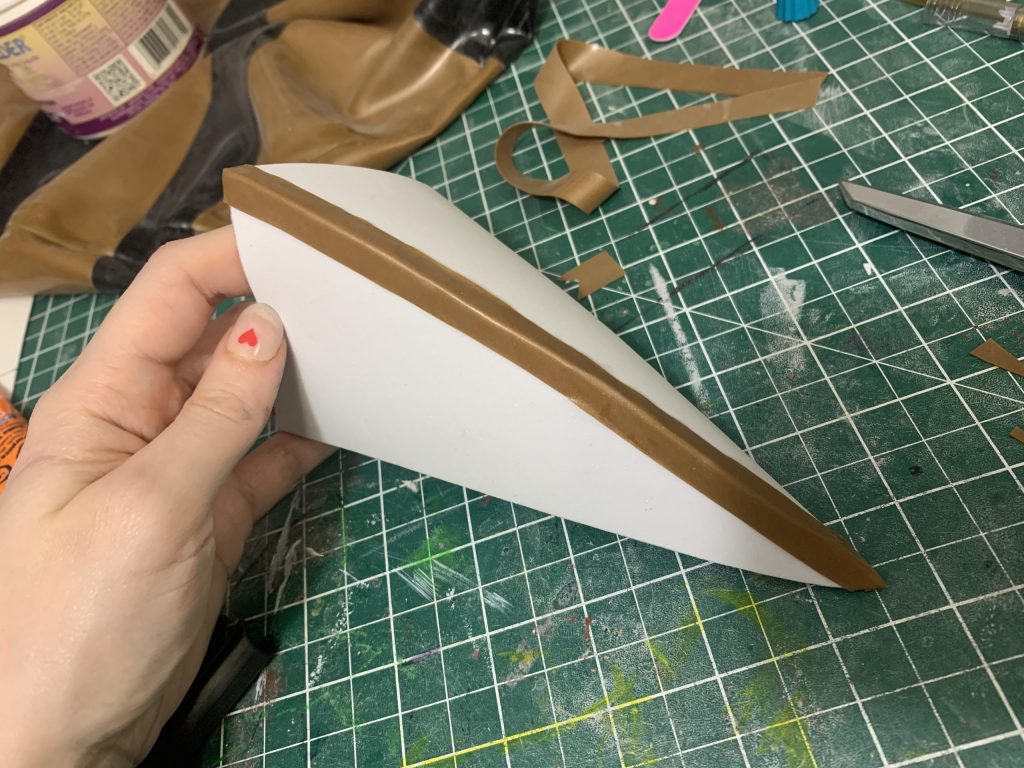
Clean!
You can also see that I’ve trimmed and folded the end under; what I wound up doing was leaving about 1/4″ of tail, cutting it carefully down the middle with my fabric scissors, and then folding it under. The others, I just butted up onto that one to adhere them together — I was most worried about the top and sides looking as sharp as possible, the bottom can be a little bit messier.
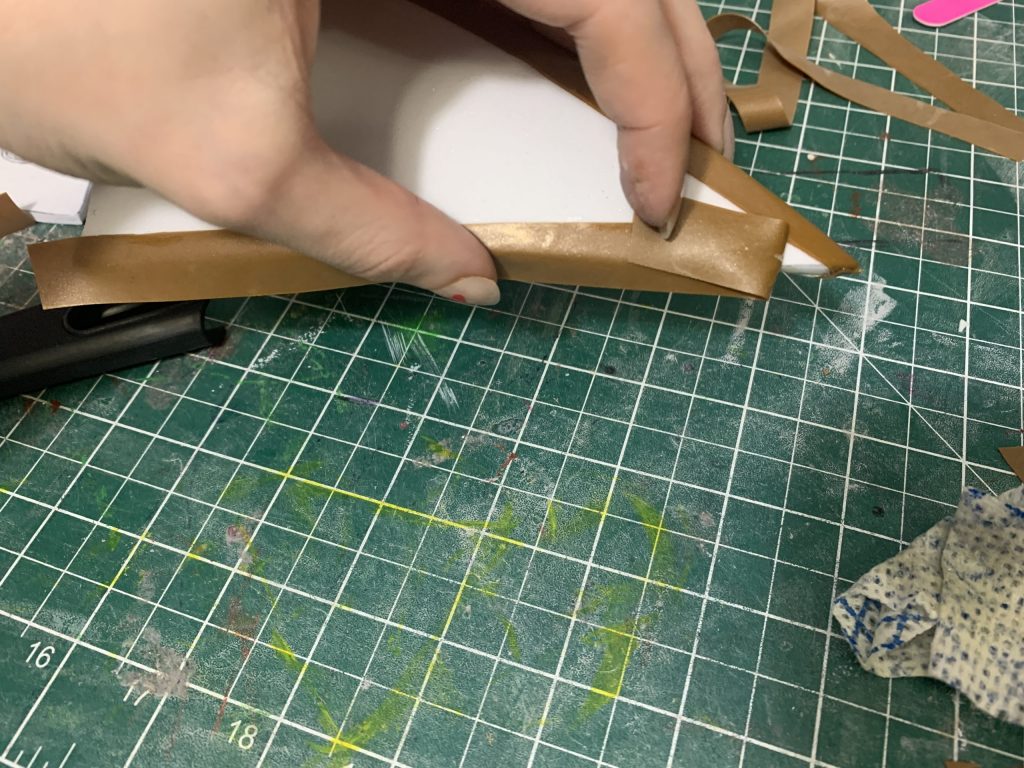
There’s a closer look, while I was applying the next bit. Same as the first! Do all three corners this way. In the next picture you can see how I overlapped the bottom trims with the top one. Anywhere there was latex to adhere to latex, I used our usual rubber cement dry mounting method, but I used the superglue to adhere everything right up until that point.
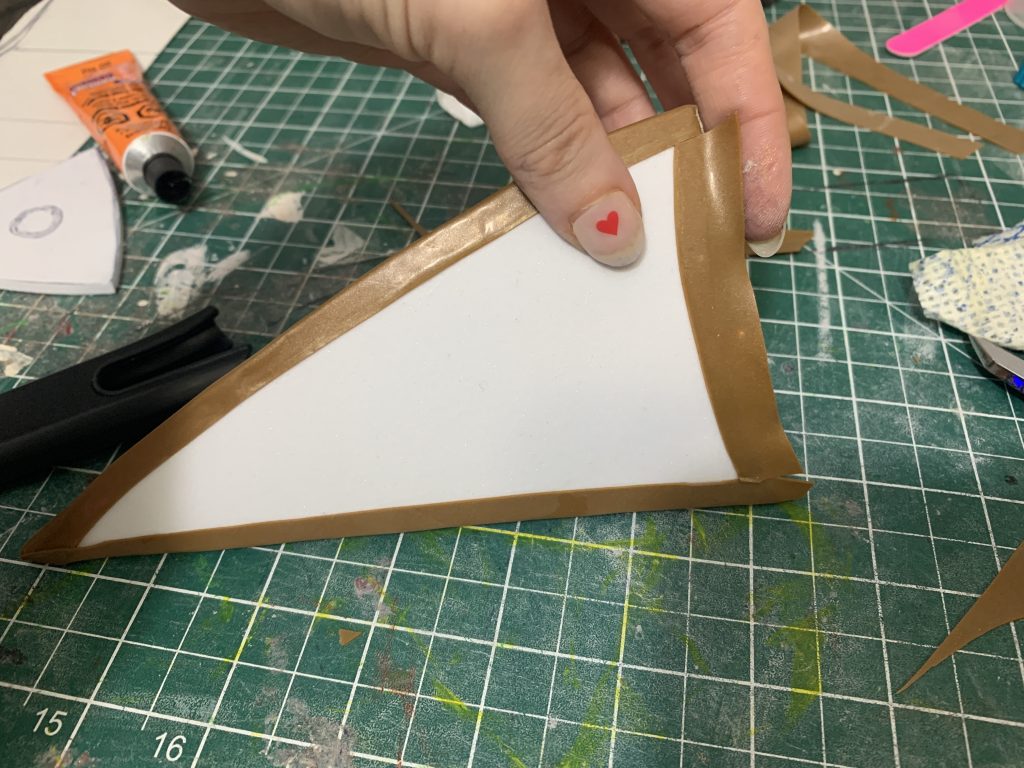
I also had to cover the edges of the base, which I also did with leftover 1/2″ gold trim.
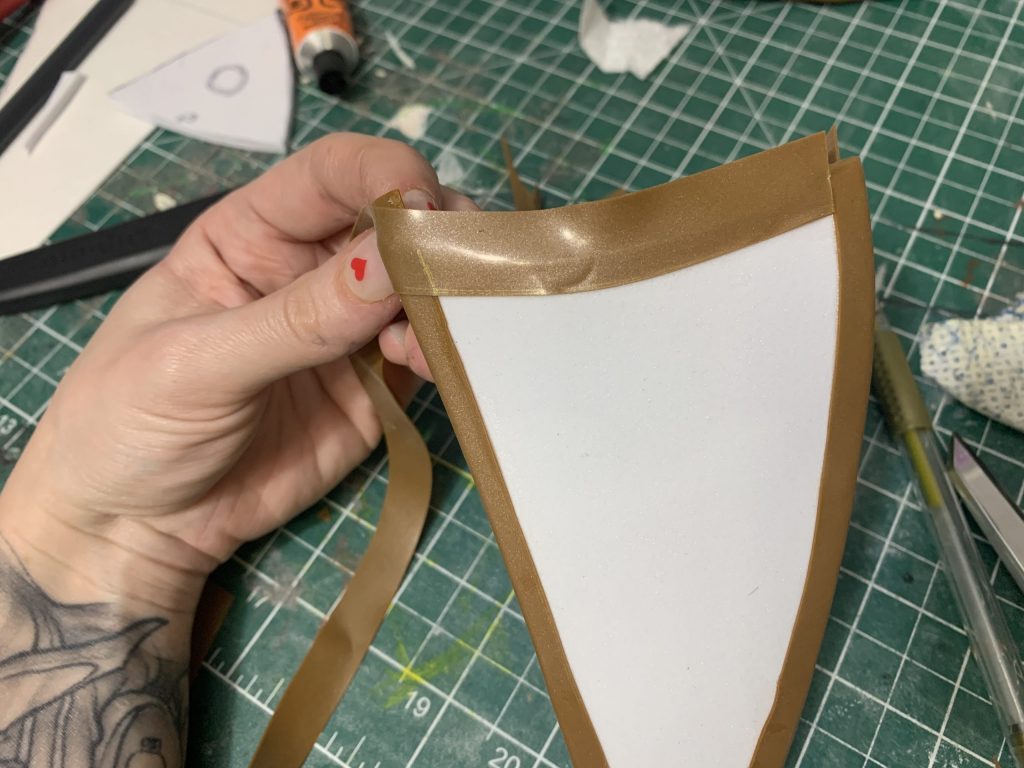
This shows how I cut the trim to fit — you can see, by the helpful nail mark I left, where I stopped gluing to check the fit. I then cut that with scissors, and glued it down.
Do all three sides with that, and then, it’s time to fill in the blanks with a nice big patch.
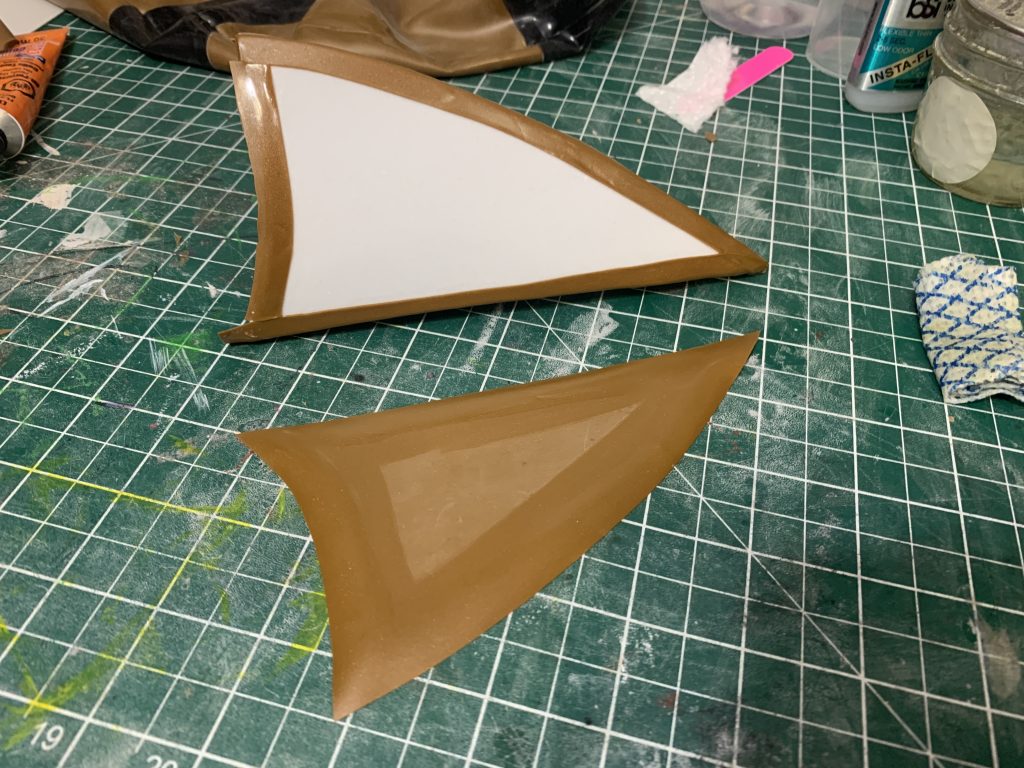
The patch is cut using the same pattern as the original foam pieces, but shrunk just a tiny bit, I think I did about 1/8″. I wanted these to be close to full size. Clean and apply glue to the inside of the patch, and the pieces glued to your foam, and let them dry, as per usual.
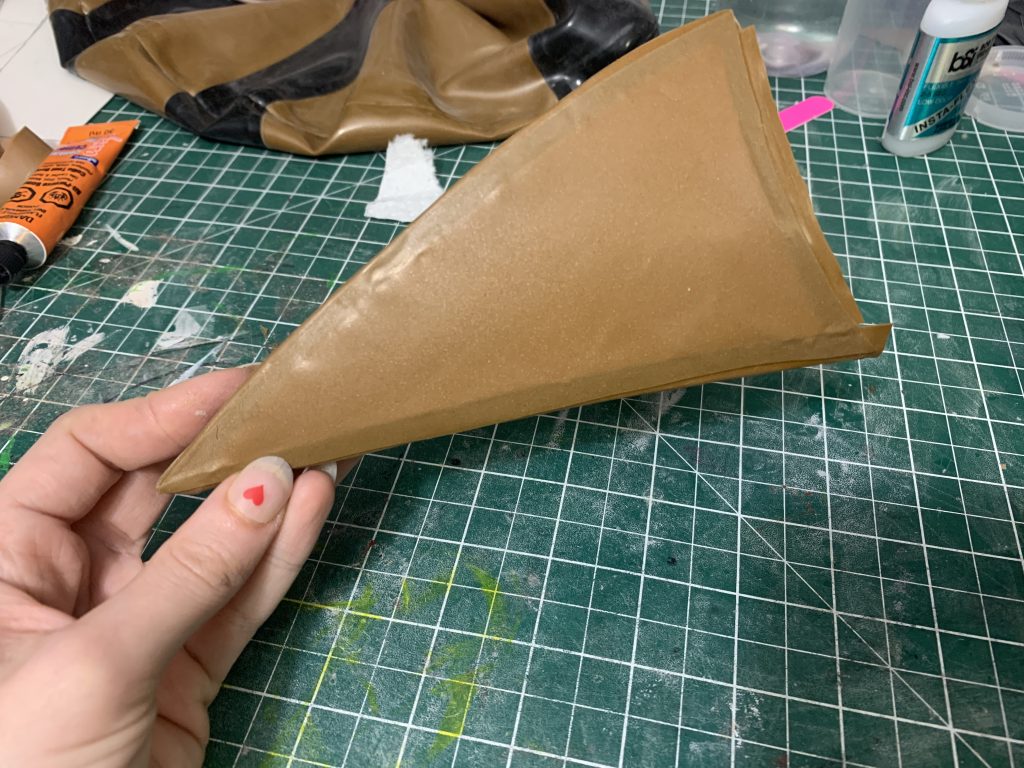
To get this on, I lined up the base first, then applied the top down to the tip, then returned to the base and smoothed it down to glue onto the bottom, again moving towards the tip. Take your time, and don’t be afraid to use a thinner-soaked q-tip if necessary to gently pull back up and reposition.
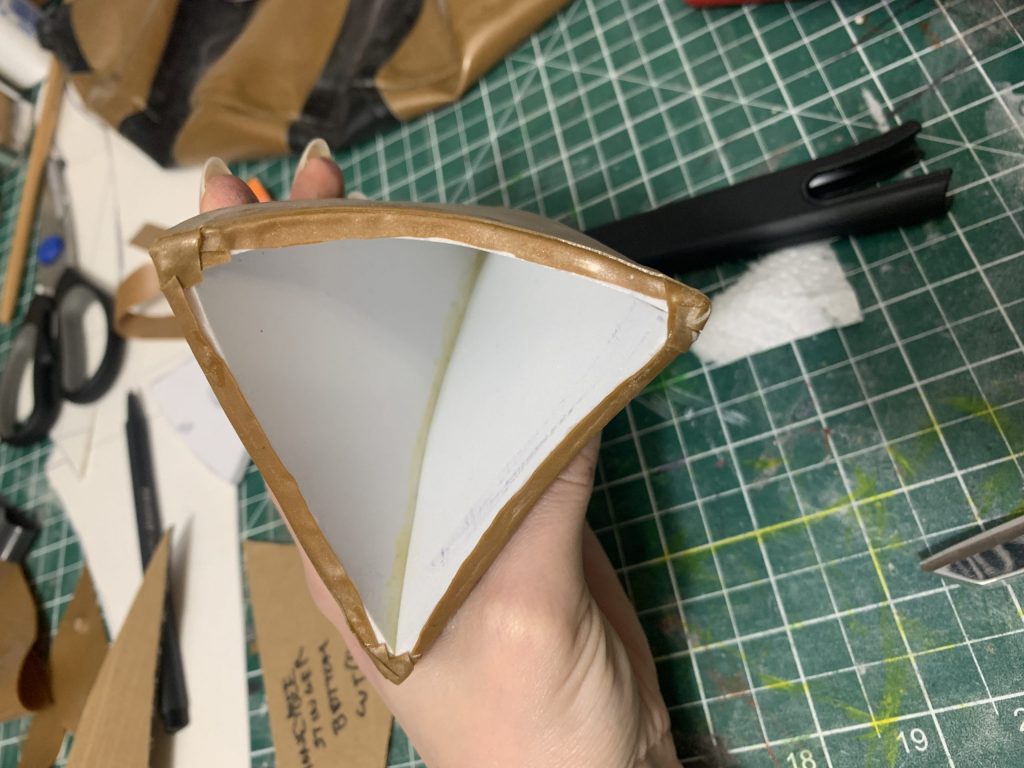
The last thing that I did was fold over all of the latex on the base, and super-glue or rubber cement it (if there was latex there already to adhere it to) into place. Doesn’t have to be perfect, because this bit is going to be against my inflatable for the most part, but it looks much nicer than just having that be white.
I also patterned out a little piece for in here, which looks like this —
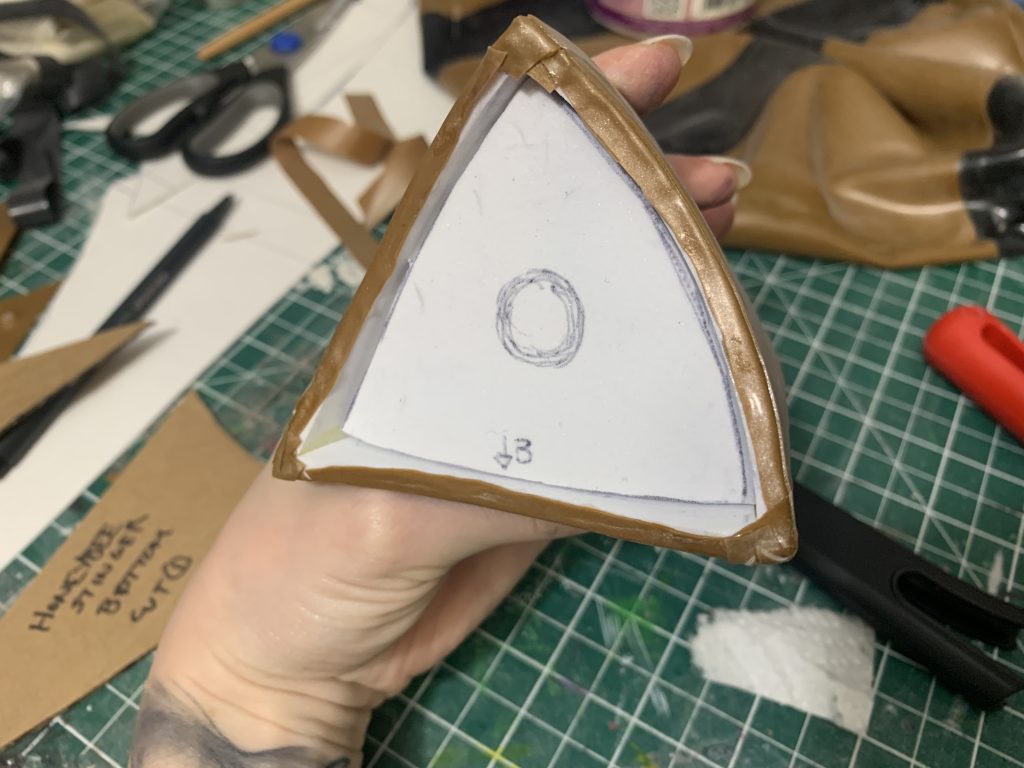
This piece is going to help us do the next part, but only after we punch out that hole in the middle, which is where the shaft of the airtight valve is going to go. 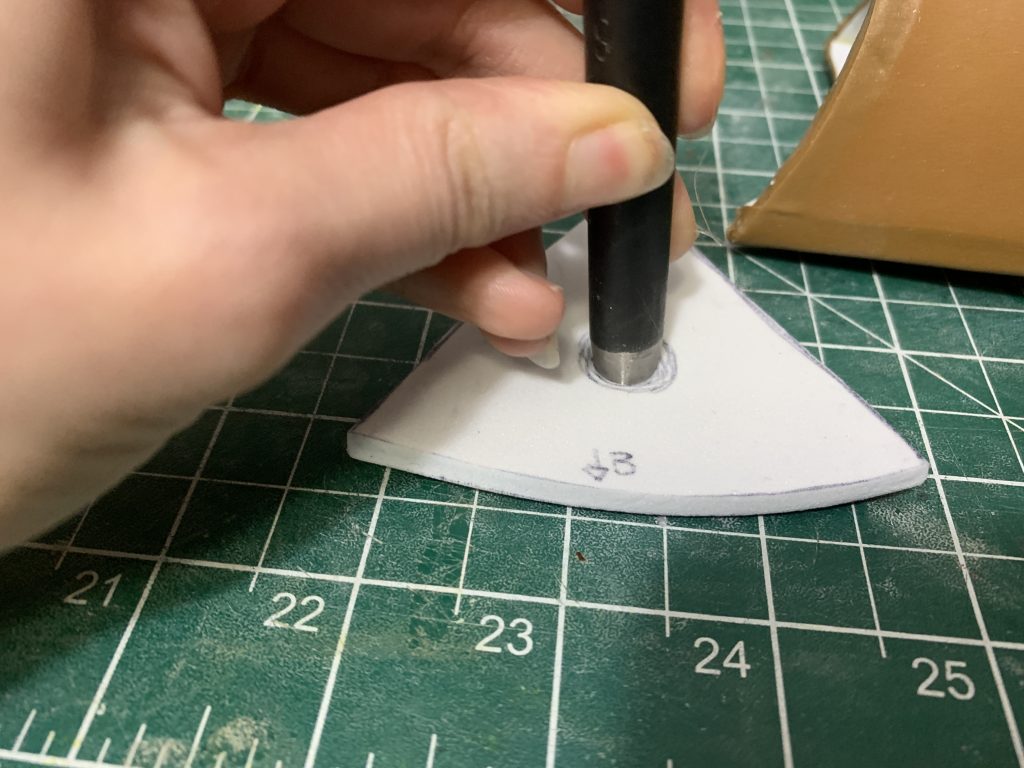
This is easy to do with a leather punch, and just your fingers for pressure, no need to hammer for foam. I also find that twirling the leather punch will help it cut.
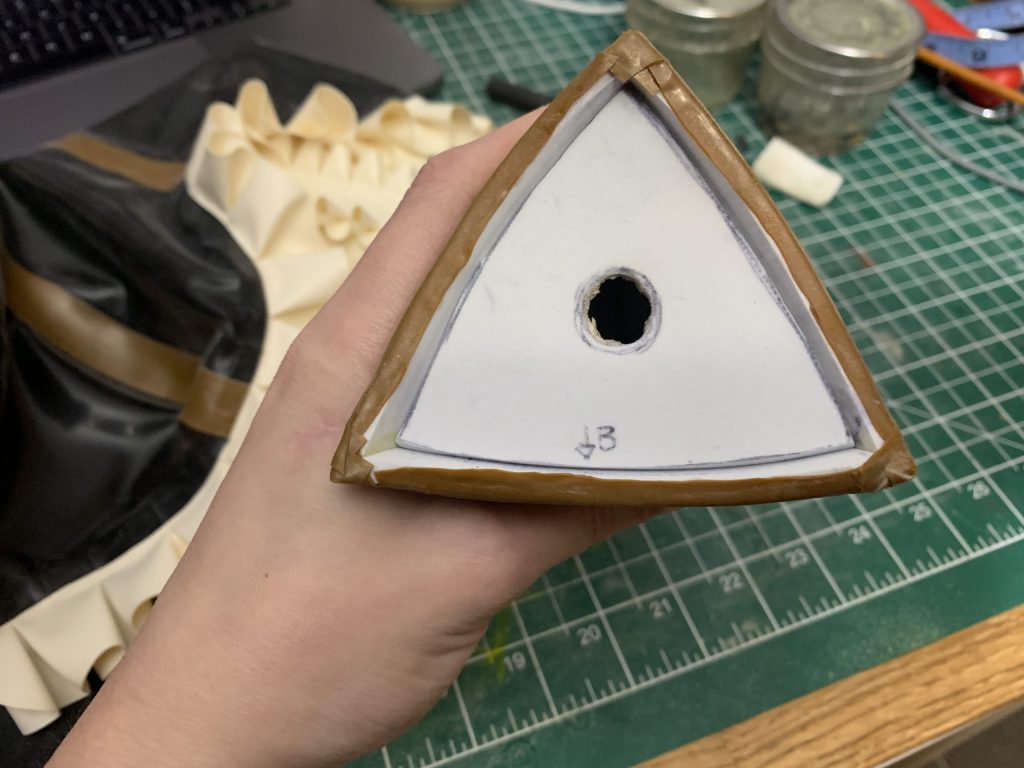
I wanted my hole to be just a touch bigger than my largest leather punch, so I punched a few holes — it’s not pretty, but it works! And it doesn’t have to be super pretty, because this part is on the inside. (Something I ascribe to basically only foam, if my garments are not pretty on the inside I might actually die.)
Part Eight: Attaching the Stinger
At this point, I hadn’t yet glued the last piece into the stinger, because I wanted to test the depth of that piece first — it has to be in far enough that the stinger will sit flush with the rest of the thorax, but not too deeply so that the velcro won’t adhere.
Yep, you heard me right. Velcro. I have become unimaginably powerful, I can adhere anything to anything else that I want.
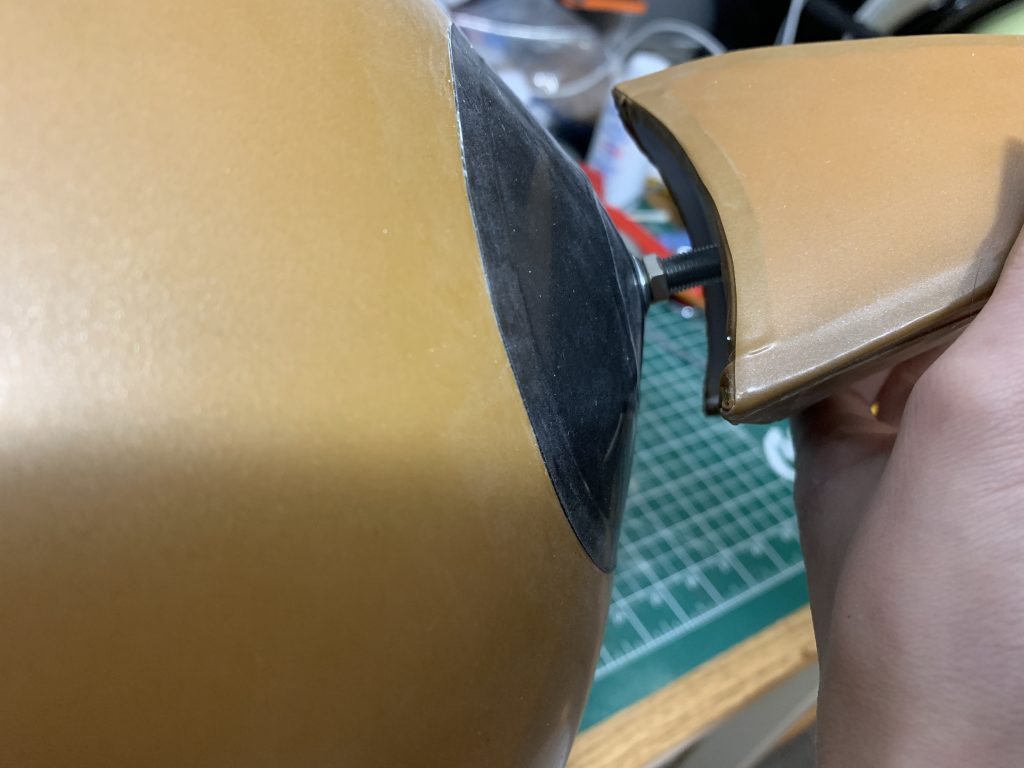
So I wedged the piece in place, slid the stinger on, and tested. This is a little bit hard to eyeball — what I ultimately wound up doing is pulling it forwards, and then pushing it against the inflatable, to force the inflatable to push the piece in deep enough.
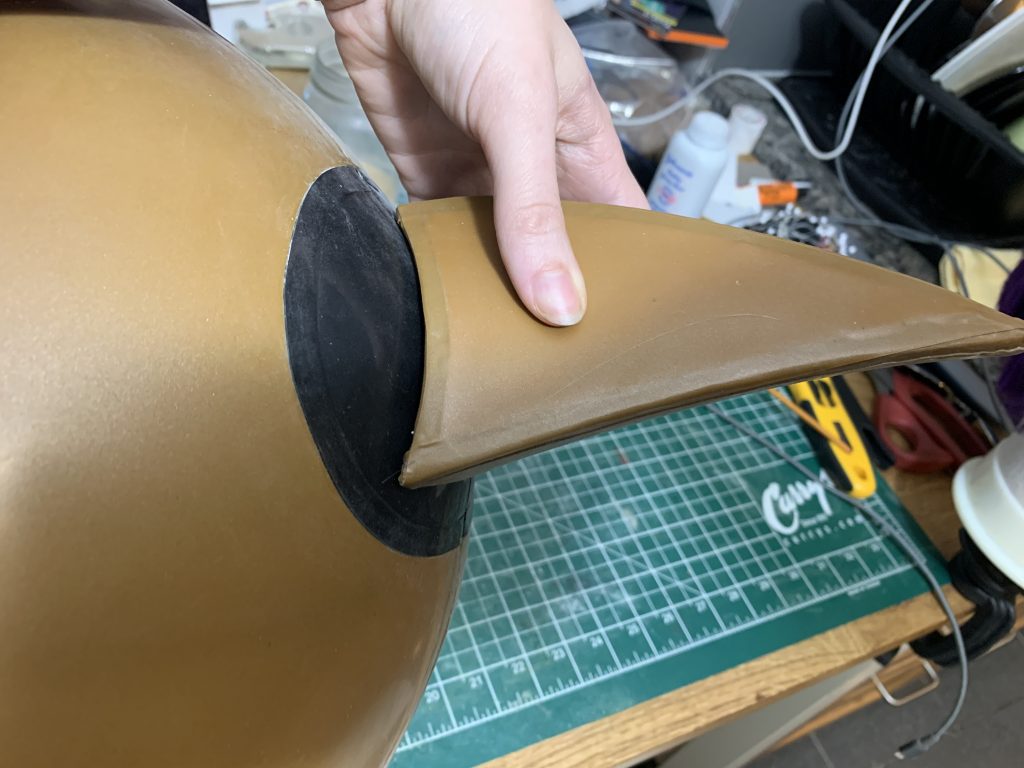
This is how I want it to adhere, and the inflatable more or less pushed the piece to the right spot for me, so I glued that into place (by not touching it and just squirting some super glue around the edges because I was afraid to move it too much).
Next, it was time for some velcro.
I originally did this next bit with regular velcro, and then decided to pry it off and buy more of the industrial strength velcro I had used on the previous two stingers, because in my opinion, it really did make a difference when I saw this one with the regular velcro.
(I do recommend, when you’re trying to take the stinger off, taking the whole outfit off and using a finger to get in-between the stinger and the inflatable, and really helping the heavy-duty velcro pry apart. I live in constant fear that the bond of the velcro to its other half will be stronger than the bond of the Velcro to the inflatable, and that it’ll rip a hole on its way off. 😂)
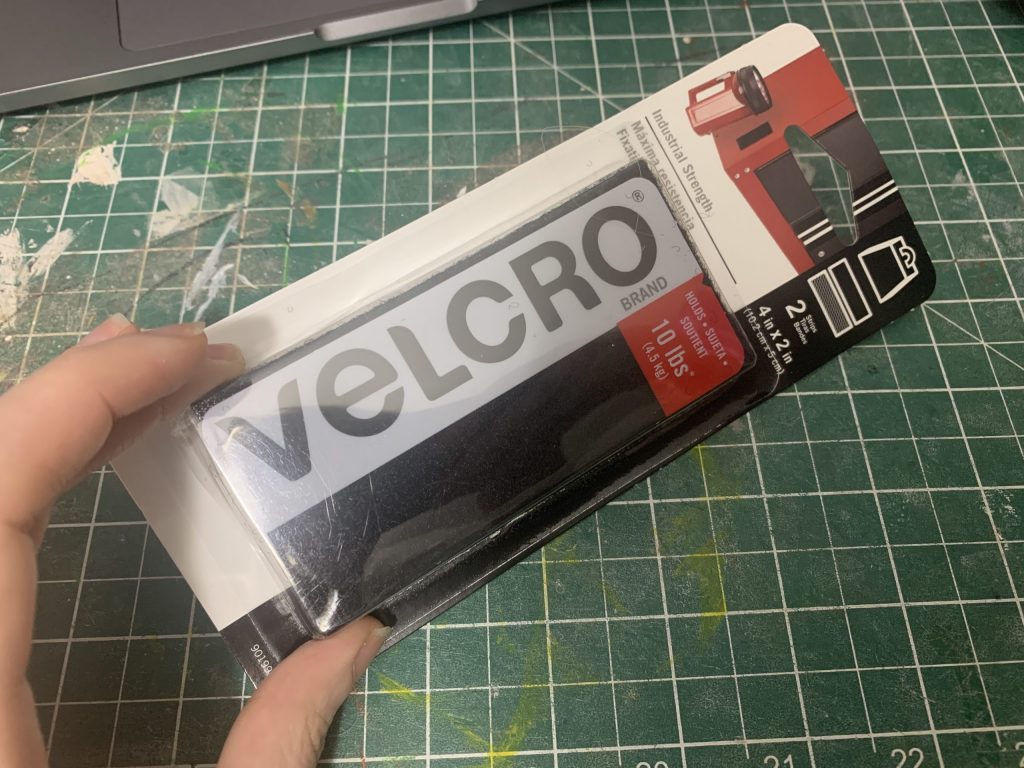
Here’s the Velcro I like to use, just as a point of reference! I use back for the stinger, and white for everything else that I’m doing, so I generally have two of these little packs going at once.
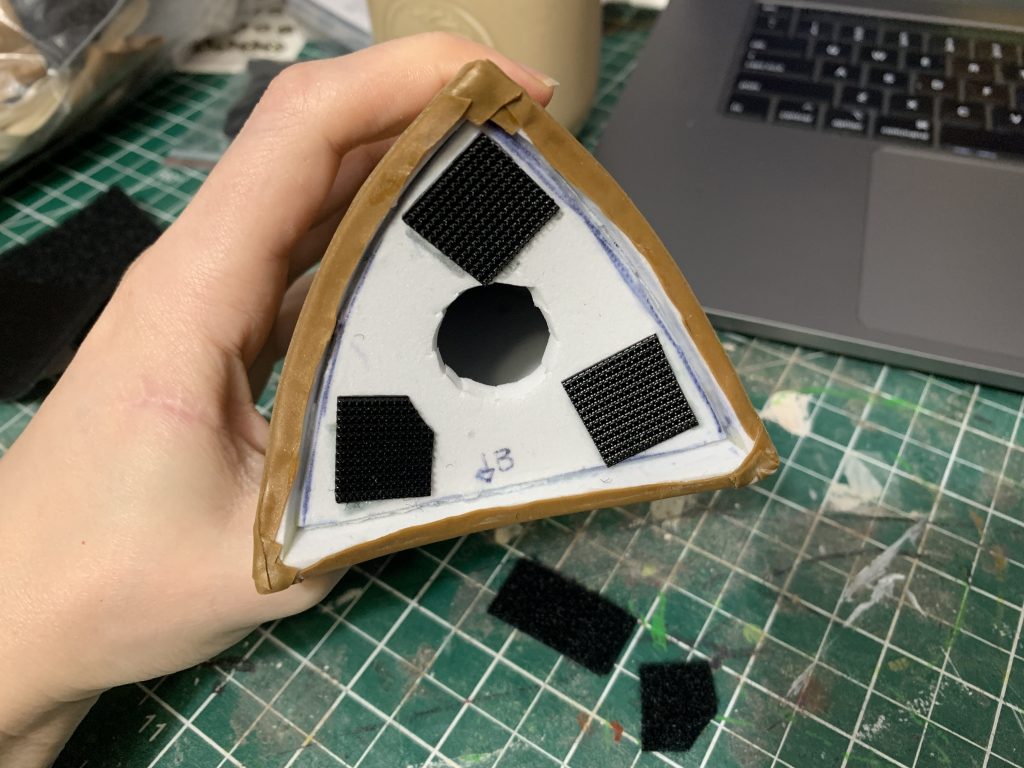
Here are the pieces in roughly the organization that I want them — a good way to figure out where these are, is to wet them, and then push them against the inflatable tail. The latex will have wet marks in the powder wherever these pieces of velcro are. As long as they’re close, though, you’ll be fine (this is industrial strength), so you can also have your pieces a little off. Given the proximity to the hole for the valve, you can probably eyeball where the corresponding velcro needs to go.
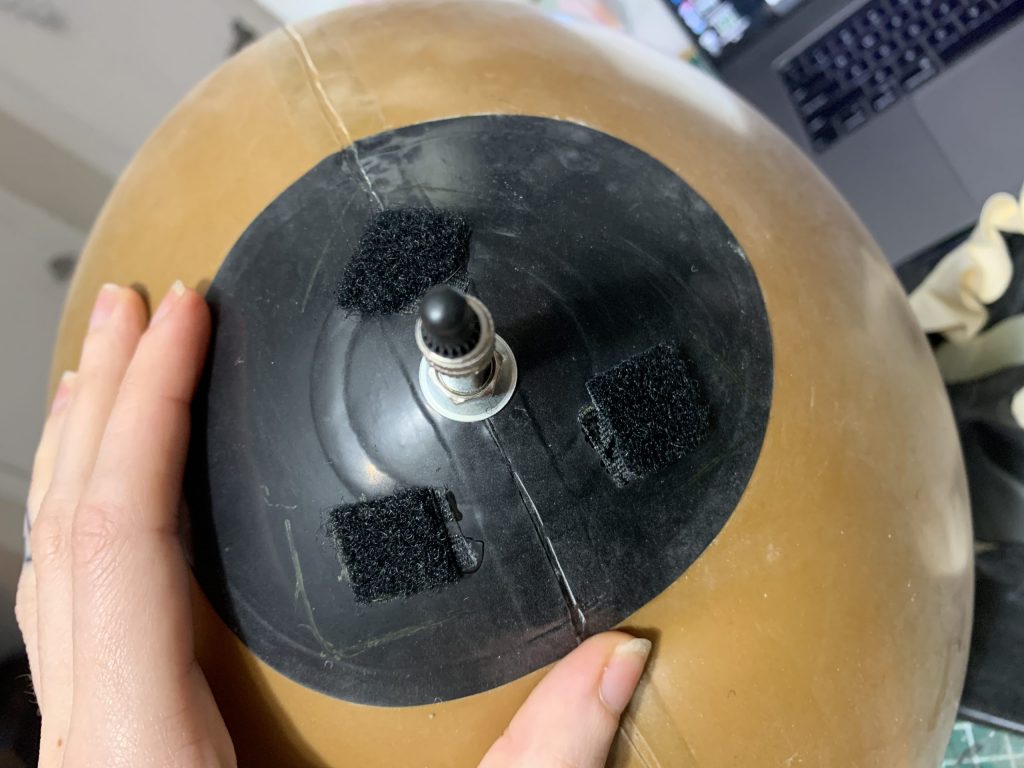
Make sure you only put a thin layer of glue on this — too much and it’ll take forever to adhere.
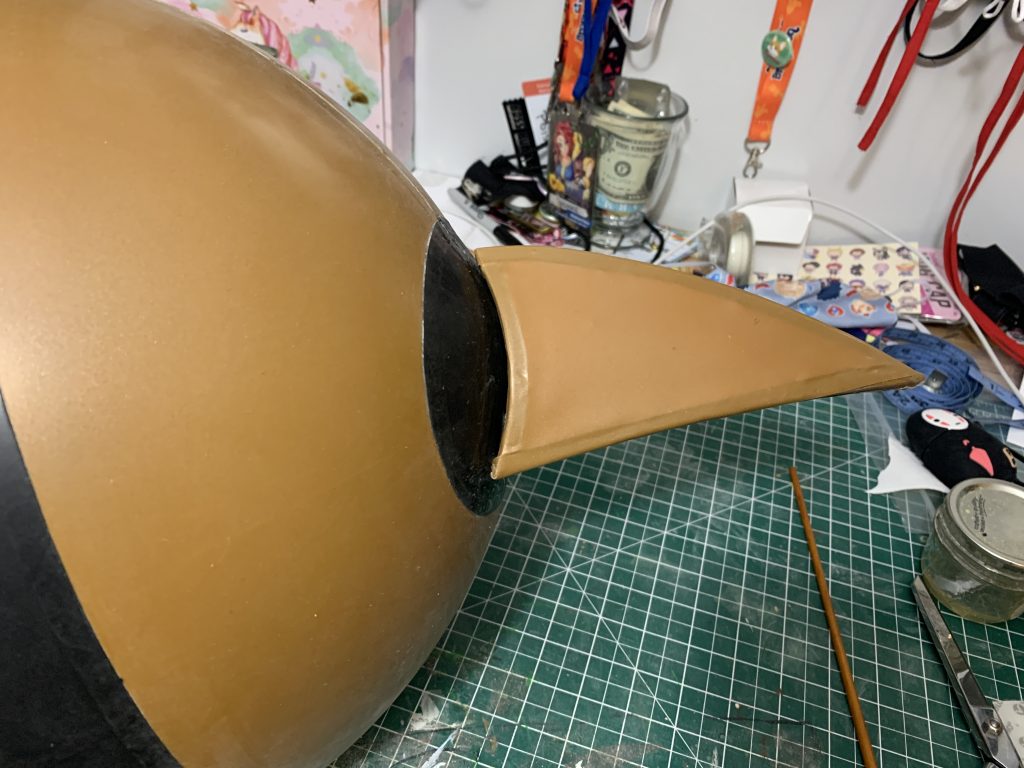
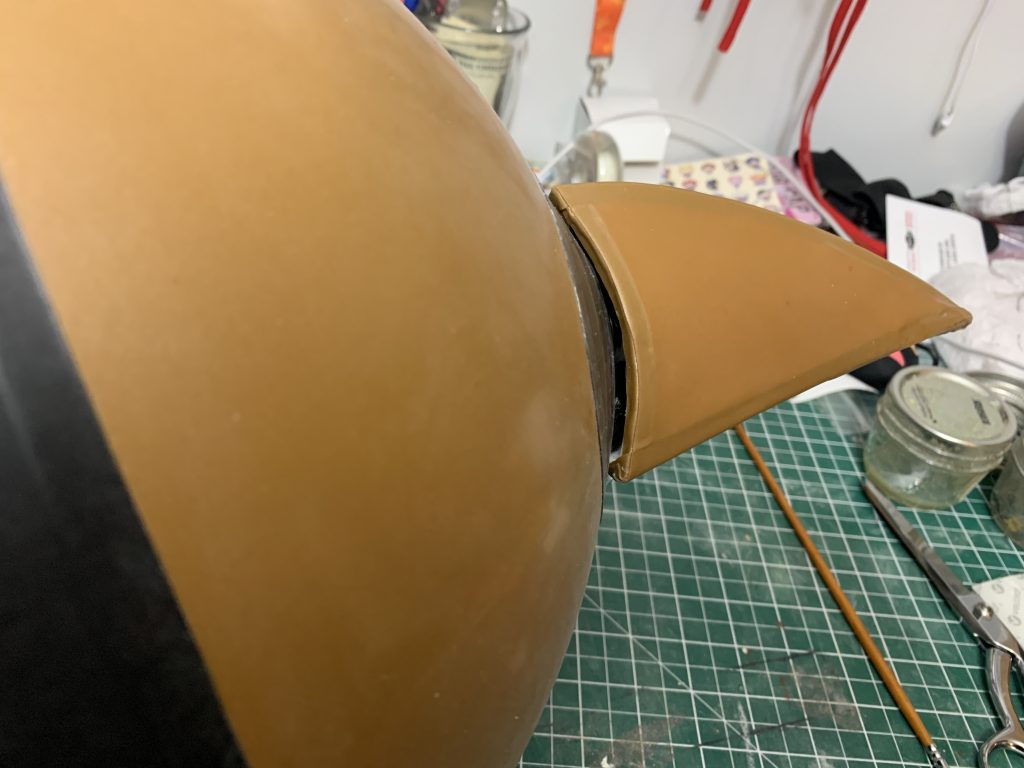
Here’s the final look on the stinger! Attached all by itself with velcro!
So let’s move on to the other finishing touches!
Part Nine: The Closures & Other Details
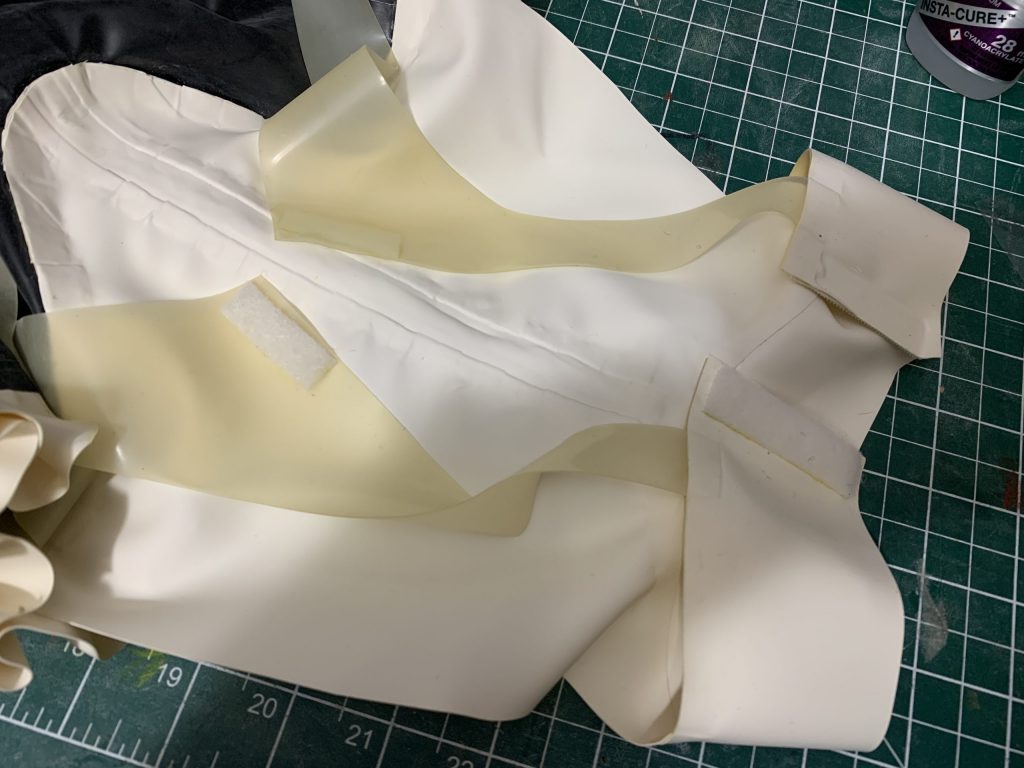
Here’s the velcro on the back of the neck and the middle of the back strap. Generally, I’d put snaps on these, but both of these areas will be covered — the neck with a fur ruff, and the middle of the back with the wings, so I’m not worried about the visuals on this.
(And I have to say, honestly? The velcro was pretty convenient, I liked it a lot!)
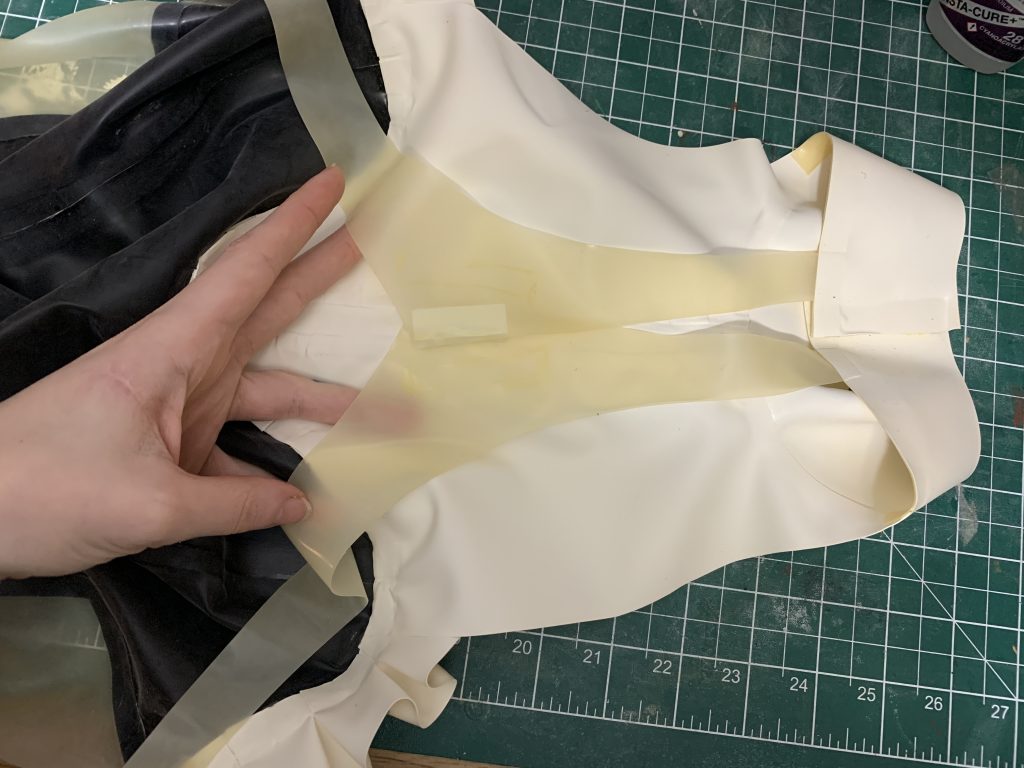
Here’s how the back overlaps — just a little bit, right under where the wings will go on!
Speaking of — I also added two strips of velcro here. The corresponding pieces were put on the wings, so that they can be just stuck on, once the rest of the suit is on.
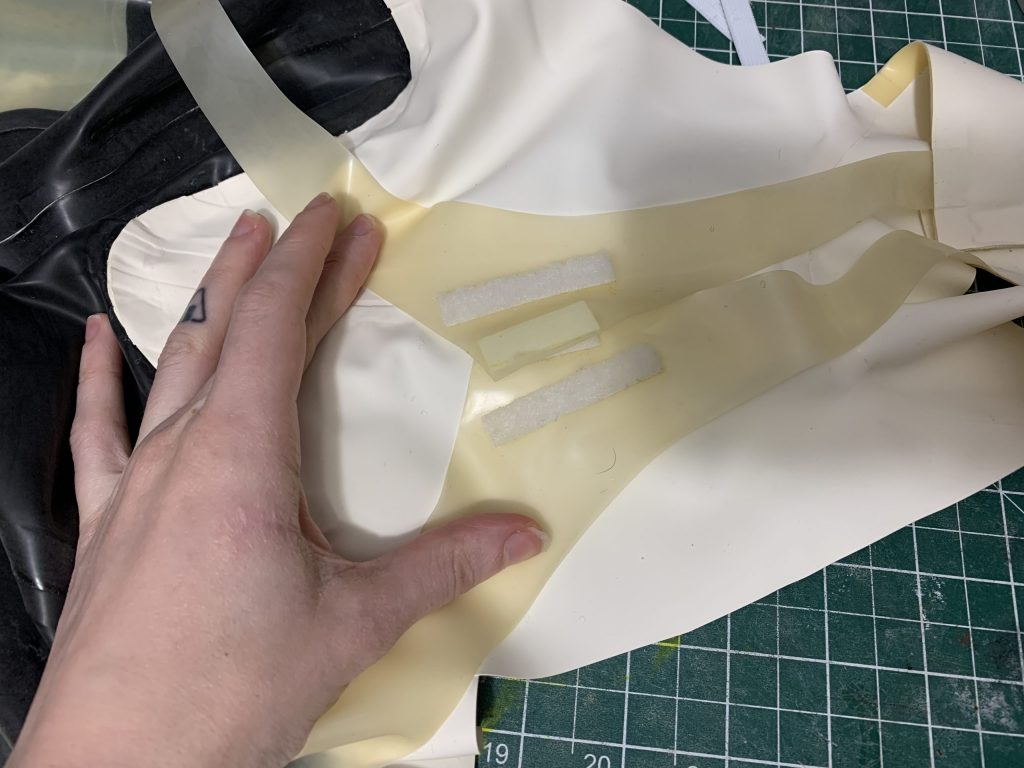
But, again, we’ll talk about the wings in just a minute — let’s finish up what’s left of the bodysuit here. Really, the only ting that’s left on the bodysuit itself is the fake buttons on the front.
For that I use 15mm snaps — I bought a kit of 150 of them at one point, and I’m slowly working my way through them all. The kit I bought comes with a tiny hole punch the right size for the snaps, and all of the tools to hammer them in.
In this case, though, I only need the tops. (Three for the front of the bodysuit, and one each for the little wrist things.)
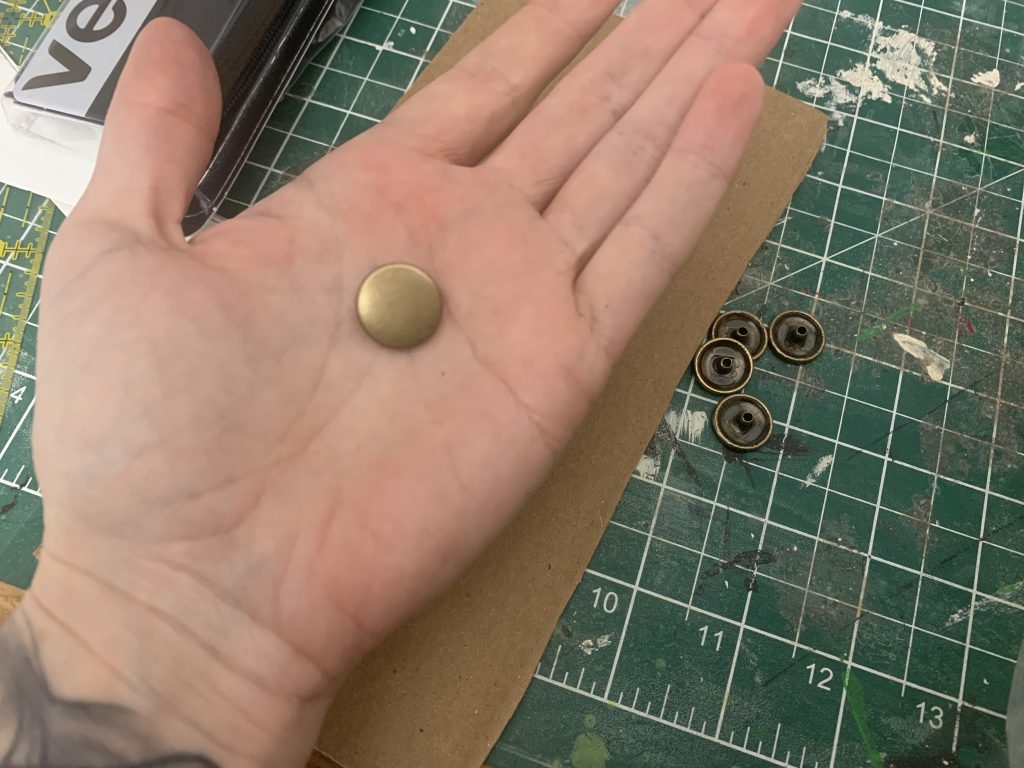
I have both gold and silver in the set, and the colour is pretty close, but since this is going to be installed onto white latex, which is also white latex which will ostensibly be folded up to store (since it’s kind of a weird shape to hang, even if I wanted to), I decided to cover all of these with paint. Latex discolours when it comes into contact with metal (see my Panther Writeup if you’d like to see some metal discolouration), and white is especially bad for this, so the paint layer will keep that from happening.
Luckily I already have a colour-match to the Metallic Honey (yes, that’s actually what the colour is called, isn’t that perfect?) latex I was using, which is this:
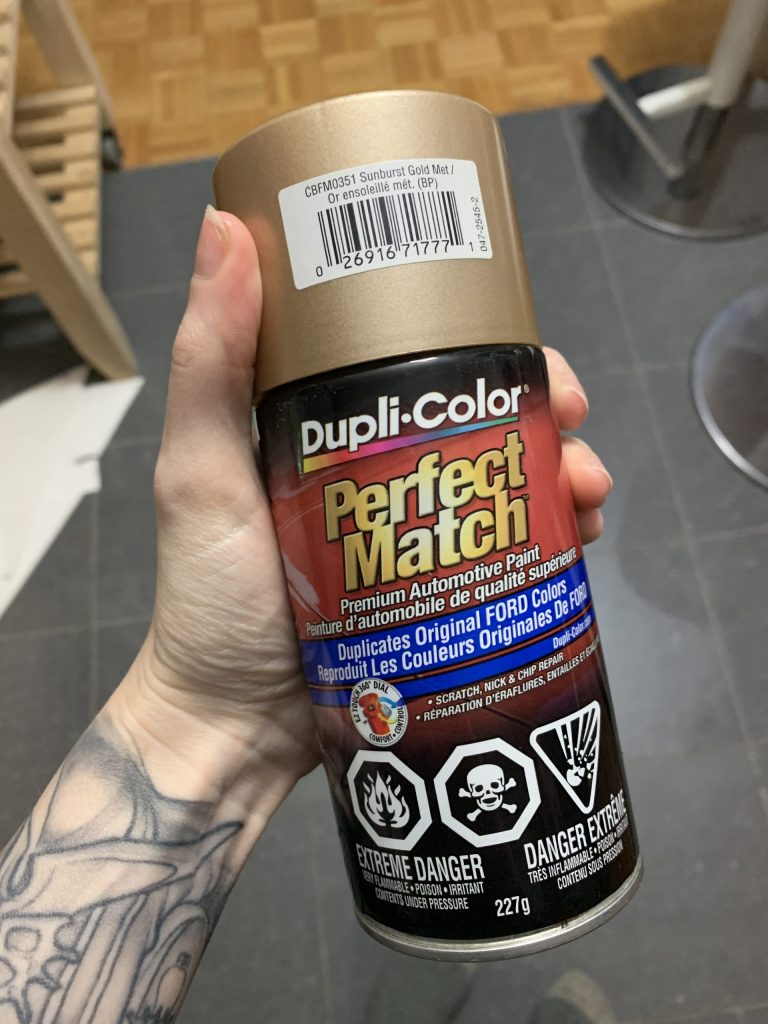
This is also just my go-to rich gold for props, so really, I lucked out. I’d bought this to touch up Shigaraki’s hands.
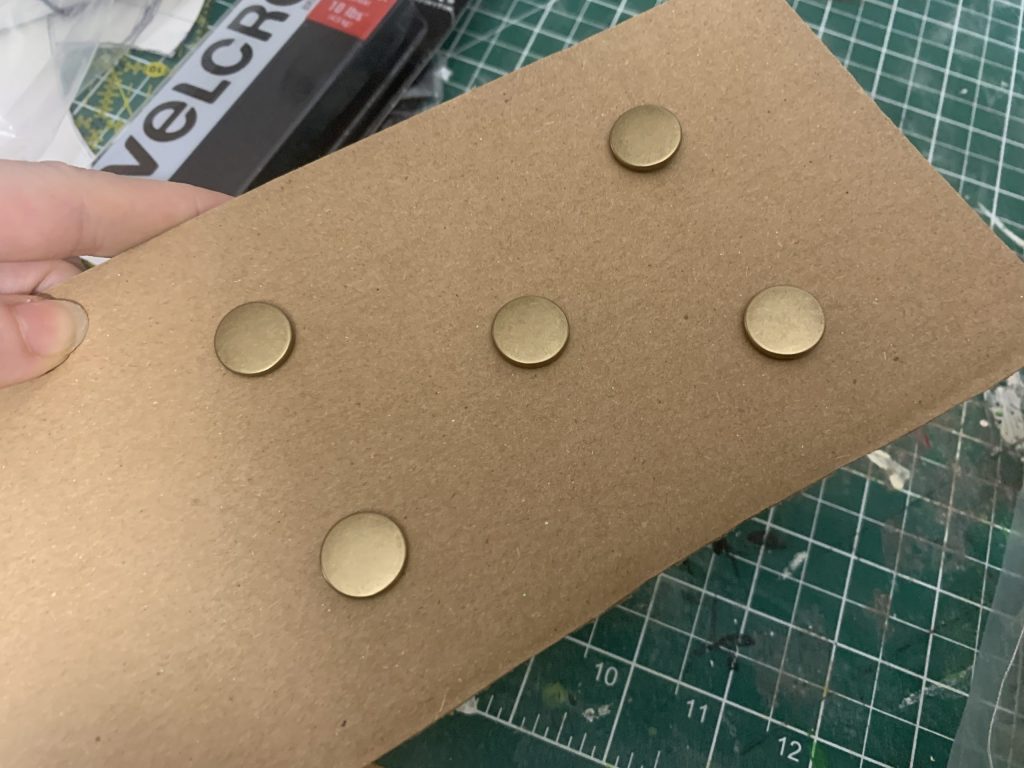
I’ve found that the best way to paint these guys is to cut a little slice into a piece of cardboard, and push the shaft of the snap into it. That’ll hold them in place while you spray paint them.
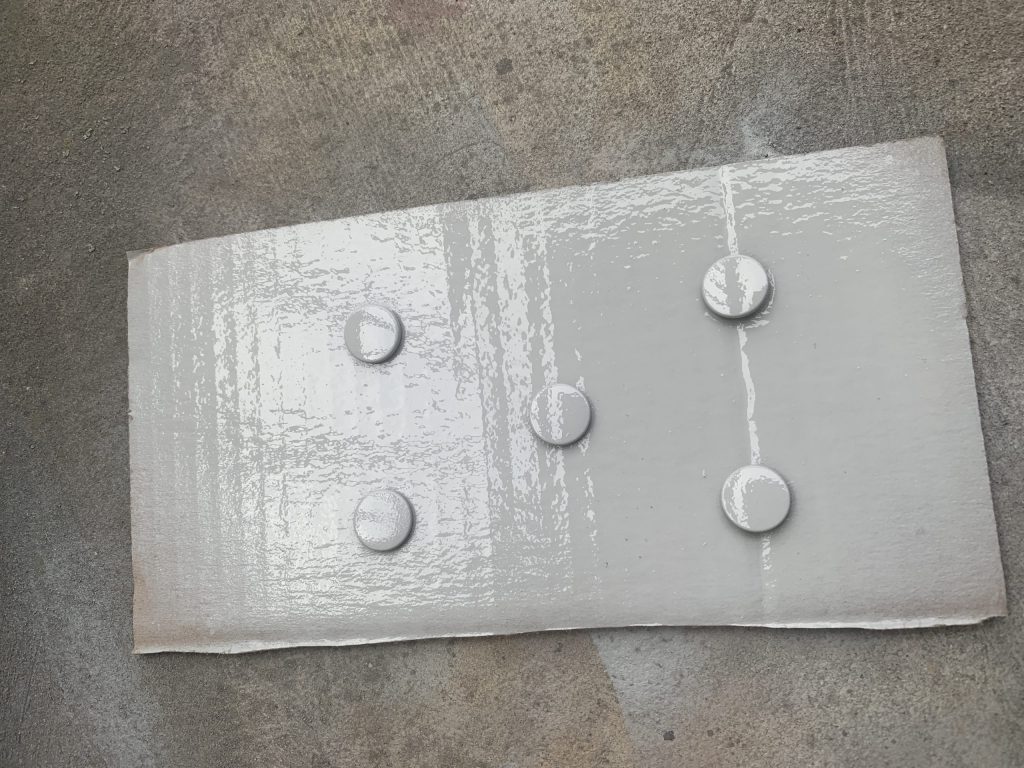
I did a couple coats — these are metal, so you need a primer layer that’ll stick to that. My usual High-Fill Automotive Primer sticks to basically whatever, which is dope, so a couple quick coats of that …
And then a couple coats of the automotive paint (which I absolutely did not take photos of before I installed them, whoops), and now we’re ready to install!
We need to do a couple of things before we go hammering these in, though —
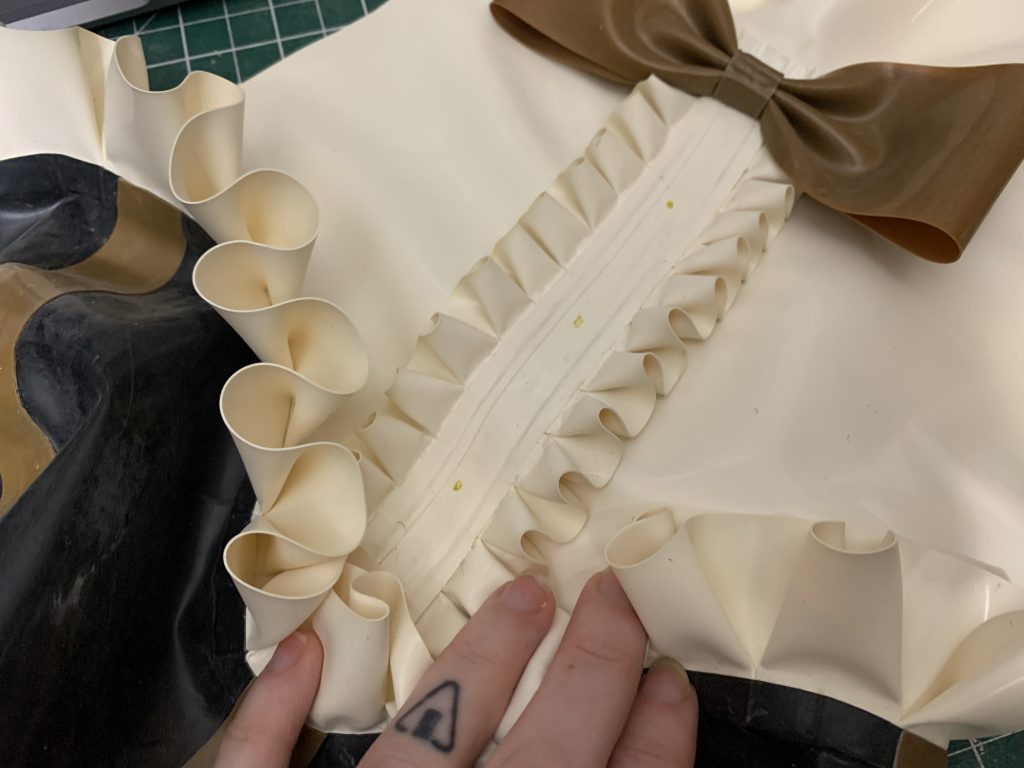
Here I’ve marked where I want the buttons down the front!
Now, if we’re poking holes through latex, we want to reinforce the back — partially to reinforce the latex from breaking, but also in this case because we don’t want the latex to stretch in this area, because the snaps can pop out, if the latex stretches too far!
For reinforcement in this case, I painted some liquid latex onto a piece of white cotton twill (but basically any non-stretch fabric will work, and tbh it doesn’t super matter what colour it is because we’re going to sandwich it in latex in a minute).
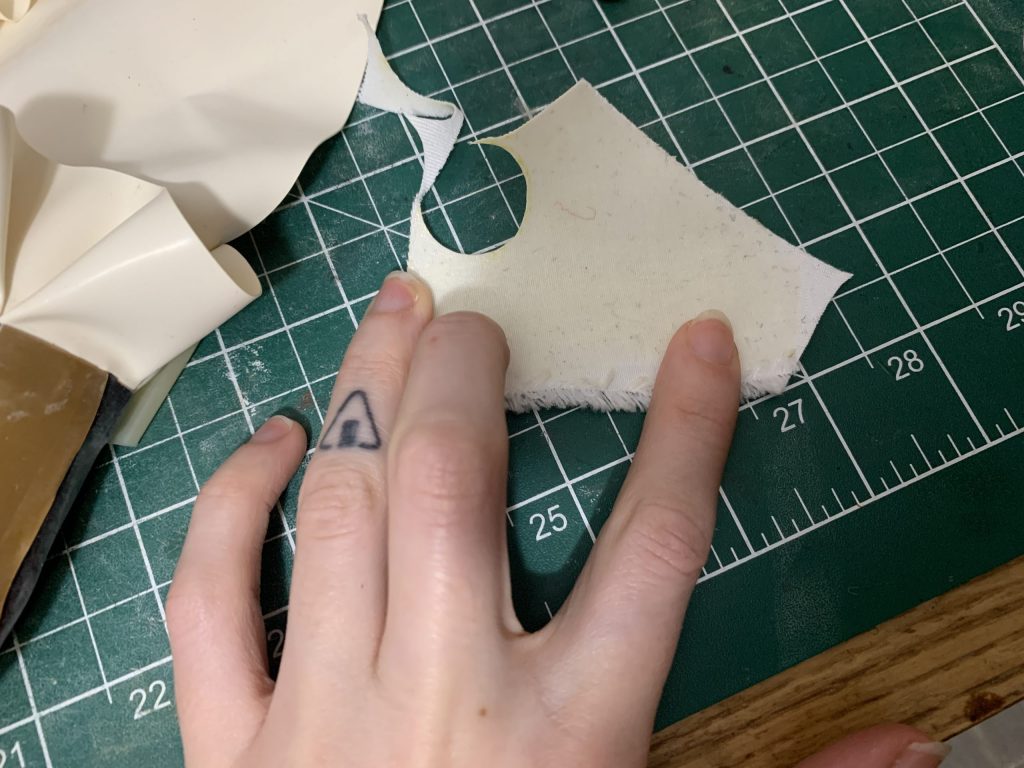
Paint on a layer of liquid latex, set it aside to dry, I also only did one side of this to save time, because drying was taking forever.
I like to install the reinforcement on the back, and the quickest way to make sure they line up is to punch the holes through the latex, and use those to figure out where to put your reinforcement on the back.
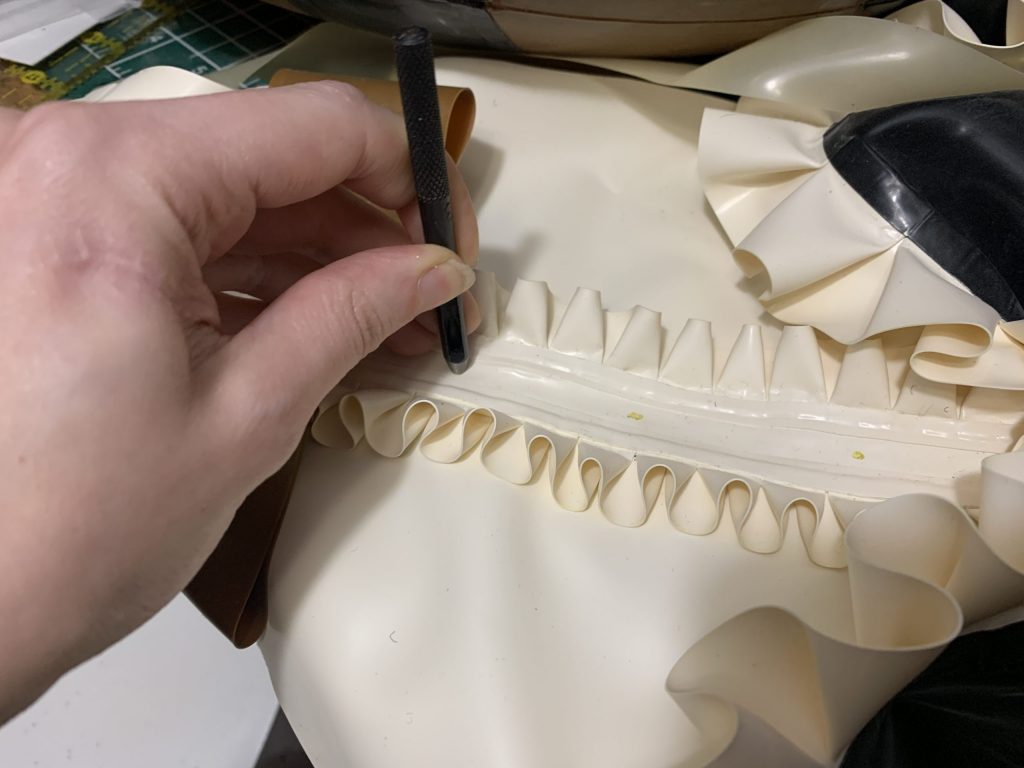
Go ahead and punch those holes through with your hole punch!
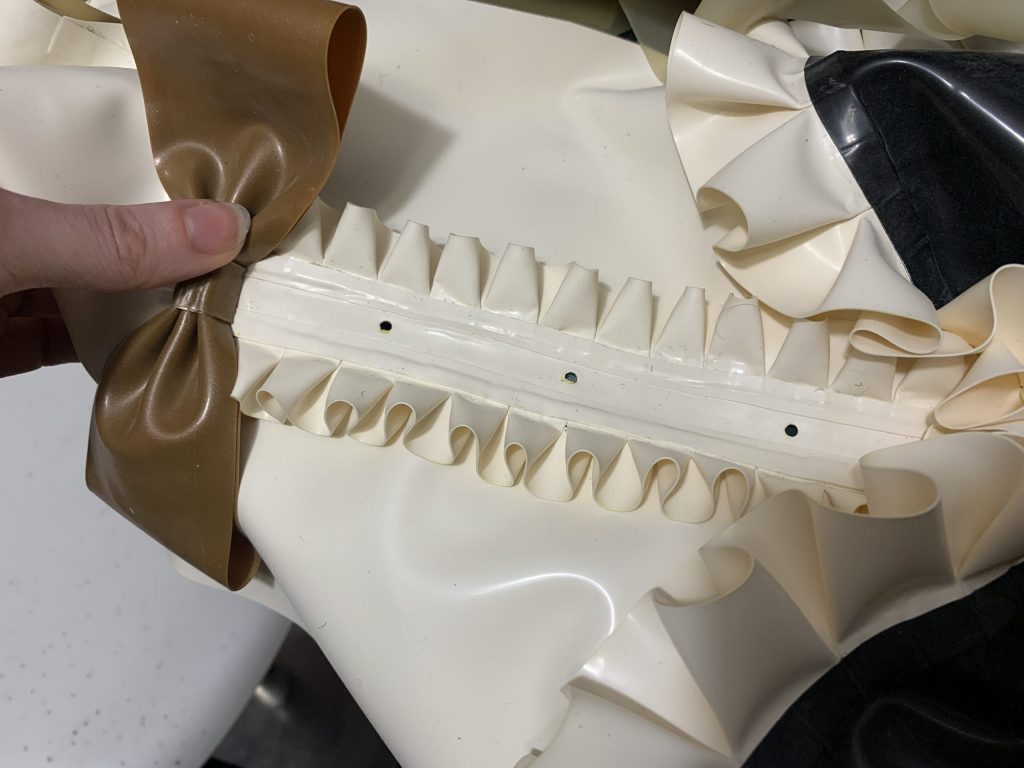
Then you can flip this over to the other side, and use the holes to line up your reinforcement.
For reinforcing snaps/snap heads, I generally want the reinforcement to be slightly larger than the head of the snap, so I traced the snap heads onto the fabric and then cut out those circles, cleaned and glued around the holes on the back, and applied glue to the liquid-latex’d side of the fabric, let everything dry, and then stuck them down and rolled them.
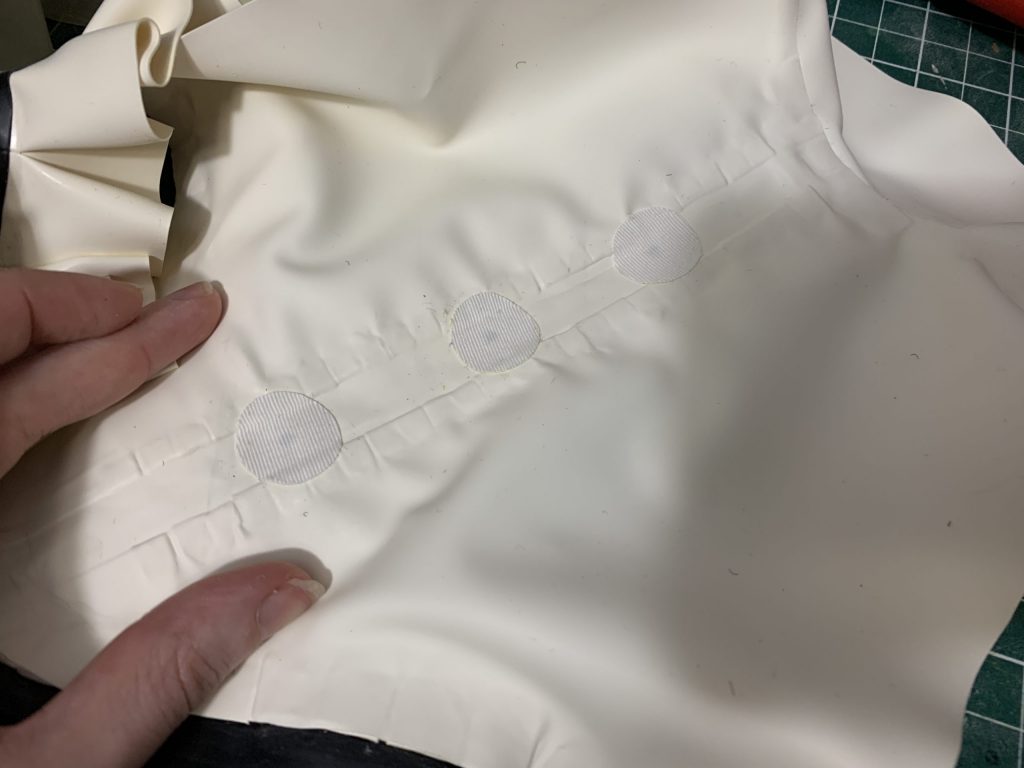
As a note, whenever I use Twill for a reinforcement, I always try to use the flatter side of the fabric, which is generally the “wrong” side. It just looks nicer against the outside of the latex, because the latex will take on the texture of the fabric being rubberized and adhered to it.
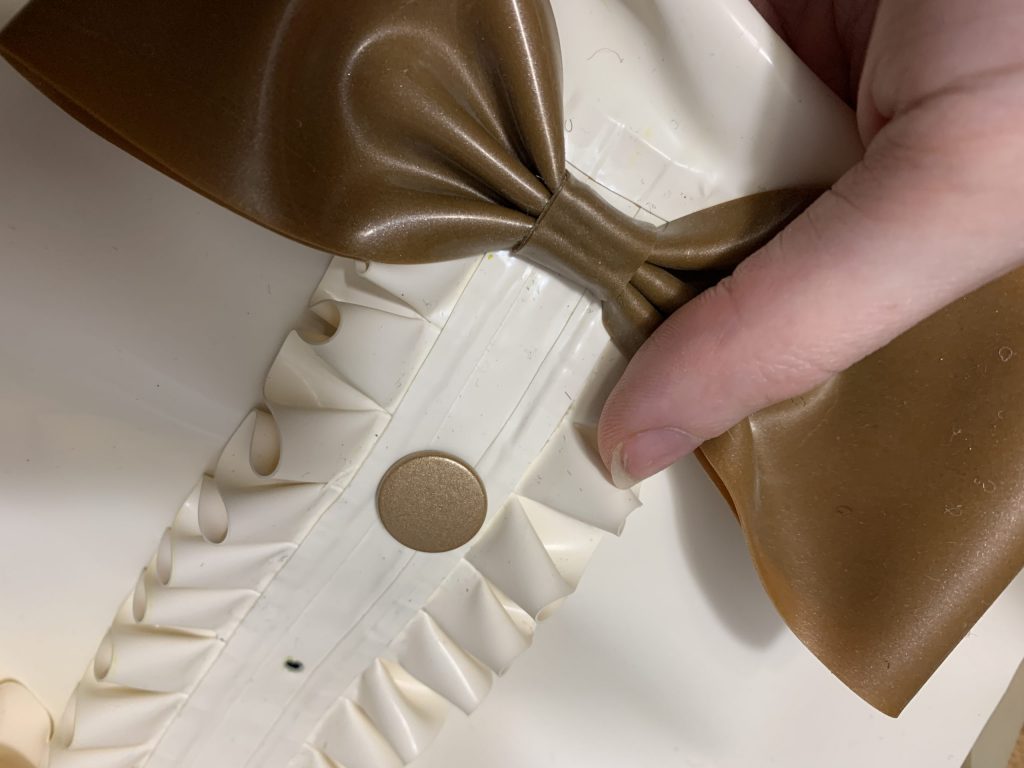
Because all of this is getting put onto white latex, which is notorious for staining when it comes into contact with, to be honest, basically anything, I really want to get as much of the metal covered as possible, so I’m not going to sandwich the back in until I can also cover the back of the snap head shafts.
When you buy a snap kit, you’ll get all of the tools involved too — this is important, because a lot of snaps are slightly different sizes. So make sure you’ve got the right size tool for the job.
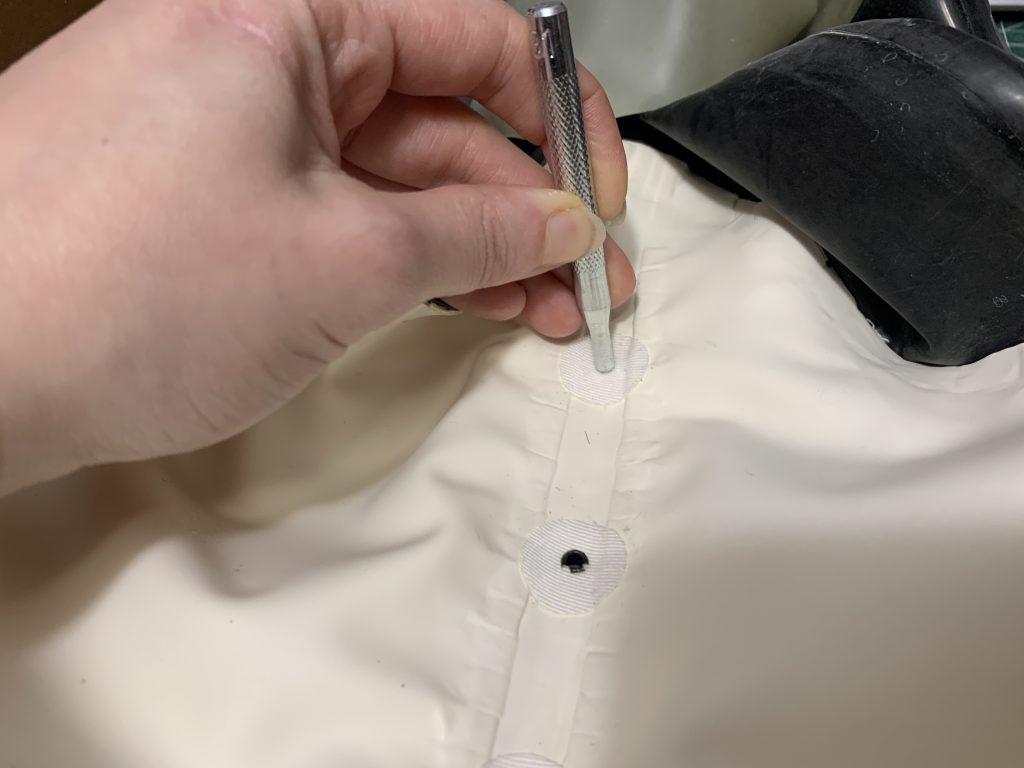
The tool you’re looking for is this one, in particular, if you bought a kit that didn’t come with instructions. You want to gently hammer the shaft of the snap head down, so that it splits and catches on the non-stretch reinforcement. This is where the non-stretch becomes super important, because you can see how small the lip is that’s holding the snap head in place — if that hole was to stretch at all, it would just pop out.
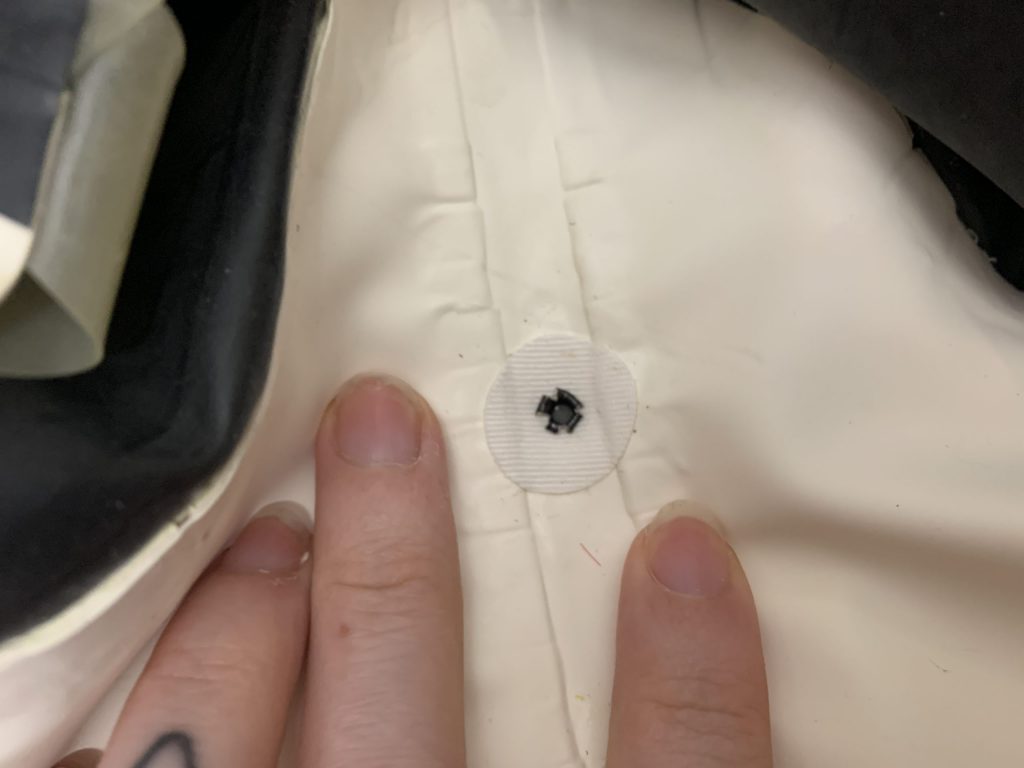
Closeup look at what the back of your snap head will probably look like.
Now we’re going to sandwich all of that in, with slightly bigger circles of white latex. Apply glue around the edges of your fabric — you can put it on your fabric if you’ve done both sides up with liquid latex, but there’s not much point if the back is just raw fabric like I have it here — and apply glue to your latex circle, apply it, roll it down.
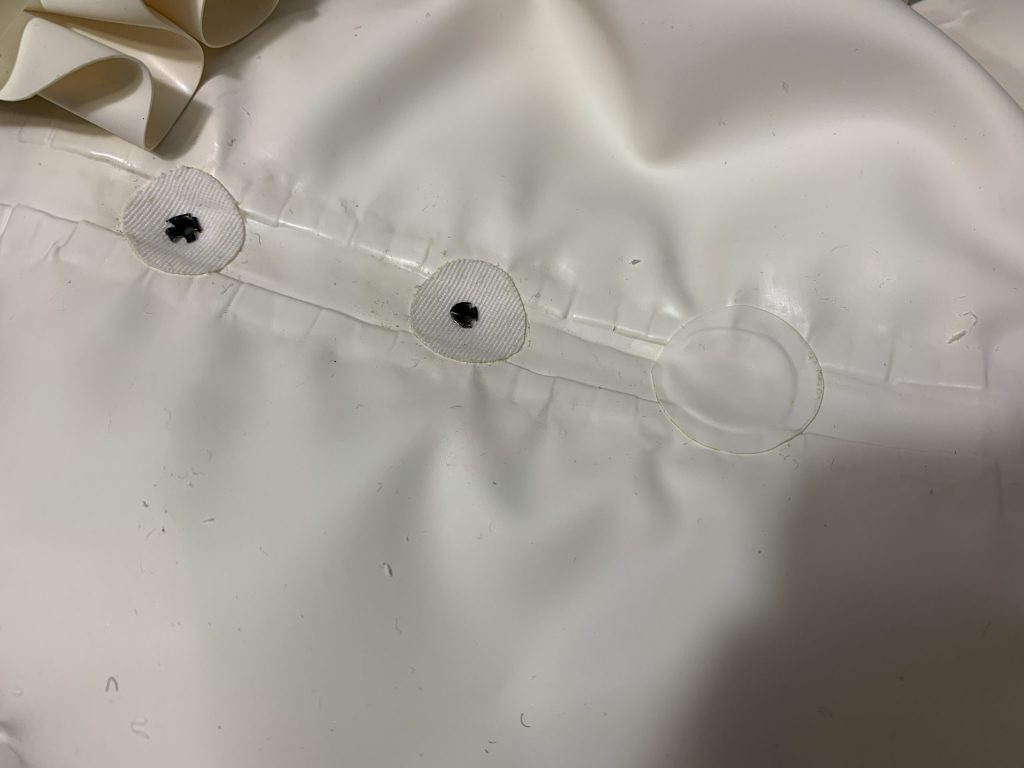
Do the same for all of them —
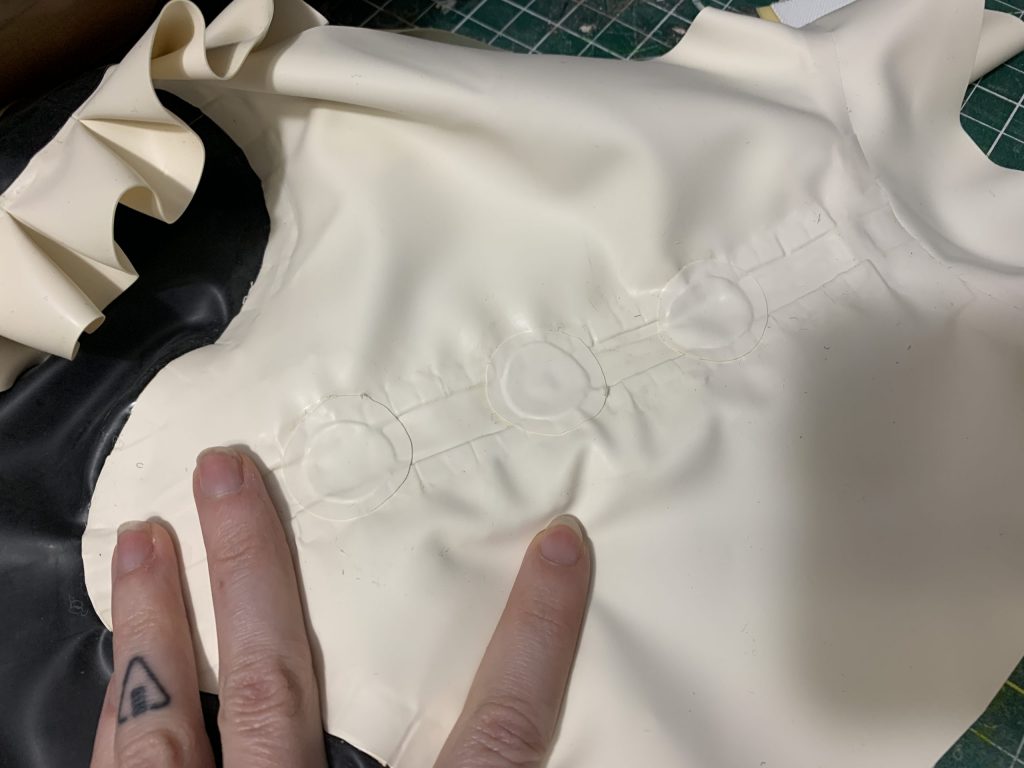
And now you don’t have to worry about any metal staining your nice white latex!
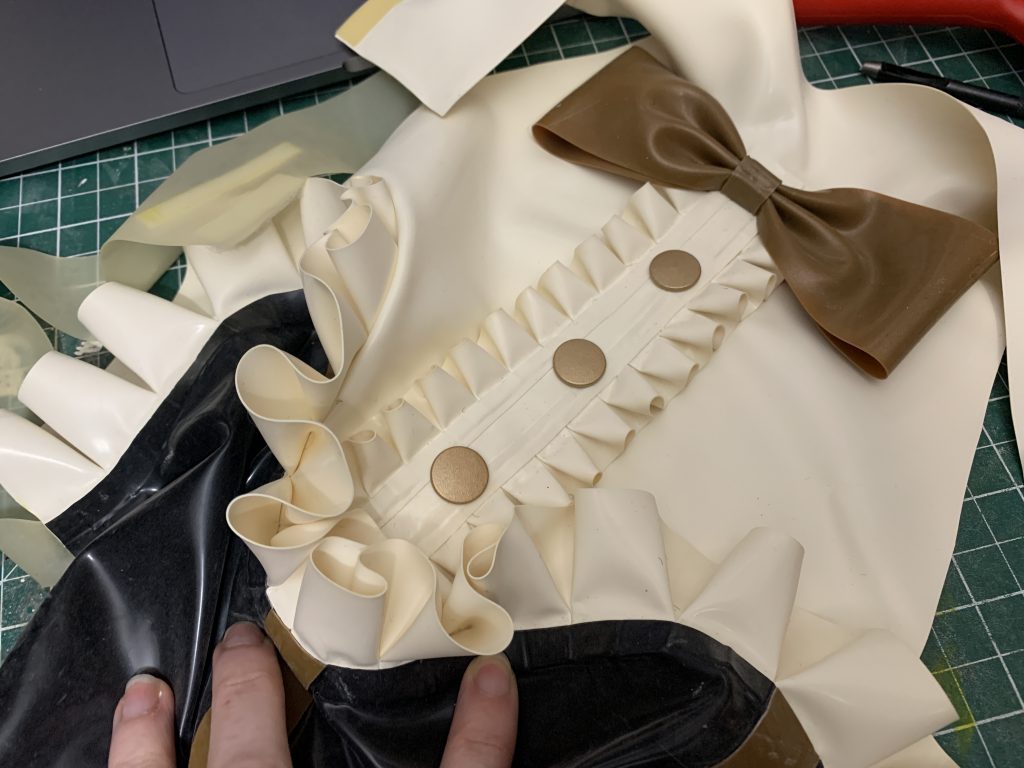
Phew! That’s the Bodysuit, done. But there are a few more pieces that we have left to cover.
Part Ten: Cuffs and Leg Wraps
So it’s been a million years since we looked at reference at this point, but you may remember that the Honeygirls also have leg-wraps, and Chippendale style cuffs on their wrists. I love for everything to match, so of course, those had to be made out of latex as well.
The leg wraps are pretty easy —
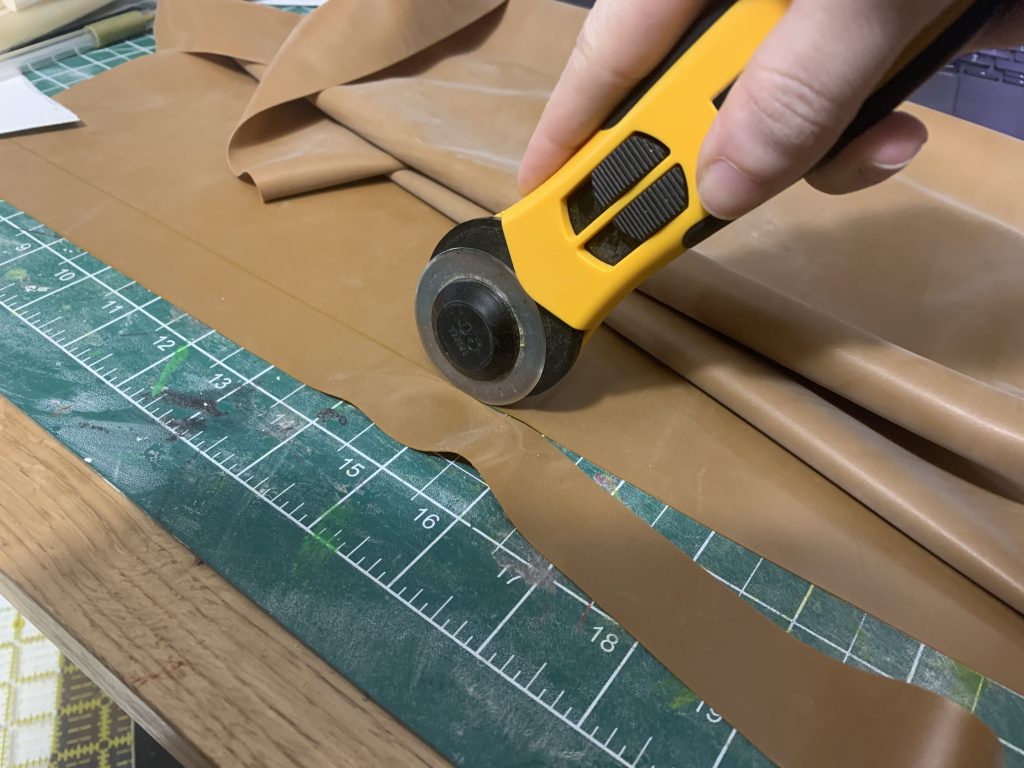
They’re essentially just long strips of 1″ wide latex. For me, it was two widths (aprox. 39.5″) glued together of the gold for the shorter wrap, and 3 widths for the black one. Cut your strips, glue them together at 3/8″ seam allowance to get longer strips, clean off any remaining gel pen off the edges — voila! Leg Wraps!
The cuffs are a little more complicated, but not by much!
Because latex stretches, we can just do pull-on cuffs, no need to worry about any type of closure detail, which saves us a lot of time. Essentially, how I did the cuffs was a loose wrist measurement +2″ on either side for the bit that stands out from the wrist.
The wrist measurement of these pieces you see here is roughly 7″, so it’s 7″ + 2″ on either side, for a total of 11″, and 2″ wide. Easy rectangle to plot and cut.
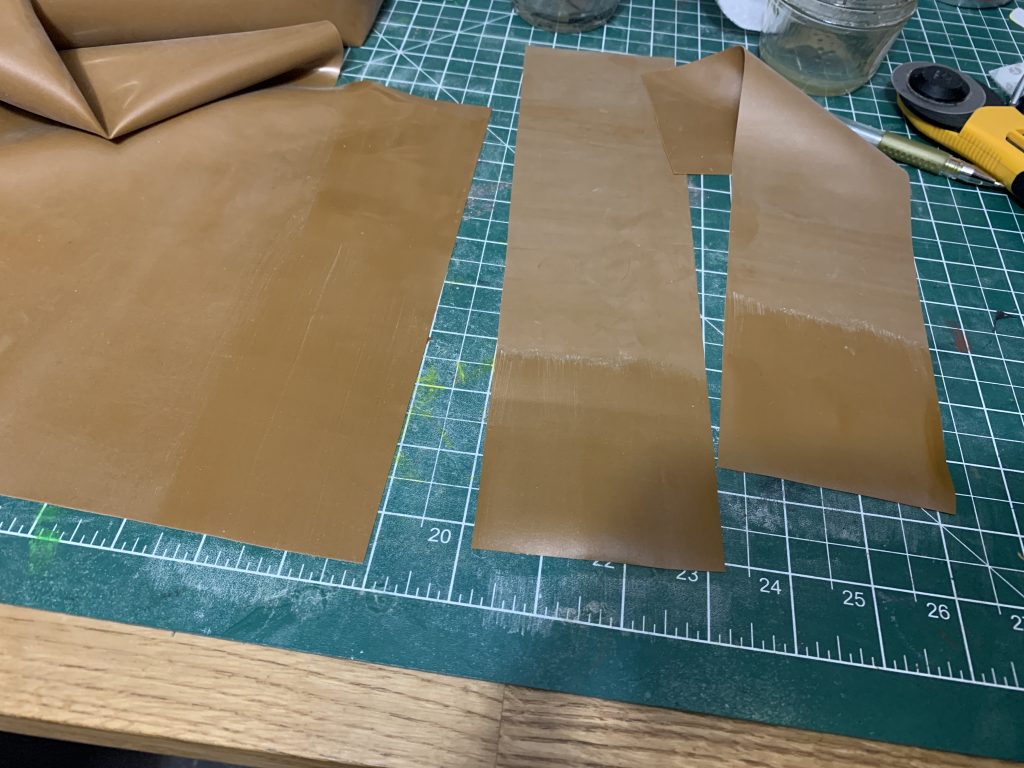
For the stand-out bit at the side, though, I wanted the latex to be really thick, so that it would stand on its own, so I applied a third layer of latex to those 2″ that are going to be permanently adhered together. The easiest way to do this is to mark that 2″ on the “right” side of the latex, and then clean and glue roughly the same amount on the wrong side, to then adhere to a well-cleaned part of the sheet of latex — you can glue this too, but honestly, I’ve found for this that only one side really needs the glue, and it makes it a little easier to get your piece on smoothly if the other piece isn’t glued.
This is a technique that I started using when I was making corsets for a latex-maker — it’s basically laminating two pieces of latex together. (I also did this in my Panther walkthrough for the tops of the shoulders, and I did something similar on my Lio jacket as well on the shoulders to really make them stand like a suit jacket.) It can take some practice to get this technique down without getting air bubbles (and it’s something I want to make a video on later) but essentially what you want to do is pick an edge, start there, and then smooth the piece down like it’s a straight seam, but depending on how large the pieces you’re adhering together are, you might have to use your whole hand, rather than just a fingertip. It’s essentially just a really thick straight seam, so all the same rules apply — especially not stretching one piece more than the other.
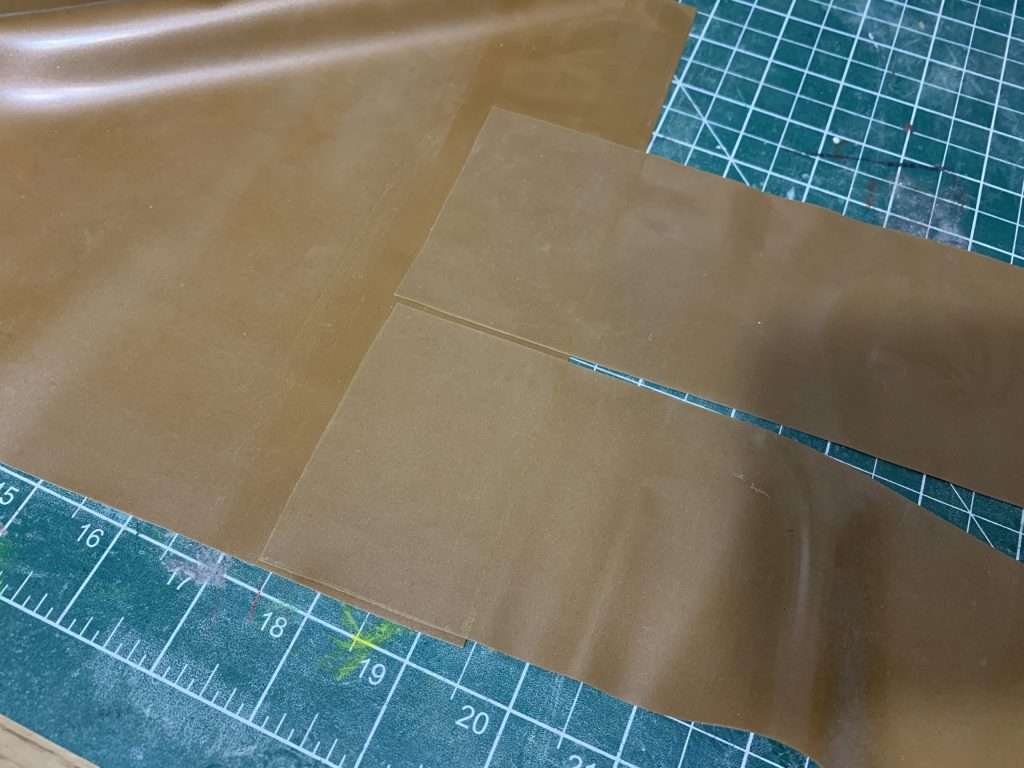
Here you can (vaguely) see the gel pen marks on the “right” side of the fabric, denoting where my 2″ of overlap ends.
If you do wind up with air bubbles, you should be able to tell before you roll everything down — take a Q-tip dipped in thinner, and gently “tunnel” into the area with the air bubble, let everything dry thoroughly, and then, starting at the end of your tunnel where the air-bubble was, press your finger back down and run it like a seam back to the outside.
Sometimes this causes a bubble of a different texture — if that happens, you might have to pull up the whole area around it and re-glue it down, if it’s something that’s not going to stretch (like this). Use your judgement on what’s acceptable to you, as far as texture-differences and small bubbles!
(You can also use a thin sharp — the tip of a hollow needle, like the one that would be used to draw blood of give injections — to lance air bubbles, if you happen to have those handy. If you’re doing a lot of overlays and find that you’re having lots of air bubbles, it might be worth it to invest in some.)
Once these are adhered down, you can go ahead and cut them out. Because you adhered it down before cutting, these will match exactly, which saves you time in trimming dumb little pieces off if they don’t match (like what happened on the tail inflatable).
While they’re still flat, I like to put the stripes on —
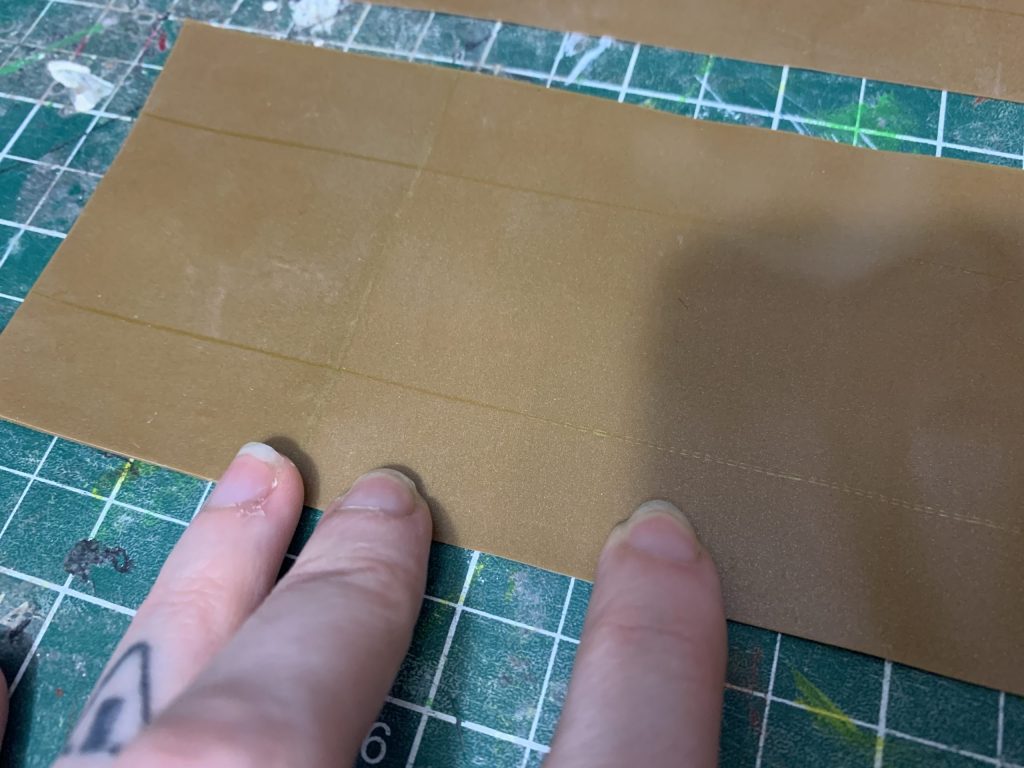
Here’s the markings for where the stripes are going to go — that’s a gel pen line 1/2″ in from the edge, on the top and the bottom. I cleaned towards the outside edges, and then applied some 1/2″ trim butting up against those.
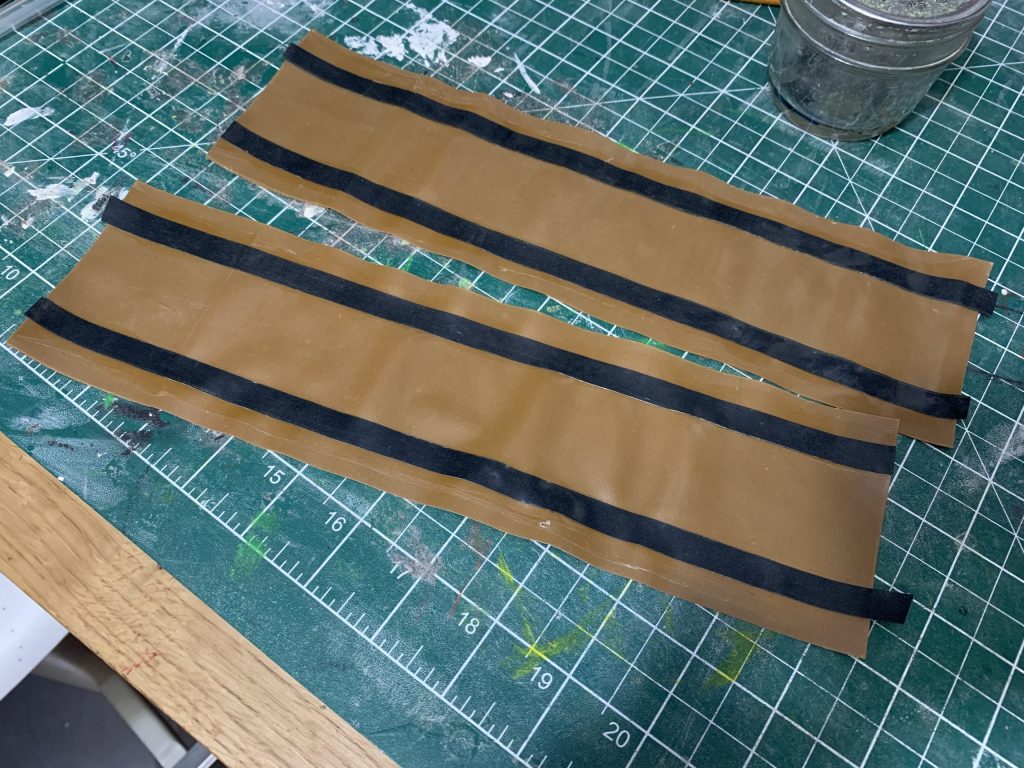
Here it is, adhered, rolled, and cleaned! I didn’t bother cutting the excess off yet, because I knew I was going to have to re-square the edges after the next step:
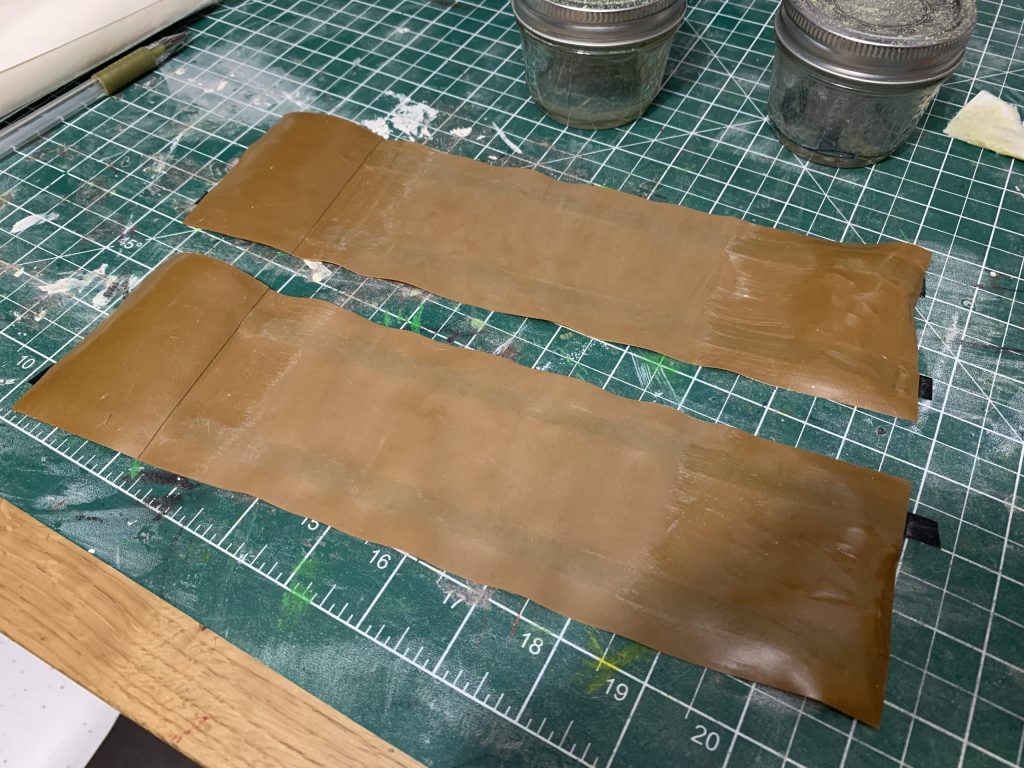
Clean and glue the 2″ of extra latex, and a matching 2″ on the other side. (You’ll notice that some extra is cleaned on mine in the photo, from when I adhered the extra latex to my cuff, there’s no glue on that bit, though, I only want it to adhere to this extra bit of latex.)
Wait for that to dry, then fold it over and press the pieces together; I generally match up one of the edges, and then smooth it out, just like when I was first adhering the extra 2″ piece.
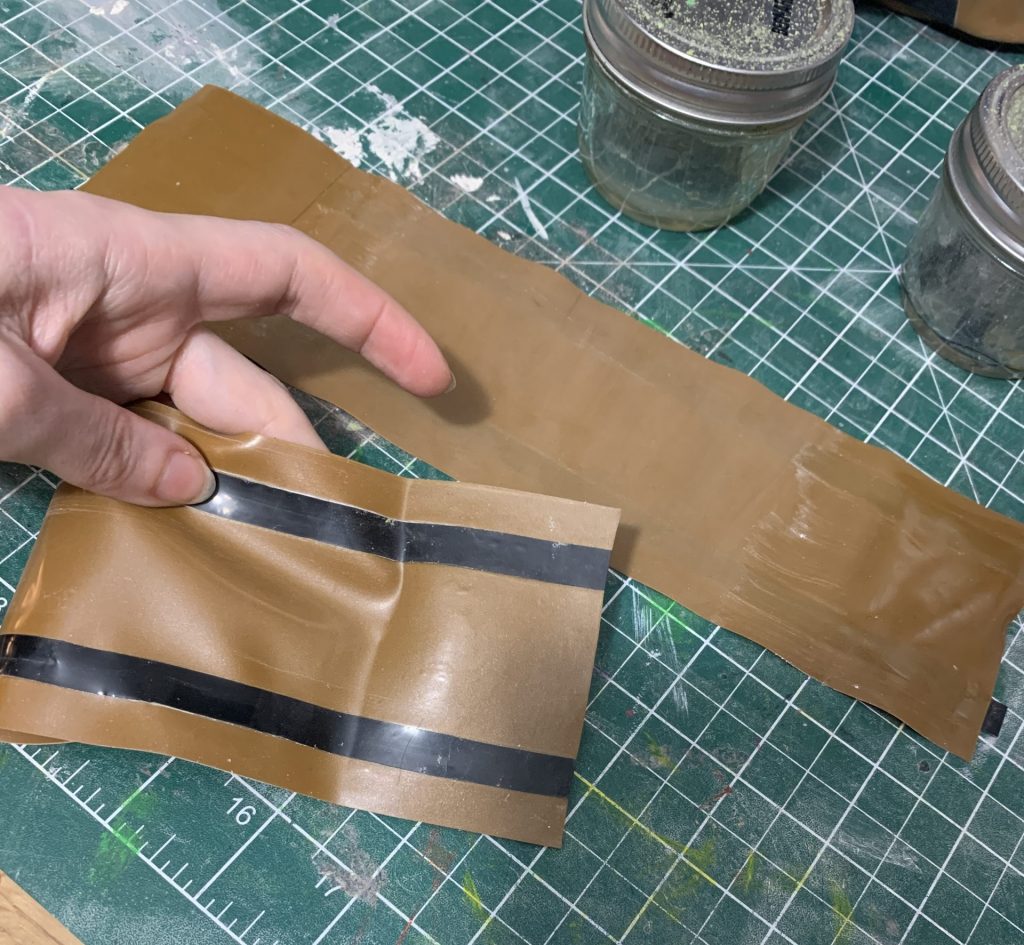
It should look something like this when you’re done. The extra bit of latex serving as the point of adherence really glues the two together cleanly; it’s hard to get that clean of a line without that extra piece in there.
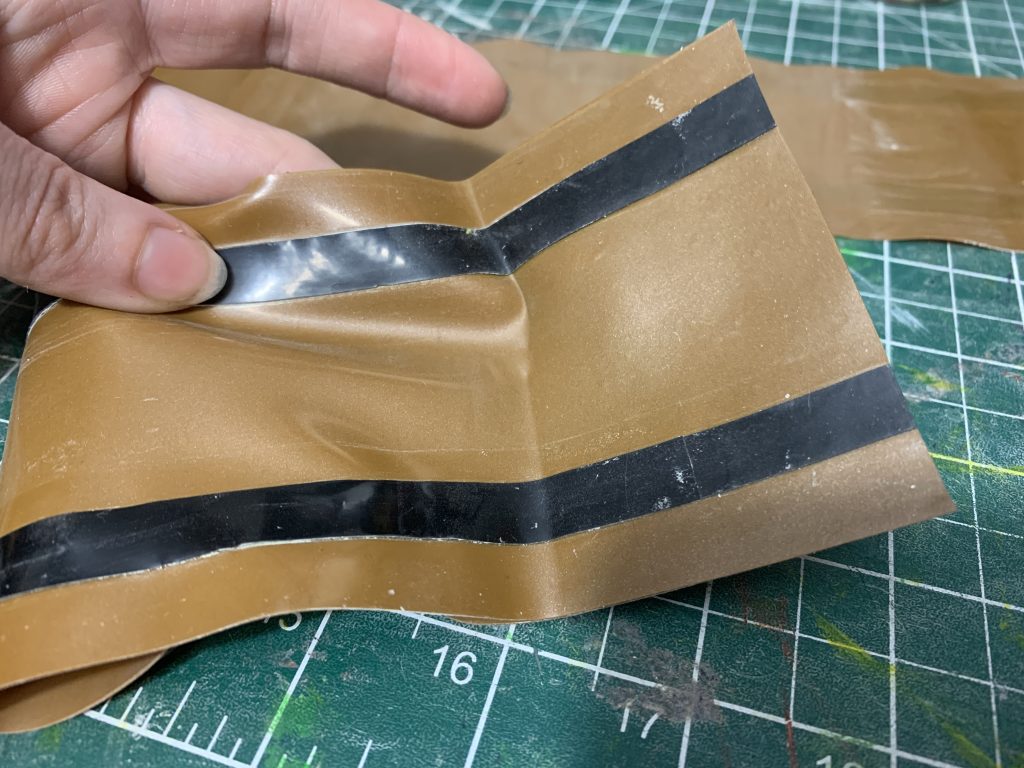
It’s also a stronger bond than it would be without that intermediary piece there.
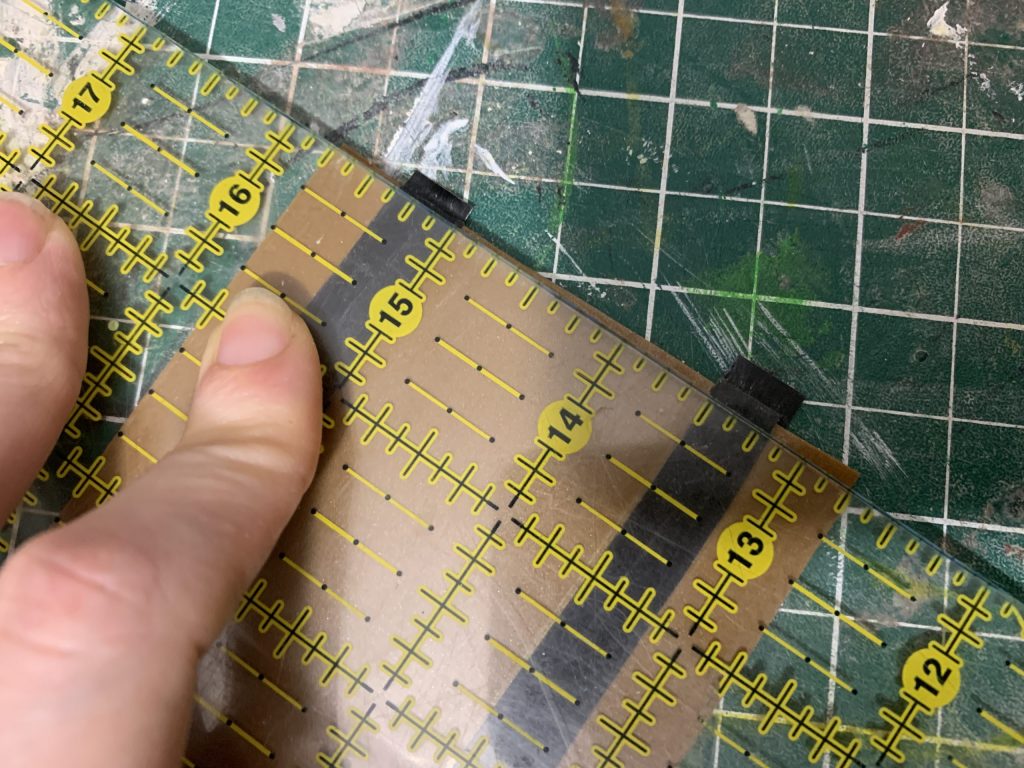
Now it’s time to square this up, which is easy to do with the dress-maker’s ruler, since there are so many lines to match up to parts that I know are straight — in this case, I made sure I was square with the line I’d drawn earlier for the trim (it’s lined up with the 15″ mark in this photo).
Press this down hard, and use it as a guide for your rotary cutter, and you’ll wind up with a perfectly square edge!
Last thing on these — more fake buttons!
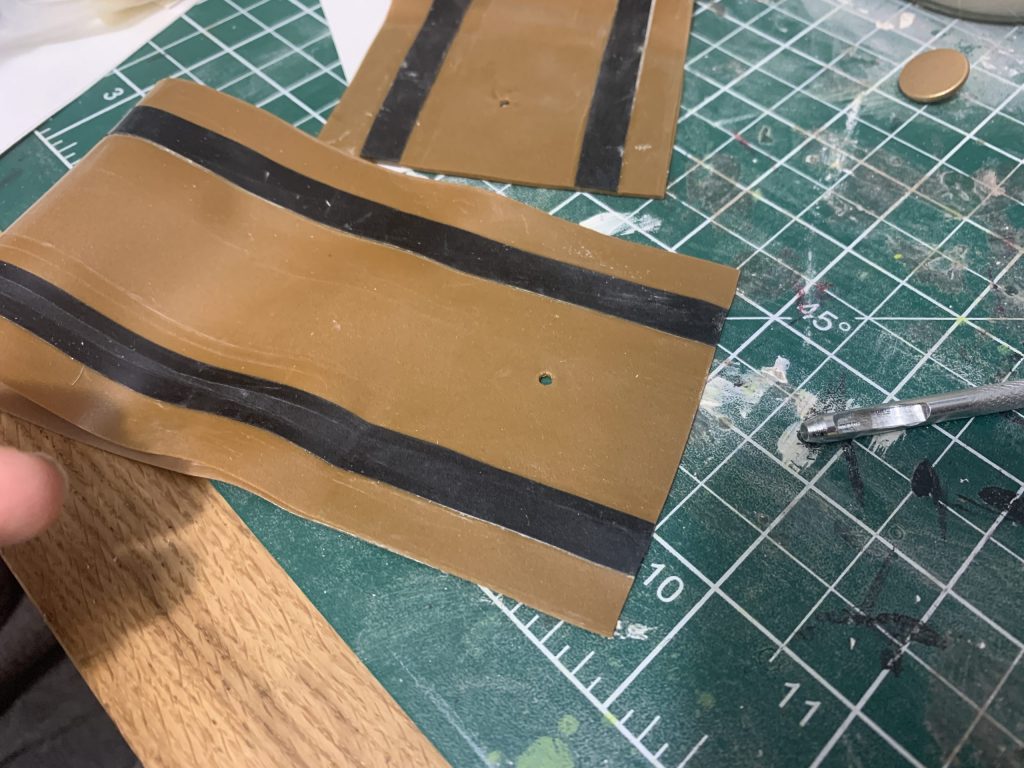
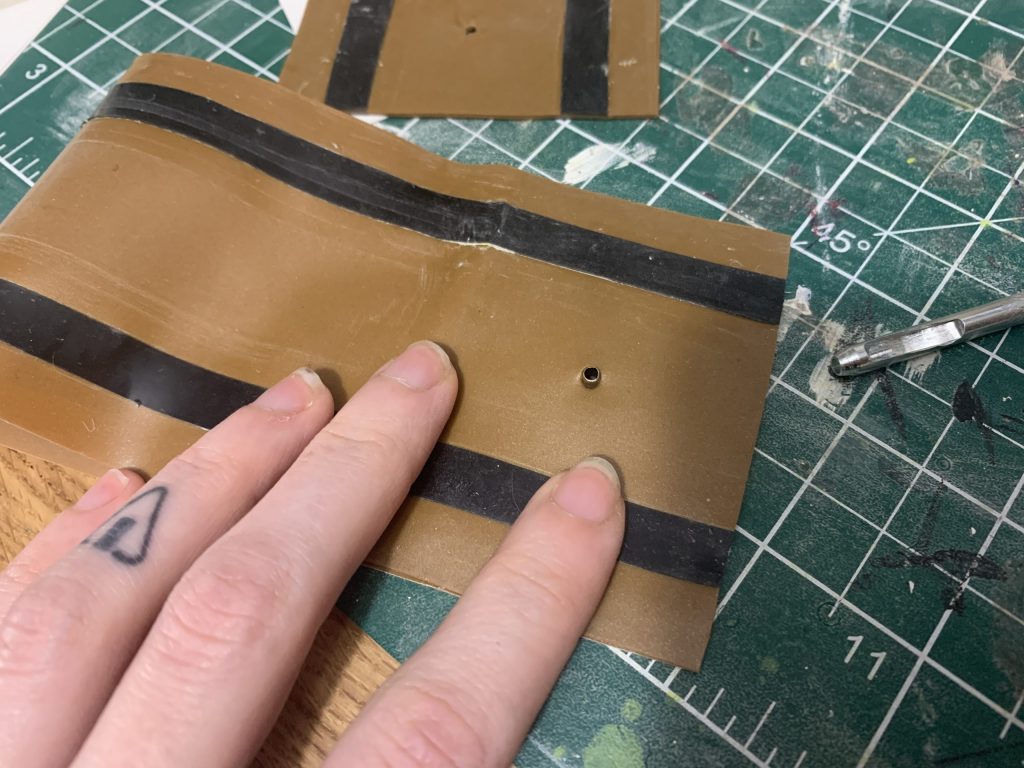
Because this is a pretty thick piece of latex, which I don’t intend to ever have stretch, I didn’t reinforce it with any fabric, though if it gives you peace of mind, feel free to put an extra piece of non-stretch fabric on the back.
Punch a hole, put the snap head shaft through …
Hammer it gently with your snap tool, and then cover the ugly back with a little round piece of gold latex.
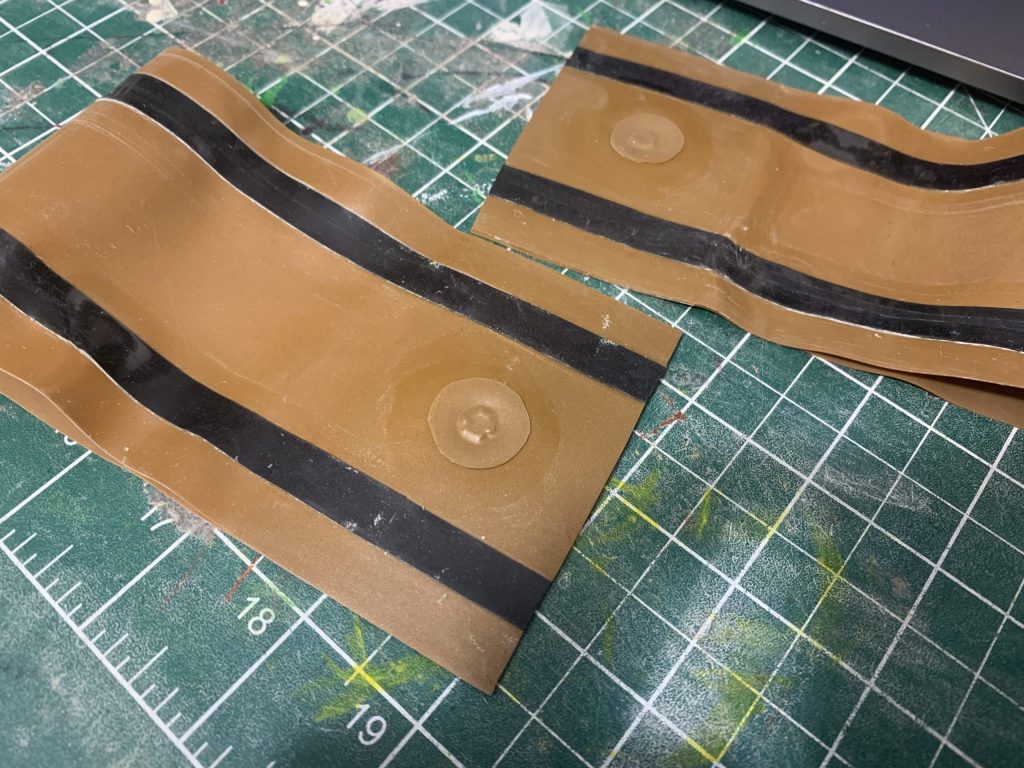
And done!
Part Eleven: The Non-Latex Parts
Only a couple parts of this cosplay left to go — the wings, Antennae, and the fur neck ruff.
The neck ruff is pretty fuckin simple. It’s fur. Make yourself a band of faux fur (you don’t need to fray-check or fold under the edges, because faux fur doesn’t fray), attach velcro, snaps, or hook and eyes to the back, and you’re done! No in-depth tutorial on that, I trust y’all can figure it out.
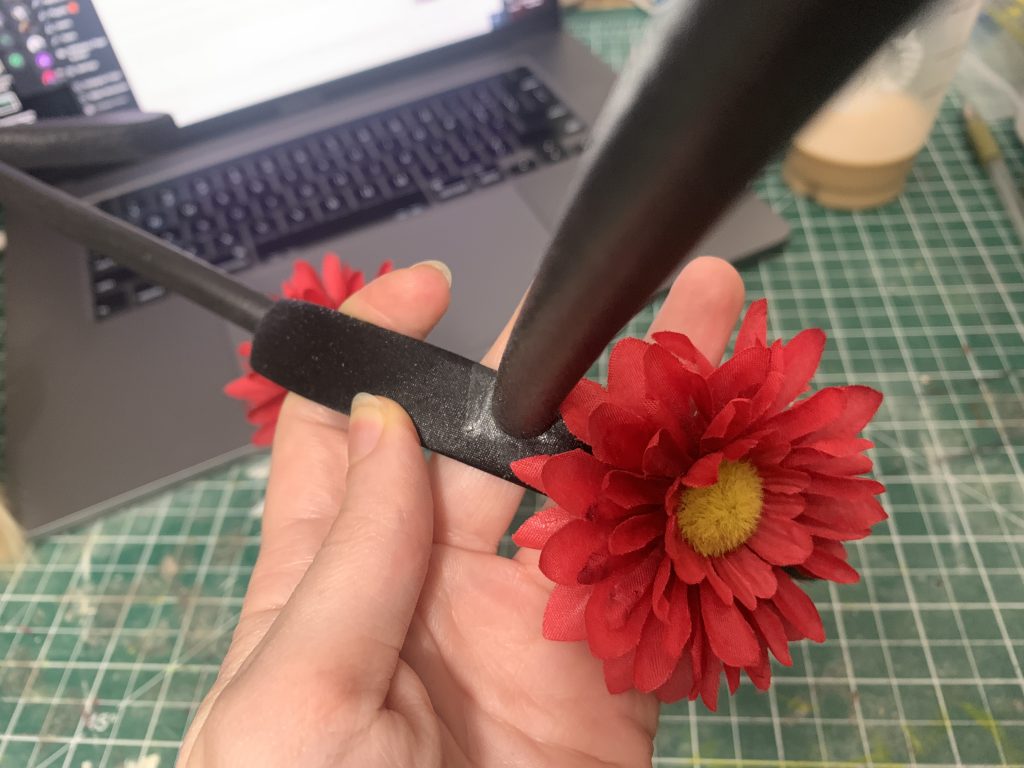
The headband is, likewise, not terrible labour-intensive or difficult, you just need specific things for it.
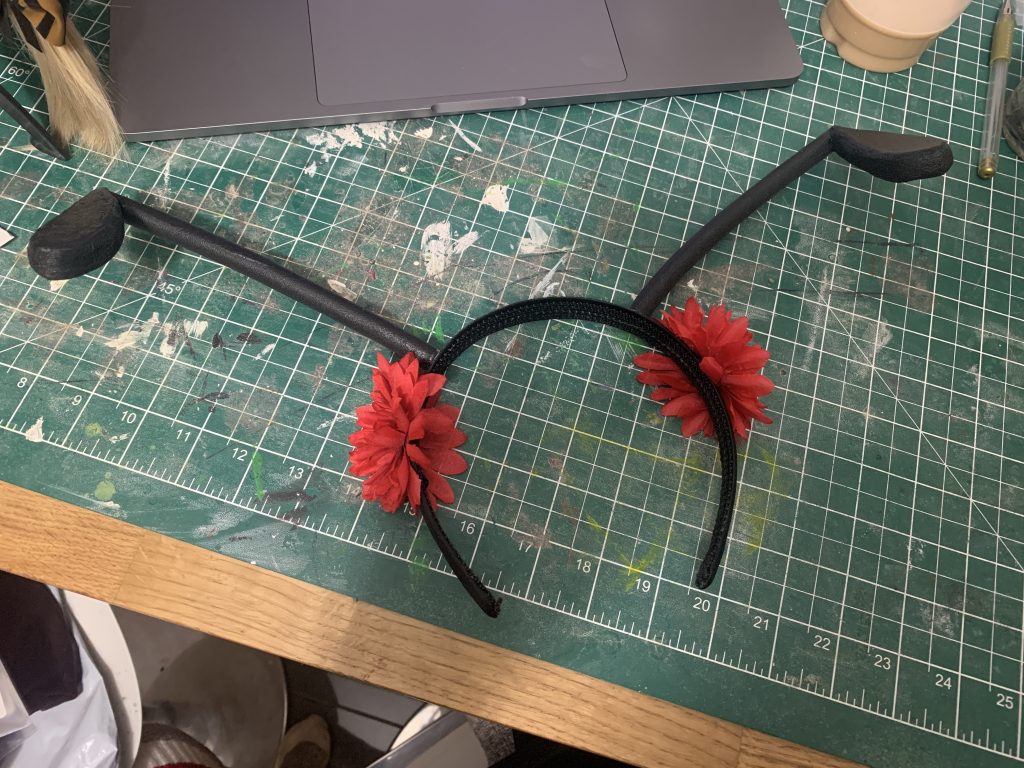
Namely, a headband, foam, and flowers. The headband and flowers are, obviously, purchased as-is.
The antennae themselves, are some thick (1/2″) foam for the tops, that has been cut into shape and had the edges sanded. The other half of the antennae is literally just round foam dowling cut to size and then glued into place. Round foam dowels are available from most cosplay supply sites, and sometimes art supply stores (especially if you’re in the US — here in Canada they’re harder to find).
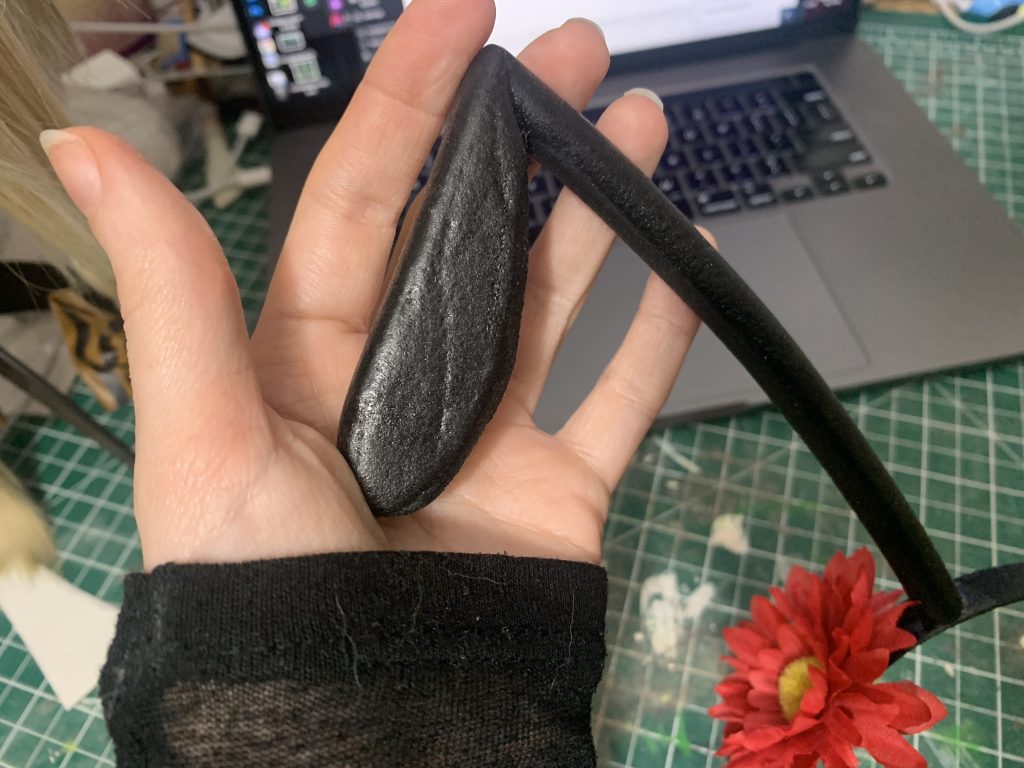
This was painted painted with a couple layer of black plastidip, just so that the foam wasn’t completely raw.It gives it a little bit of shine.
Then they were stuck in place with contact cement, though you can use Superglue, too. Whatever floats your boat, just get it stuck down.
Now the last part to go are the wings.
Full disclosure, I had a lot of this done for me, by a friend, who has a cricut machine, because I haven’t picked one up yet. (I’m still building my spare bedroom into my “studio” and that’s going to probably be one of the last things I bring in, once I figure out where in the setup it can live.)
So let’s take a look at these:
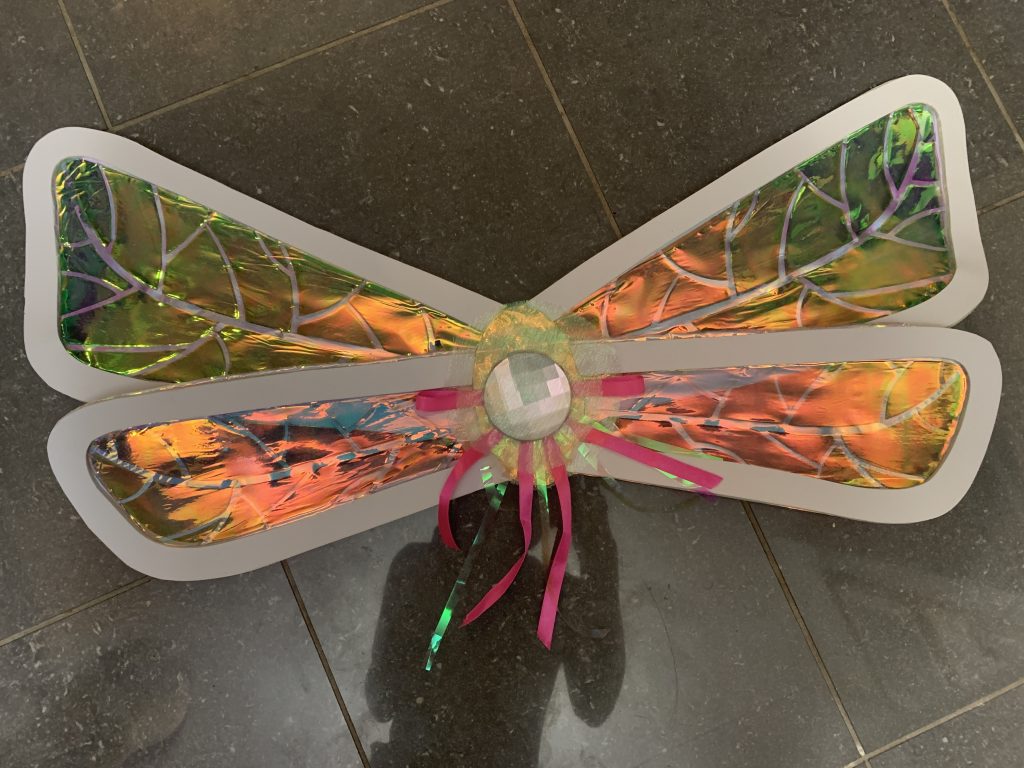
These are 2 layers of semi-transparent iridescent Heat Press Vinyl, adhered to itself, with a third layer of silver HPV sandwiched in-between for the veins, all cut on a Cricut for the wing membrane. Not too hard to cut by hand if you would like to, but time-consuming.
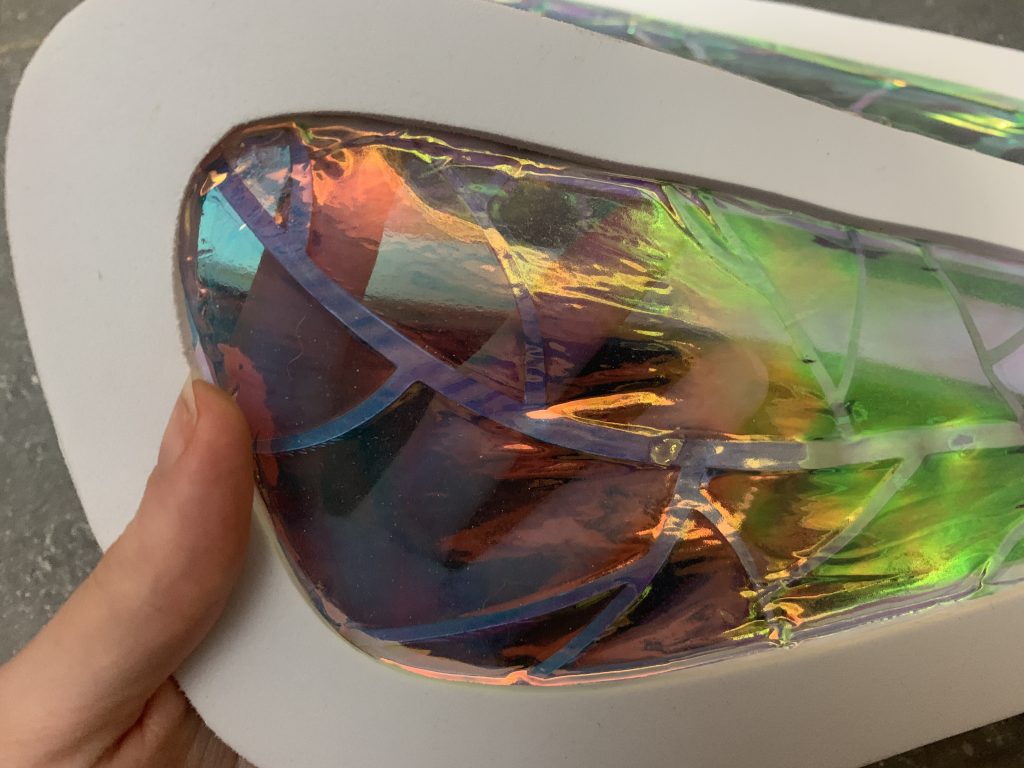
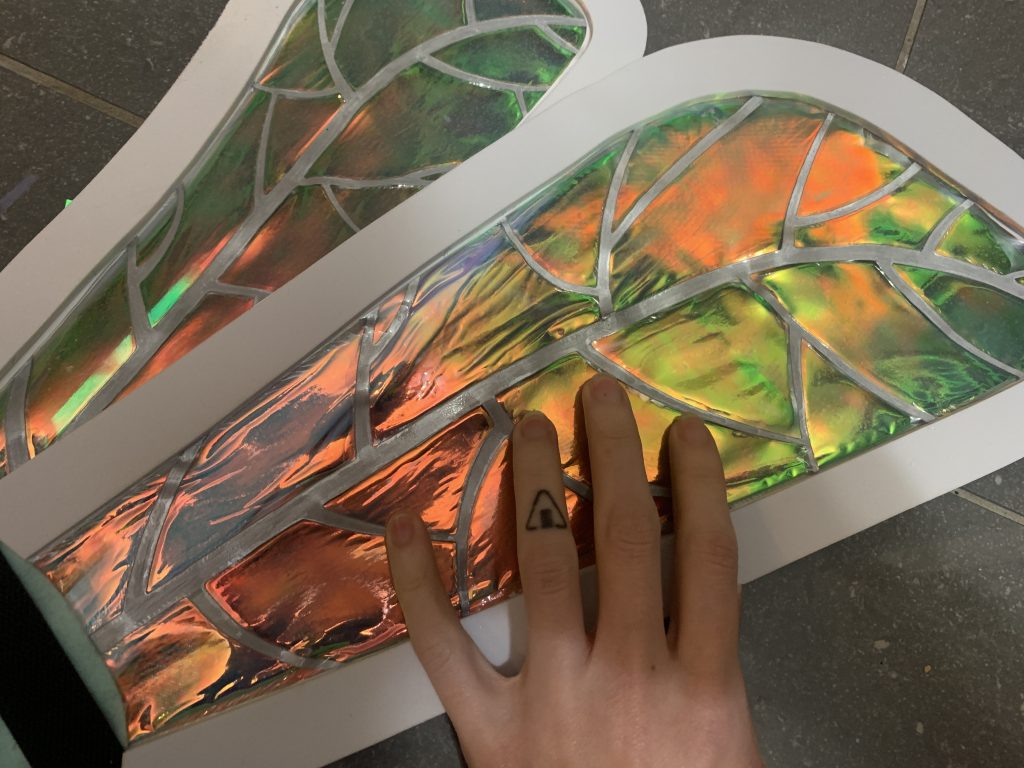
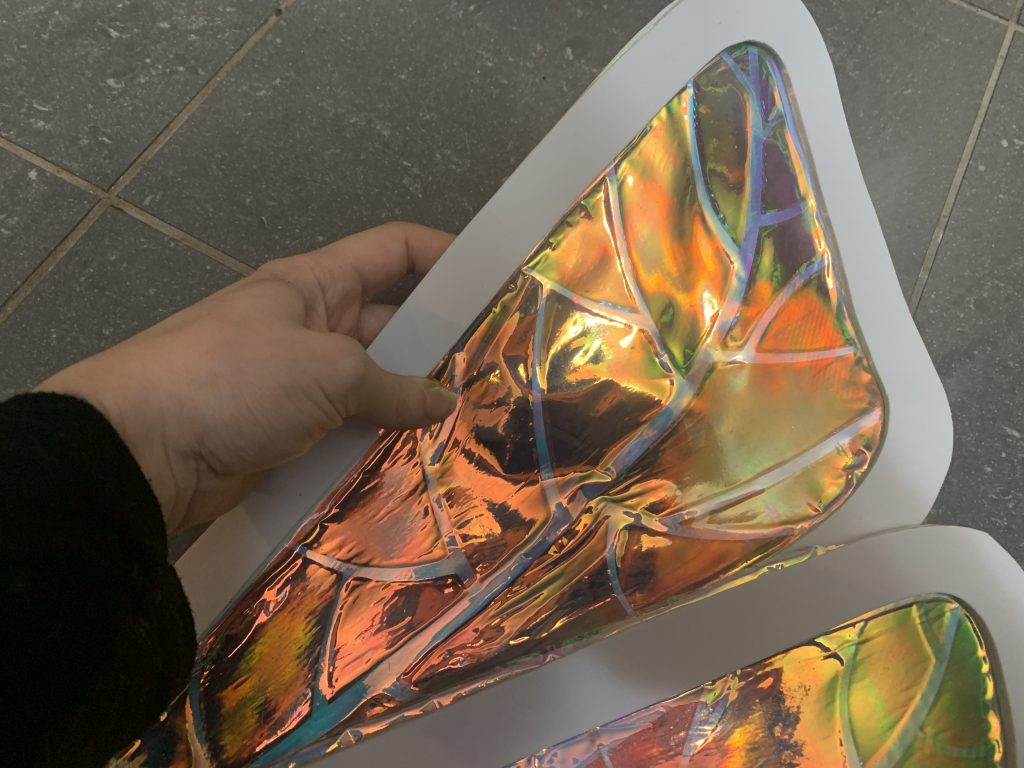
My main concern was that the wings had to be light enough to be velcro’d onto the edge, so we definitely err’d on the side of lightweight for these. Having now seen how well the velcro actually sticks, I’d be more comfortable doing these with a heavier material that wouldn’t crinkle so much, to do a second version.
The edges of the HPV are sandwiched in-between two layers of 3mm craft foam — you could cut the shapes using the same files, if you used a cricut for the wings, but I just traced out the shape of the wings and then cut those fuckers by hand, then carefully superglued them down.
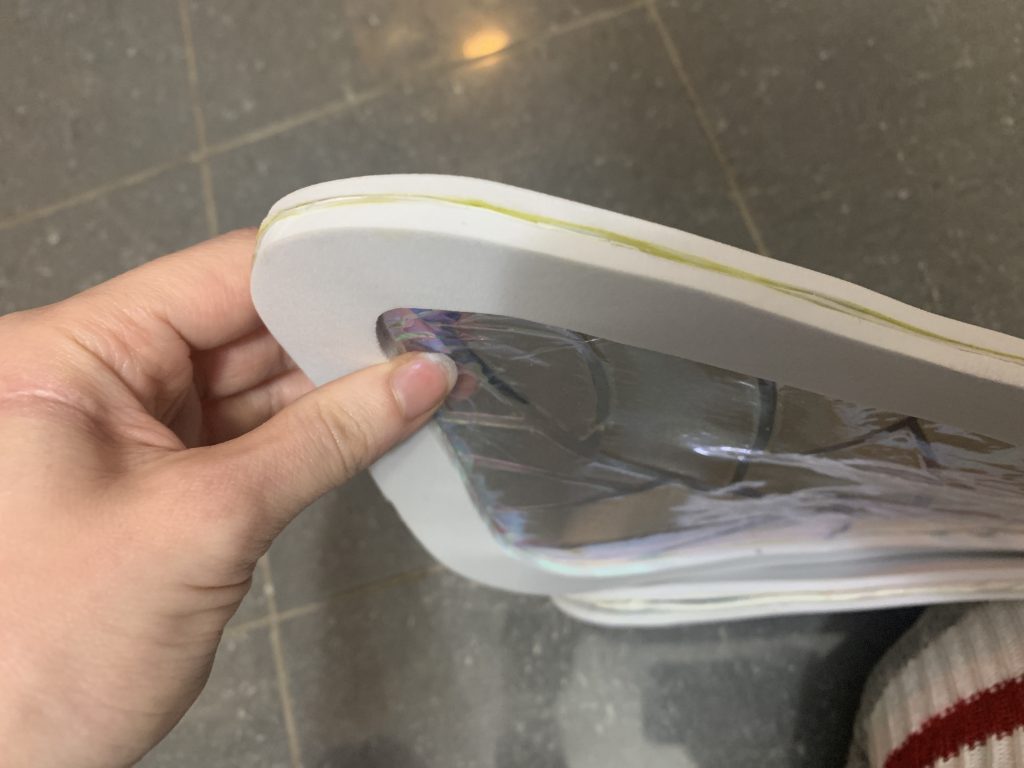
Here you can see the edges; if I was doing this again (and again, at some point, I might), I’d make the edges a little bigger, so that I could marry foam to foam completely, to make a really clean edge. But this was version one.
The middle, where all of the wings come together, is a piece of thin card stock, covered in the same HPV on the top …
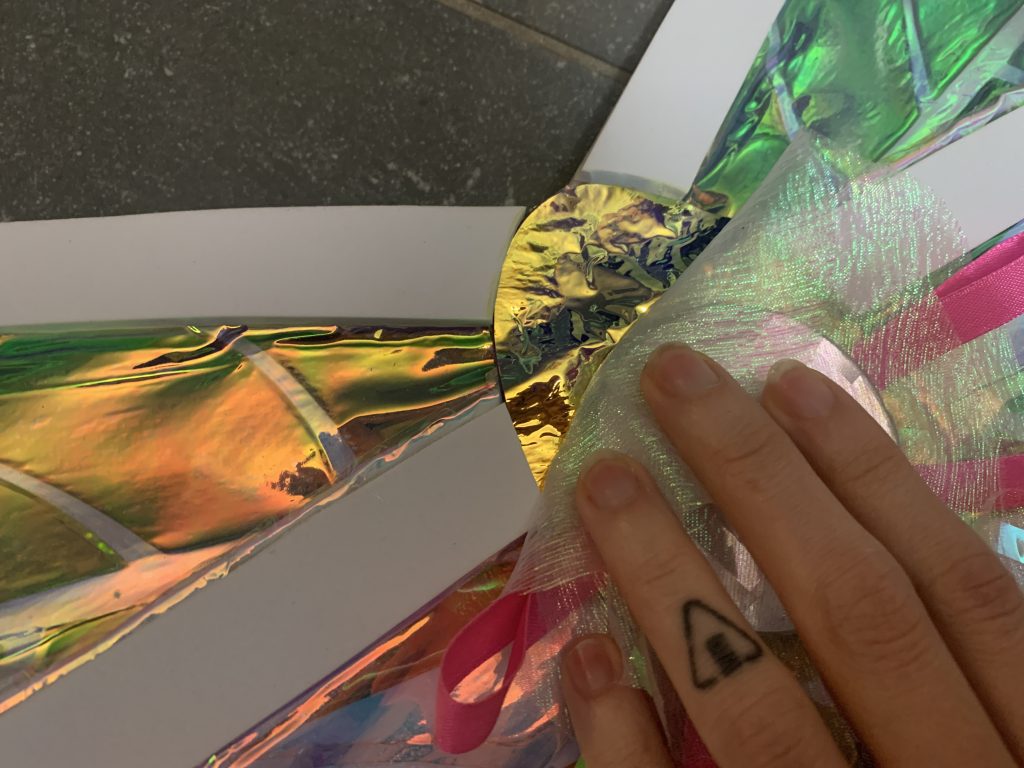
Then a layer or iridescent tulle fabric, a big ol’ gem from an art supply store with some ribbons, which has itself been covered with the iridescent tulle, and all glued into place.
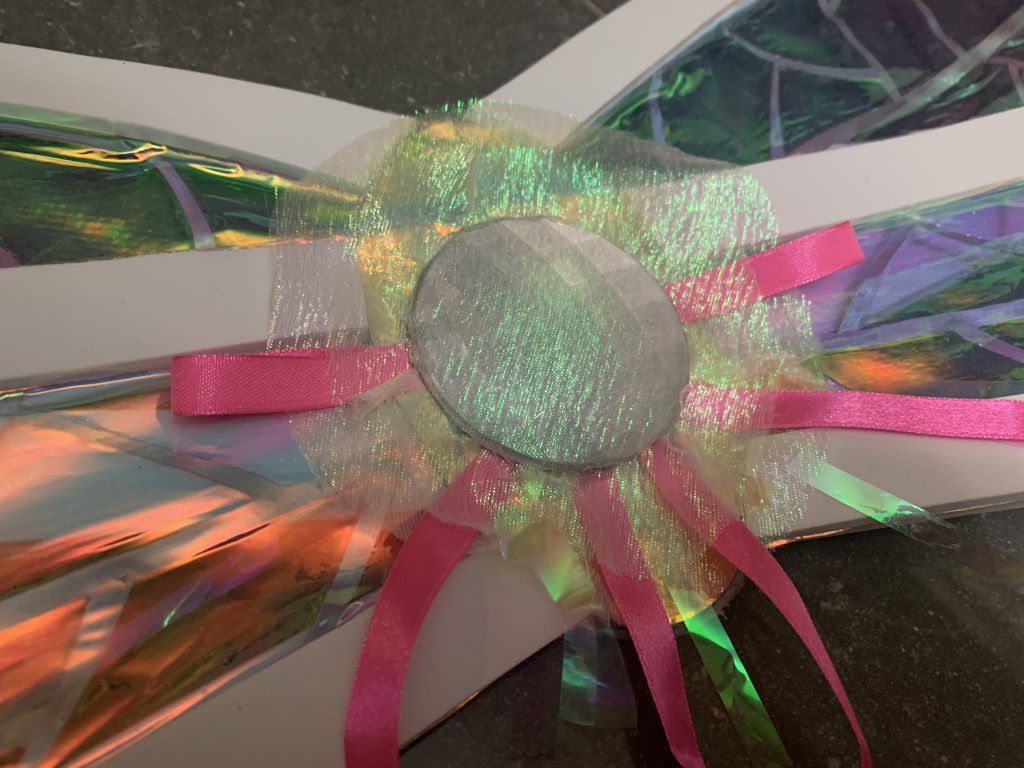
The multiple layers of tulle cover all of the “sins” of this area, like the ends of the foam edging.
The pack of this piece is a piece of felt, which I superglued the other half of the velcro from the transparent back straps.
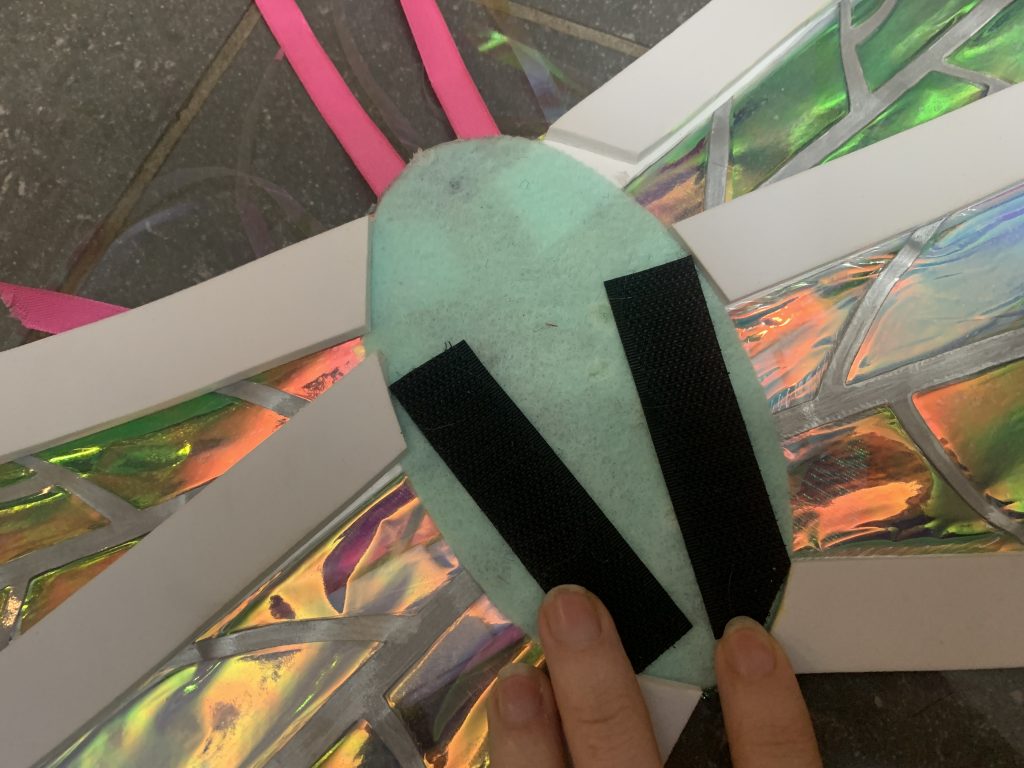
Once the Honeybee suit is on, these just attach over the back of those straps, so it hides all of the velcro on those straps!
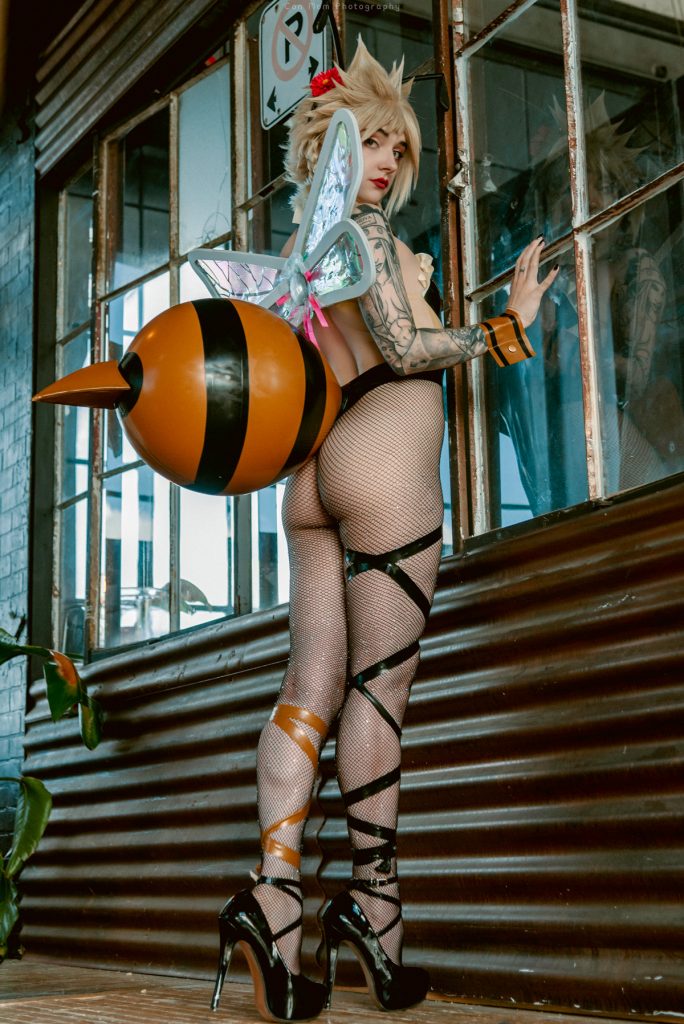
And there I think we have it! Honeybee Cloud! Give me a shout if you try any of this yourself, I’d love to see what you put together, and give you a hand if you need it! Stay safe out there, everyone!

